Author Archives: Anders

Ordering pizza with PowerShell (web scraping guide) – Part 1

Since I’ve gotten some positive feedback regarding the web scrape related posts on this blog, I thought I should write a guide on how to build PowerShell functions that interacts with a website. To make it a bit more fun, I thought it should be about ordering pizza!

The site in question is a Swedish site called OnlinePizza.

Since the actual code won’t be used for anything serious, you will see a few shortcuts here and there, the goal is to give you an idea on how to do something similar, not to create the perfect pizza automation module. In fact, we’ll only create a few functions, one for logging in, one for checking our account information and one for listing restaurants. Hopefully, the process and steps we will go through when creating these functions will teach you the basics of web scraping. To create a whole module that can handle the complete process of ordering pizzas seems a bit overkill, but feel free to keep working on it if you want to 🙂

So with no further ado, let’s get to it…

Figuring out how the site works and logging in
The first thing we need to do is figuring out how to log in. The easiest way to do this is to open a web browser with some developer features, since I’ve used Chrome before I thought I could use Internet Explorer in this example.

Begin with locating the loginpage for the site, which in this example is: http://onlinepizza.se/loggain as shown below:
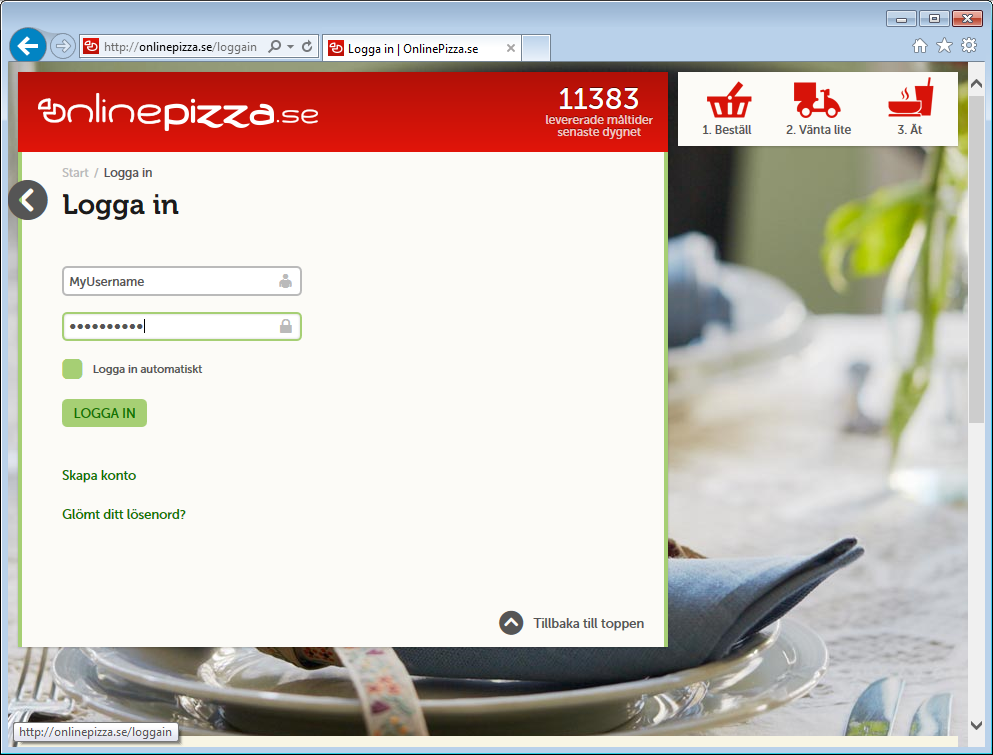
press_login
After you’ve browsed to that page and filled in your username/password, you press F12 (Ctrl+Shift+i if you’re using Chrome) and select the “Network”-tab and press the “Start capturing”-button.

Should look something like this if using IE:
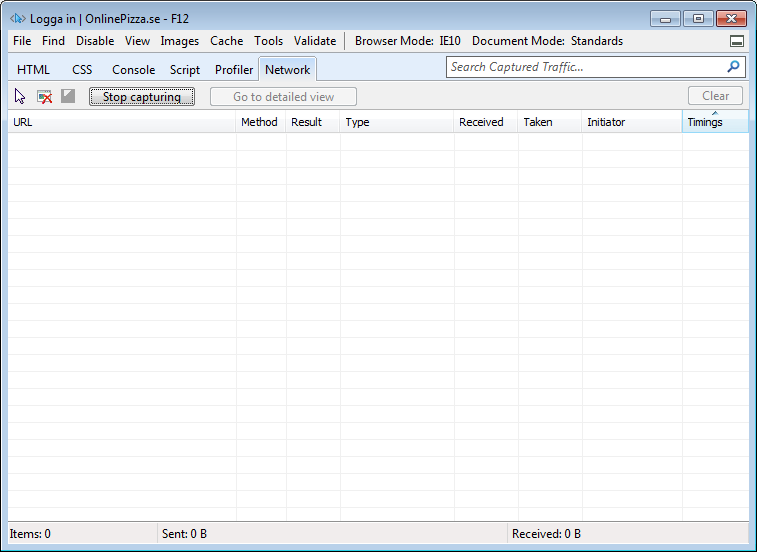
network_capture_started

Go back to the site and press the “login” button (“Logga in” in Swedish), and when it’s done, go back to the “network”-tab again and check the first request which is usually a Get or a Post request, in this case a Post-request:
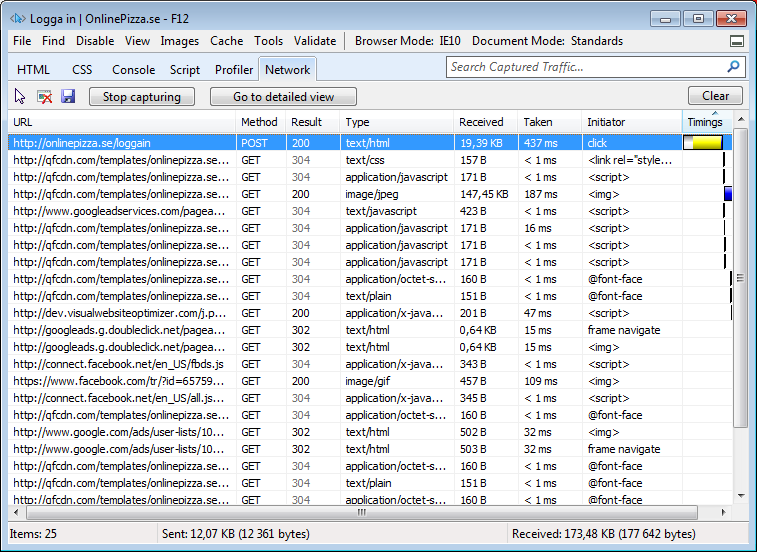
login_pressed

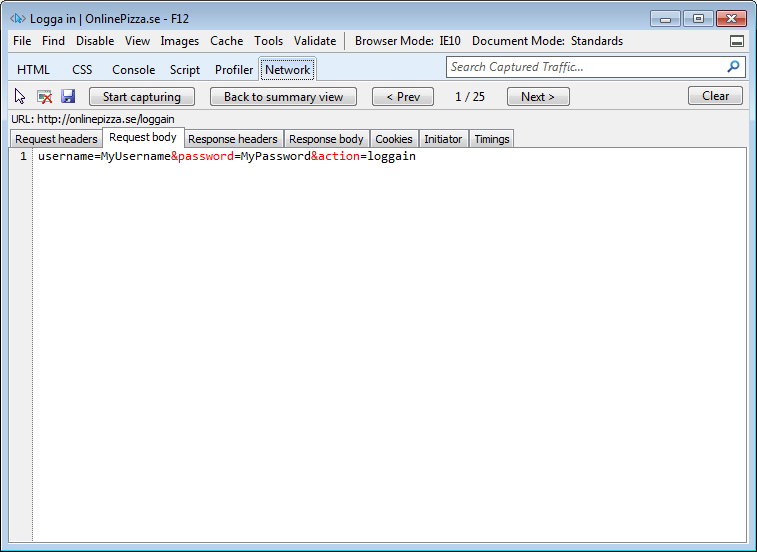
Double click on the first row and select the “Request body”-tab. This is how the webrequest looked when it got sent to the webserver, so this is what we need to mimic from PowerShell:

login_post

This can be done in different ways, you could either basically download the site, try to manipulate the fields and then post the form, or create a hashtable with the required keys (username, password and action) and send that. The later is quickest since it only needs one request, so that’s what we’ll do here (this might not always work though).

To create the hashtable you can do this:

$Request = @{'username' = 'MyUsername'
             'password'= 'MyPassword'
             'action'= 'loggain'}

We now need to send it to the web server. The easiest way to do this is usually to use the “Invoke-WebRequest”-cmdlet that came with PowerShell v3, so that’s what we’ll do here. There are a few scenarios where this will give you issues, as is the case with this site, so we’ll need to use a workaround. When trying to download the site with the “Invoke-WebRequest”-cmdlet it will give you the error: “Invoke-WebRequest : ‘”UTF-8″‘ is not a supported encoding name.”

This leaves you two options as far as I know, you either skip the “Invoke-WebRequest”-cmdlet altogether and use the .Net WebClient Class instead, or you can fix this error by sending the output of the cmdlet to a file instead of the pipeline. We’ll do the latter here and save the .Net-method for another post.

Note: As stated above, this is mostly to give you and idea on how to create a “web scraping function” in PowerShell so we’ll do a few shortcuts. If this was a to become a serious module that would later be used in production, make sure the output-file is written to a place where the user will have write access and that it has a name that won’t damage (overwrite) anything.

The command itself is pretty simple, it looks like this:

Invoke-WebRequest -Uri "https://onlinepizza.se/loggain" -Method Post -Body $Request -SessionVariable Global:OnlinePizzaSession -OutFile .\dump.htm

I’ll break it down a bit so you’ll know what each parameter does:

  1. Uri – This specifies where to send the request. This should be the URL you saw in the screenshot of the “Request body” above, this can differ from the actual loginpage depending on the site.
  2. Method – This should match the method you saw in the loginrequest, in this case it was a “Post”-request.
  3. Body – This is what the request will actually contain, in our case the hashtable we created.
  4. SessionVariable – The variable we specify here (no leading $!) will contain cookies and other data needed to keep the session consistent through the rest of the commands we will run (this will for example keep us logged in). I’ve specified it in the “Global” scope since we want to use it together with other functions later on, and to make that work, it can’t be in the functions scope (since that will be gone before the next function will execute).
  5. OutFile – Our workaround. Specify a file where the output from the command (the html of the site) should be saved.

Alright, so the request is sent and we should now be logged in, you can verify this by looking in the “dump.htm”-file, it will usually contain a “You have been logged in!”-message of some sort. In this case that message is in Swedish though.

So, we have figured out how to log in, we now need to wrap a function around this, which will be our next step in this process!

Creating the function
To create this function we need to ask for a parameter, the only one we need in this case is the credential, which should be of the type PSCredential.

The code for defining the function name and the parameter looks like this:

function Connect-OnlinePizza
{
    [cmdletbinding()]
    param(
          [Parameter(Mandatory=$True)]
          [System.Management.Automation.PSCredential] $Credential)

As you can see, we also add the almost magical “cmdletbinding”-keyword aswell to get all the wonderful features that gives us. We also state the Credential-parameter as mandatory, and we define its data type, which will make the function ask for the credential in the same way as “Get-Credential” works if the user didn’t specify any.

We now need to place the credential in our request, which we can do this way:

$Username = $Credential.UserName
$Password = $Credential.GetNetworkCredential().Password

$Request = @{'username' = $Username
             'password'= $Password
             'action'= 'loggain'}

We then add our “Invoke-WebRequest”-command again:

Invoke-WebRequest -Uri "https://onlinepizza.se/loggain" -Method Post -Body $Request -SessionVariable Global:OnlinePizzaSession -OutFile .\dump.htm

And we should be logged in. When building something like this we should make sure though. This can easily be done by looking for that “You have been logged in!”-text in the dump.htm-file, for example with the “Select-String”-cmdlet.

And while we’re at it, why not delete the dump.htm-file to clean up a bit. That would look like:

$LoggedIn = Select-String -Path .\dump.htm -Pattern "inloggad som $Username" -Quiet

Remove-Item .\dump.htm -Force -Confirm:$false -ErrorAction SilentlyContinue

if ($LoggedIn) {
    Write-Verbose "You are now logged in!"
}
else {
    Write-Error "Login failed!"
}

And that’s it! When put together, the code looks like this:

function Connect-OnlinePizza
{
    [cmdletbinding()]
    param(
          [Parameter(Mandatory=$True)]
          [System.Management.Automation.PSCredential] $Credential)

    $Username = $Credential.UserName
    $Password = $Credential.GetNetworkCredential().Password

    $Request = @{'username' = $Username
                 'password'= $Password
                 'action'= 'loggain'}

    Invoke-WebRequest -Uri "https://onlinepizza.se/loggain" -Method Post -Body $Request -SessionVariable Global:OnlinePizzaSession -OutFile .\dump.htm

    $LoggedIn = Select-String -Path .\dump.htm -Pattern "inloggad som $Username" -Quiet

    Remove-Item .\dump.htm -Force -Confirm:$false -ErrorAction SilentlyContinue

    if ($LoggedIn) {
        Write-Verbose "You are now logged in!"
    }
    else {
        Write-Error "Login failed!"
    }
}

And this is how it looks in action:
Connect-OnlinePizza_screenshot

That’s it for this post. In the next one, we’ll create the function for fetching our account information and one for getting a list of what restaurants are available in our location.
Export nested group structures with PowerShell

I got a request the other day for a script that can export members of nested Active Directory groups.

They wanted the export to be more or less in the same format as a file structure.

The results are therefor returned as strings in the following format:
Group \ SubGroup1 \ SubGroup2 \ User1 (SamAccountName)
Group \ SubGroup1 \ SubGroup2 \ User2 (SamAccountName)
Group \ SubGroup1 \ SubGroup2 \ User3 (SamAccountName)

and so on. I thought that someone else might try to achieve a similiar task so I uploaded the code here.

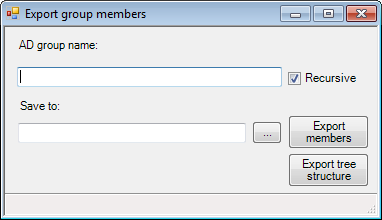
Also, I wrote a quick and simple GUI for this, which is available here, it looks like this:

exportadgroupmembers

The form makes it simpler for end users to use.

Both requires the Active Directory module and the GUI requires PowerShell v.3 or higher.

Check for potential token size issues

If a user is a member of too many groups they might run into authentication problems. Those problems are related to their kerberos token size.
An article describing this and potential workarounds/fixes are available at: http://support.microsoft.com/kb/327825.

I wanted an easy way to check what token size a user might have, so I created an advanced function for this.

It supports pipelining of the identity, you can specify a server (domain or domain controller) if you want to, and it will return the estimated token size of that user and some information on how many groups the user is a member of (including nested groups).

It uses a ldap filter to find all the groups (LDAP_MATCHING_RULE_IN_CHAIN). The “builtin” groups like Domain Users etc. are excluded when using this method, and obviously any local groups on a server, but it should be accurate enough to check if the user might have token size issues.

A usage example:

PS> Get-ADUser -Filter { DisplayName -eq 'Anders Wahlqvist' } | Get-ADTokenSize

DistinguishedName : CN=Anders Wahlqvist,OU=Users,DC=Domain,DC=com
EstimatedTokenSize : 1992
GlobalGroups : 55
UniversalGroups : 44
DomainLocalGroups : 0
GroupsWithSidHistory : 0
AllGroups : 99

The code is available here.

Is this AD group still used?

That’s a pretty hard question to answer, and it depends on how the group is used.

But one way of verifying this is to check when any of it’s members logged on last time. There is an obvious risk that the group is not used for anything in particular but it still might have users/computers in it, but it might give you a hint.

I therefor wrote an advanced function that can help you with this.

It’s pretty straight forward to use, just write:

Get-ADGroupLastUsed -Identity "Domain Admins" -Recursive

The “Recursive”-switch makes it resolve the members in all child groups. It works for both user and computer objects.

This can be pretty useful in certain scenarios, and I hope it might be of use for you too!

The code is available at this link.

Save thumbnailPhoto to file with PowerShell (Get-ADThumbnail)

A while back I wrote an advanced function for uploading a picture to Active Directory (ConvertTo-ADThumbnail), but I never wrote a function for downloading the picture and save it on disk, so here it is!

It has two parameters, Identity and Path. Identity is the SamAccountName, DistinguishedName, ObjectGUID or SID of the user(s) which photo you want to save on file, and Path is the folder path were it should be save. It saves the file with the name “SamAccountName.jpg”.

This can be useful if you want to verify which picture is actually uploaded to a certain user.

You could also download the pictures of all the people called ‘John’ in your Active Directory with the oneliner:

Get-ADUser -Filter "GivenName -eq 'John'" | Get-ADThumbnail -Path C:\Temp\

I hope someone might have use for this function which is available through this link.

Checking TV Show schedules with PowerShell

Remember the post about buying groceries with PowerShell? One of the usage examples suggested that you could order some snacks when a tv show you like is having a season finale (or premiere for that matter!).

But how to check for this in an automated way? With PowerShell of course 🙂

I’ve written two advanced functions for doing this:

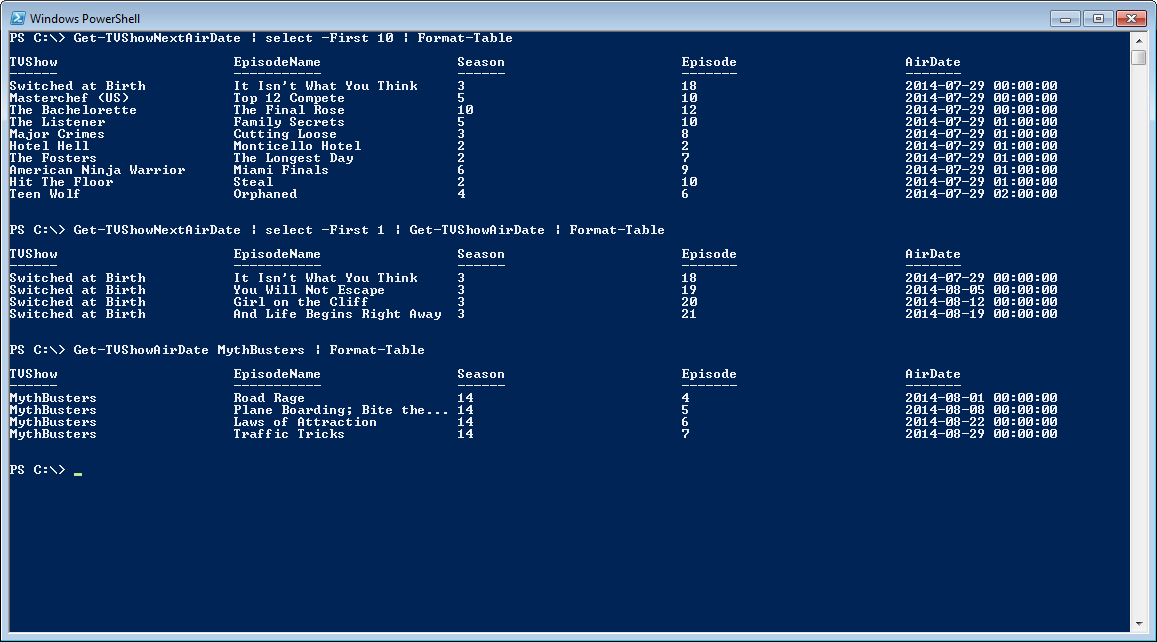
  • Get-TVShowNextAirDate retrieves a list of most tv shows that are currently airing and is listing their next airdate.
  • Get-TVShowAirDate retrieves all known airdates of the tv show specified (supports pipelining! 😉 )

Screenshot of these in action:
tvshowinfo

That’s all the tools you need to automate your popcorn order! 😉

The code can be viewed through this link (Updated 2016-10-06).

Happy automating anything!

Checking who is home with PowerShell

The first thing that comes to mind when doing home automation is probably controlling lights and sockets depending on if someone is home or not. Most apps I’ve seen for this can’t handle multiple family members though, which is quite useless. You don’t want to turn on all the lights when you come home if someone else is sleeping or watching a movie with dimmed lights for example.

So how to figure out who is currently at home?

The method I chose was to check if our phones are connected to WiFi. There are a few obstacles to overcome before this works though, for example:

  • Many smartphones turn off WiFi to save battery (for example the iPhone)
  • They use dynamic IP-addresses and name resolution is not always available, so how to find them?
  • The script therefor checks for how long a phone has been offline before it does any changes, and it starts off by doing a pingsweep to populate the arp-table to find the different phones MAC-addresses.

    This scripts updates the status of each phone in a file on disk and also changes a device in Telldus Live! to On/Off. That makes it possible to filter events in Telldus Live! based on who’s home, or when the last person leaves.

    The script-module used here can be found in this post.

    The script looks like this:

    # Import the telldus module
    Import-Module 'C:\TelldusScripts\Telldusv2.psm1'
    
    # Set telldus credentials
    $Username = "[email protected]"
    
    # Get the password from the file (a saved PowerShell credential)
    $Password = Get-Content 'C:\TelldusScripts\TelldusPassword.txt' | ConvertTo-SecureString
     
    # Build the credential
    $TelldusCredential = New-Object System.Management.Automation.PsCredential($Username,$Password)
    
    # Specify path to the "FamilyMember" file
    $FamilyMemberFile = "C:\TelldusScripts\FamilyMembers.csv"
    
    # How many times should we wait for the network scan to finish?
    $MaxWaitRounds = 10
    
    # How long should we sleep between each "network scan check"?
    $WaitBetweenNetworkScanSeconds = 10
    
    # Load that file into an array
    $FamilyMembers = Import-Csv $FamilyMemberFile -Encoding utf8
    
    # Get the subnets
    $DeviceSubnets = $FamilyMembers | select -ExpandProperty WiFiSubnet | Sort-Object -Unique
    
    # Set the time limit for when a device should be considered offline
    $NotHomeTimeLimit = 120
    
    # Do a ping sweep in those subnets to find any device MACs
    foreach ($DeviceSubnet in $DeviceSubnets) {
    
        Start-Job -ArgumentList $DeviceSubnet -ScriptBlock { $Subnet=$args[0] ; 1..25 | % { ping "$Subnet$_" -n 1 -w 1 } }
        Start-Job -ArgumentList $DeviceSubnet -ScriptBlock { $Subnet=$args[0] ; 26..50 | % { ping "$Subnet$_" -n 1 -w 1 } }
        Start-Job -ArgumentList $DeviceSubnet -ScriptBlock { $Subnet=$args[0] ; 51..75 | % { ping "$Subnet$_" -n 1 -w 1 } }
        Start-Job -ArgumentList $DeviceSubnet -ScriptBlock { $Subnet=$args[0] ; 76..100 | % { ping "$Subnet$_" -n 1 -w 1 } }
        Start-Job -ArgumentList $DeviceSubnet -ScriptBlock { $Subnet=$args[0] ; 101..125 | % { ping "$Subnet$_" -n 1 -w 1 } }
        Start-Job -ArgumentList $DeviceSubnet -ScriptBlock { $Subnet=$args[0] ; 126..150 | % { ping "$Subnet$_" -n 1 -w 1 } }
        Start-Job -ArgumentList $DeviceSubnet -ScriptBlock { $Subnet=$args[0] ; 151..175 | % { ping "$Subnet$_" -n 1 -w 1 } }
        Start-Job -ArgumentList $DeviceSubnet -ScriptBlock { $Subnet=$args[0] ; 176..200 | % { ping "$Subnet$_" -n 1 -w 1 } }
        Start-Job -ArgumentList $DeviceSubnet -ScriptBlock { $Subnet=$args[0] ; 201..225 | % { ping "$Subnet$_" -n 1 -w 1 } }
        Start-Job -ArgumentList $DeviceSubnet -ScriptBlock { $Subnet=$args[0] ; 225..255 | % { ping "$Subnet$_" -n 1 -w 1 } }
    }
    
    $NumberOfRounds = 1
    
    while ((Get-Job -State Running).count -gt 0 -AND $NumberOfRounds -le $MaxWaitRounds) {
        Write-Output "Scanning network for devices... (Round: $NumberOfRounds of max $MaxWaitRounds. Number of jobs running: $((Get-Job -State Running).count).)"
        sleep -Seconds $WaitBetweenNetworkScanSeconds
        $NumberOfRounds++
    }
    
    
    # Loop through the family members
    foreach ($FamilyMember in $FamilyMembers) {
    
        # Reset the variables
        $FamilyMemberLastStatus = $null
        $FamilyMemberCurrentStatus = $null
    
        # Get last status
        $FamilyMemberLastStatus = Get-Content $($FamilyMember.StatusFile)
        
        # Get current status by name
        $FamilyMemberCurrentStatus = Test-Connection $($FamilyMember.DeviceName) -Count 1 -Quiet
    
        # Get it by MAC if that failed
        if ($FamilyMemberCurrentStatus -eq $false) {
            $CurrentFamilyMemberIP = $null
            $CurrentFamilyMemberIP = arp -a | select-string $FamilyMember.DeviceMAC | % { $_.ToString().Trim().Split(" ")[0] } | select -First 1
    
            $FamilyMemberCurrentStatus = Test-Connection $CurrentFamilyMemberIP -Count 1 -Quiet
        }
        # Check if the current status is online
        if ($FamilyMemberCurrentStatus -eq $true) {
            
            Write-Output "$($FamilyMember.Name)'s device is online!"
    
            # Update status file
            Write-Output $true | Out-File $FamilyMember.StatusFile
    
            # If it was offline last time, set the telldus device to on
            if ($FamilyMemberLastStatus -ne $true) {
                Write-Host "This is a change since last run, setting device to on."
                Connect-TelldusLive -Credential $TelldusCredential
                Set-TDDevice -DeviceID $FamilyMember.DeviceID -Action turnOn
            }
        }
        # So the device was offline...
        else {
            Write-Output "$($FamilyMember.Name)'s device is offline!"
    
            # Verify if this is temporary (iPhone sleep mode) or if it has been offline for a while
            $LastChangeTime=(gci $($FamilyMember.StatusFile)).LastWriteTime
            $Now=Get-Date
            $LastChangeTimeSpan = (New-TimeSpan -Start $LastChangeTime -End $Now).TotalMinutes
    
            # Only change status if the device has been offline for $NotHomeTimeLimit minutes.
            if ($LastChangeTimeSpan -gt $NotHomeTimeLimit -AND $FamilyMemberLastStatus -eq $true) {
                # It was, update statusfile to offline
                Write-Output $false | Out-File $($FamilyMember.StatusFile)
    
                Write-Output "This device has been offline for more than $NotHomeTimeLimit minutes. Turning Telldus device off..."
                Connect-TelldusLive -Credential $TelldusCredential
                Set-TDDevice -DeviceID $FamilyMember.DeviceID -Action turnOff
            }
        }
    }
    

    I’ve scheduled it to run quite often to always check if someone has arrived. Hopefully the comments in code will give you the help you need, if not, post a comment below and I’ll be glad to help you!

    The csv file ($FamilyMemberFile, C:\TelldusScripts\FamilyMembers.csv) used in the script above should have the columns Name, DeviceName, DeviceMAC, WiFiSubnet, StatusFile, DeviceID.

    Name = The name of the person who owns the device
    DeviceName = The DNS name of the device. iPhones use “DeviceName.local”
    DeviceMAC = MAC-address of the devices, use “-” as a separator.
    WiFiSubnet = The subnet where the phone gets its IP-address.
    StatusFile = The path to a file unique for this phone where the status can be written (if it’s home or not)
    DeviceID = The device id in Telldus Live! that is used to filter if this person is home.

    Example:
    Name,DeviceName,DeviceMAC,WiFiSubnet,StatusFile,DeviceID
    John,”JohnsiPhone.local”,”00-01-03-04-05-06″,”192.168.1.”,”C:\TelldusScripts\IsJohnHome.txt”,”123456″

    The script will loop through all devices added and set the status in the status file (True/False) aswell as the device in Telldus Live! (On/Off) depending on if the phone was online or not.

    Hope that made sense for you!

    Web scraping with PowerShell (Getting a package trace from a postal service)

    Building an advanced function that can consume information on the web is pretty powerfull and I use it for all kinds of things.

    In this post I will try to guide you through the process on how to build one for more or less any service, but the example will be the Swedish postal service.

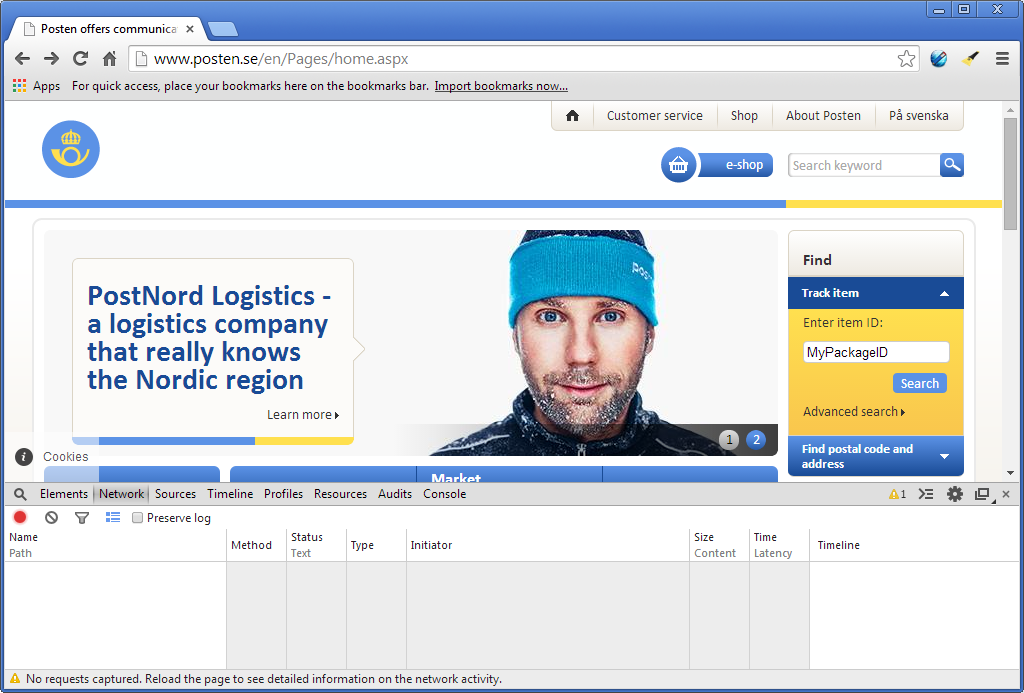
    I usually start with a web browser that has some developer features, for example Google Chrome. Go to the website and press Ctrl+Shift+i, select the “network tab” and enter whatever information you need to send to the service, in this case the ID of the package I want to trace.

    In this example it should look like this: (I have chosen to use the English version of the website):
    ChromeCtrlAltI

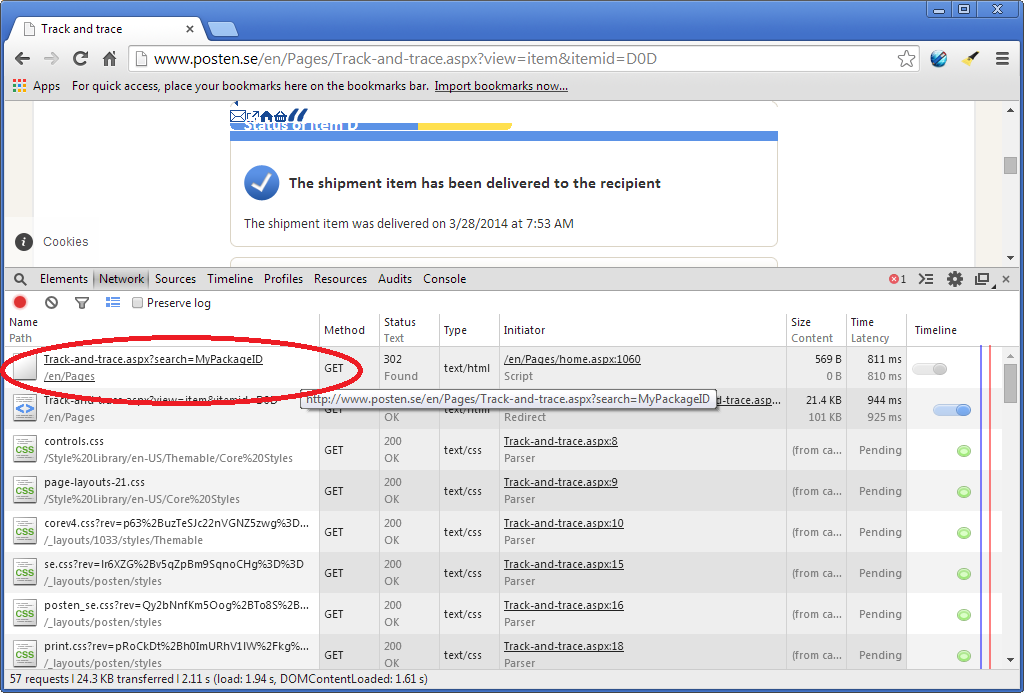
    Press the submit button and look at the beginning of the network trace. You usually find a GET or POST request there, in this case it is a GET-request.
    In this example it looks like this:
    ChromePackageTrace

    You can right click that row and select “Copy link address”, which in this case is “http://www.posten.se/en/Pages/Track-and-trace.aspx?search=MyPackageID”.

    Now open whatever PowerShell script environment you prefer, for example the PowerShell ISE. Start with sending the same request from PowerShell, that can be done by using Invoke-WebRequest (if you are using PowerShell v3 or higher). Start with putting a variable where “MyPackageId” is.

    For example:

    $Id = "MyPackageId"
    $PackageTrace = Invoke-WebRequest -Uri "http://www.posten.se/en/Pages/Track-and-trace.aspx?search=$Id" -UseBasicParsing
    

    The “UseBasicParsing” switch is not mandatory here, but if you don’t need the html returned to be parsed into different objects it is a bit quicker.

    We now need to parse the html-code stored in the “Content”-property to get what we want. This can be a bit time consuming, but with a little help from Chrome it gets easier.

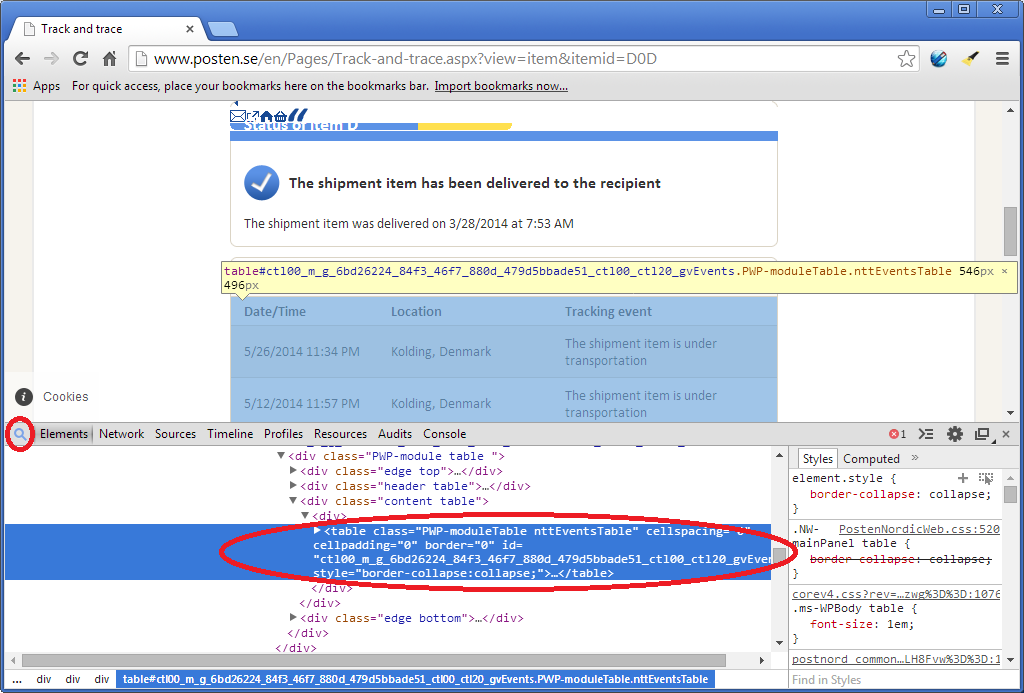
    Press the magnifier button and hover the mouse over parts of the site or parts of the HTML-code (if you select the “Elements-tab”) and you will soon find what part of the HTML code you need.

    In this example the table-tag. Screenshot:
    FindWhatYouNeed

    Now we need to do some string manipulation to get the parts we need properly formatted. In this case we want to split the HTML to get the parts between the start of the table and the end of it. What we have left is the rows with all the package events, find something that splits them up in to nice pieces, in this case the “tr class=” tag. The first of the rows that gets returned are some table information (containing a unique ID that might change) and the table columns, so we want to skip those. A oneliner that does all of this looks like:

    $TraceItems = ((($PackageTrace.Content -split "<table class=`"PWP-moduleTable nttEventsTable`"")&#91;1&#93; -split "</TABLE>")[0]) -split "<tr class=" | Select-Object -Skip 2</code>
    

    We can now loop through these items, parse them and build an object out of them. Each one of these items has three columns; a date, a location and a comment/tracking event. The columns are enclosed in the “TD”-tags so we can split them up at those.

    When you have all the values we need we create the object and send it to the pipeline. Could look something like this:

    foreach ($TraceItem in $TraceItems) {
    
        $EventDate = (($TraceItem -split "<td>")[1] -split "</td>")[0]
        $Location = (($TraceItem -split "<td>")[2] -split "</td>")[0]
        $Comment = (($TraceItem -split "<td>")[3] -split "</td>")[0]
        $PackageId = $Id
    
        $returnObject = New-Object System.Object
        $returnObject | Add-Member -Type NoteProperty -Name EventDate -Value $EventDate
        $returnObject | Add-Member -Type NoteProperty -Name Location -Value $Location
        $returnObject | Add-Member -Type NoteProperty -Name Comment -Value $Comment
        $returnObject | Add-Member -Type NoteProperty -Name Id -Value $PackageId
    
        Write-Output $returnObject
    }
    

    We now have “objectified” a website and made it useful in PowerShell! When we have come this far it’s a good idea to create an advanced function around it to make it really useful.

    There are many good posts explaining how that is done, for example this one by Don Jones, so please refer to that if you need some help on getting started.

    I have made a quick example of an advanced function out of the code written in this post which is available here.

    This is how the function looks in PowerShell (MyPackageId actually seems to be a valid Id, but it looks a bit weird. The output in PowerShell matches the site though):
    Get-PackageTrace-dump

    Good luck automating anything!

    And if you want to learn more, checkout my webscrape guide in this post!

    Getting the username of snapshot owners/creators in vSphere

    Have you ever taken a snapshot of a virtual machine that you forgot to delete afterwards? Me too.

    If snapshots never get deleted they can grow in size and affect the performance and stability of the virtual machine.

    The “Get-Snapshot”-cmdlet does not contain the username of the admin who took the snapshot, therefor I wrote an advanced function that can get this information.

    I know there are other scripts for doing this, but those did not work in our environment and instead of debugging them it was easier to just create a new one 🙂

    I’m guessing a lot of you have different accounts for administering vSphere and using e-mail, so you might need to parse the username you get back before looking up the users e-mail in Active Directory, and since this is probably pretty specific for your environment I didn’t see much of a reason to publish the script we use to loop through the snapshots.

    But get the username from the function, check when the snapshot is created (CreatedTime) and if it is greater than your threshold then send out an e-mail, and you are done 🙂

    The function returns the name of the VM, the size of the snapshot (in mb), the name of the snapshot, Id of the snapshot, the Creator (username) and the time when it was created.

    The code for this function is available here.

    I would also like to credit Dave Garnar who did most of the heavy lifting in figuring out where to find the username information and was kind enough to post it in this post. I basically just created an advanced function out of it, nothing fancy.

    Sending custom “password is about to expire” notifications with PowerShell

    Sending out reminders to your users about changing their password before it expires could really take some load of the Helpdesk, and there are a few scripts available that does just that. What I found was that most of these scripts were assuming that everyone in the organization should get the same e-mail, which is not always true.

    Therefore I wrote a new one where you could specify how the e-mail should look depending on where in your organization the user works. In our case, we needed to have different languages for different countries, the instructions were different aswell (some users needed to use a password change portal to change their passwords, others are using the classic “CTRL + ALT + DELETE”-method). We also have different contact information for the helpdesk in those countries and departments.

    I will do a walk-through of this script to help you customize it to fit your organisation.

    The first thing you need to do, is to decide when the users should receive a notification. This is done with these variables:

    # Set when users should get a warning...
    
    # First time
    $FirstPasswordWarningDays = 14
    
    # Second time
    $SecondPasswordWarningDays = 7
    
    # Last time
    $LastPasswordWarningDays = 3
    

    Users will then receive a warning 14 days, 7 days and finally 3 days before the password expires. Depending on how the number of days are rounded in the e-mail, it may differ a day from what you specify here.

    You then need to set what smtp-server to use:

    # Set SMTP-server
    $SMTPServer = "MySMTP.Contoso.Com"
    

    There is no need to change the next part of the code, it basically is just calculating when passwords will expire based on your domain policy and what you set in the variables above. It looks like this:

    # Get the password expires policy
    $PasswordExpiresLength = (Get-ADDefaultDomainPasswordPolicy).MaxPasswordAge
    
    # Calculating when passwords would have been set if they expire today
    $CurrentPWChangeDateLimit = (Get-Date).AddDays(-$PasswordExpiresLength.Days)
    
    # Calculating all dates
    $FirstPasswordDateLimit = $CurrentPWChangeDateLimit.AddDays($FirstPasswordWarningDays)
    $SecondPasswordDateLimit = $CurrentPWChangeDateLimit.AddDays($SecondPasswordWarningDays)
    $LastPasswordDateLimit = $CurrentPWChangeDateLimit.AddDays($LastPasswordWarningDays)
    

    We are now ready to load the users, you might want to adjust the filter a bit depending on how your Active Directory design is. Just edit the first part of the filter (Mail -like ‘*@*’) to do this.

    # Load the users
    $MailUsers = Get-ADUser -Filter "(Mail -like '*@*') -AND `
    (PasswordLastSet -le '$FirstPasswordDateLimit' -AND PasswordLastSet -gt '$($FirstPasswordDateLimit.AddDays(-1))' -OR `
    PasswordLastSet -le '$SecondPasswordDateLimit' -AND PasswordLastSet -gt '$($SecondPasswordDateLimit.AddDays(-1))' -OR `
    PasswordLastSet -le '$LastPasswordDateLimit' -AND PasswordLastSet -gt '$($LastPasswordDateLimit.AddDays(-1))') -AND `
    (PasswordNeverExpires -eq '$false' -AND Enabled -eq '$true')" -Properties PasswordLastSet, DisplayName, PasswordNeverExpires, mail
    

    We now got all the users, we just need to loop through them and send out the e-mails. This is where we need to specify which users should get which e-mail.

    The comments should give you the information you need to customize it for your environment. Make sure you check out lines 13 and 19 below and change “MyOU1” and “MyOU2” to match your Organizational Units in Active Directory.

    # Loop through them
    foreach ($MailUser in $MailUsers) {
    
    # Count how many days are left before the password expires and round that number
    $PasswordExpiresInDays = [System.Math]::Round((New-TimeSpan -Start $CurrentPWChangeDateLimit -End ($MailUser.PasswordLastSet)).TotalDays)
    
    # Write some status...
    Write-Output "$($MailUser.DisplayName) needs to change password in $PasswordExpiresInDays days."
    
    # Build the body depending on where in the organisation the user is
    
    # Change MyOU1 to match your the OU you want your users are in.
    if ($MailUser.DistinguishedName -like "*MyOU1*") {
    $Subject = "Your password is expiring in $PasswordExpiresInDays days"
    $Body = "Hi $($MailUser.DisplayName),
    
    Your password is expiring in $PasswordExpiresInDays days. Please change it now!
    
    Don't forget to change it in your mobile devices if you are using mailsync.
    
    Helpdesk 1"
    $EmailFrom = "Helpdesk 1 <[email protected]>"
    }
    # Change MyOU2 to match your environment
    elseif ($MailUser.DistinguishedName -like "*MyOU2*") {
    $Subject = "Your password is expiring in $PasswordExpiresInDays days"
    $Body = "Hi $($MailUser.DisplayName),
    
    Your password is expiring in $PasswordExpiresInDays days. Please change it now!
    
    Don't forget to change it in your mobile devices if you are using mailsync.
    
    Helpdesk 2"
    $EmailFrom = "Helpdesk 2 <[email protected]>"
    }
    # This is the default e-mail
    else {
    $Subject = "Your password is expiring in $PasswordExpiresInDays days"
    $Body = "Hi $($MailUser.DisplayName),
    
    Your password is expiring in $PasswordExpiresInDays days. Please change it now!
    
    Don't forget to change it in your mobile devices if you are using mailsync.
    
    Helpdesk 3"
    $EmailFrom = "Helpdesk 3 <[email protected]>"
    }
    
    # Time to send the e-mail
    
    # The line below might need changing depending on what SMTP you are using (authentication or not)
    Send-MailMessage -Body $Body -From $EmailFrom -SmtpServer $SMTPServer -Subject $Subject -Encoding UTF8 -BodyAsHtml -To $MailUser.mail
    
    # E-mail is sent!
    }
    

    You also need to change the body/subject/mailfrom variables to match what you want to send out. Just add more “elseif”-clauses if you want to send out more versions, or remove them if you don’t need them.

    And make sure you configure the “Send-MailMessage”-cmdlet correctly to use your smtp-server if you use authentication or a different port.

    All you need to do after that is to schedule the script to run at the same time every day and you are done! (And some testing of course… 🙂 )

    Leave a comment if you have any questions!

    The complete and uncut code is available here.