Category Archives: Active Directory

Specifying a single domain controller while keeping redundancy in a PowerShell script

When scripting against Active Directory I usually specify a domain controller for the “-Server” parameter of the AD cmdlets to prevent potential issues with replication.

For example, say you are creating a new group, and then want to change the ACLs of that group, for example the “WriteMembers”-permission. You probably want to specify the same domain controller on these two requests to make sure the newly created group is actually available when changing the ACL.

But hard coding things are usually not a good idea, and if that DC happens to go offline while a script is running, a lot of requests might fail. So what I did was to create a function that checks if the specified DC is online, and if it isn’t, it retrieves a lists of all the DCs that exists in the same site as the server where the script is executing, and picks the next available one after verifying it works.

Usage example:

PS> Get-ScriptDC -PreferedDC MyDC01.MyDomain.local
WARNING: Failed to connect to MyDC01.MyDomain.local.
MyDC02.MyDomain.local

In this case, MyDC01.MyDomain.local was offline and didn’t work, so the function instead returned MyDC02.MyDomain.local which has been verified by issuing a AD-query to it. It is simply returned as a string, so to use it in a script you could do something like this (with some errorhandling added):

$MyPreferedDC = 'MyDC01.MyDomain.local'
$DCToUse = Get-ScriptDC -PreferedDC $MyPreferedDC

Get-ADUser JohnDoe -Server $DCToUse

If you put this first in the script, you’ll know that the DC used will be online when the script starts, if you want to, you could of course run this function again within in a catch-statement to be able to “failover” to another DC during script execution.

The code for this function has been uploaded here.

The ActiveDirectory-module must be available for it to work.

Export nested group structures with PowerShell

I got a request the other day for a script that can export members of nested Active Directory groups.

They wanted the export to be more or less in the same format as a file structure.

The results are therefor returned as strings in the following format:
Group \ SubGroup1 \ SubGroup2 \ User1 (SamAccountName)
Group \ SubGroup1 \ SubGroup2 \ User2 (SamAccountName)
Group \ SubGroup1 \ SubGroup2 \ User3 (SamAccountName)

and so on. I thought that someone else might try to achieve a similiar task so I uploaded the code here.

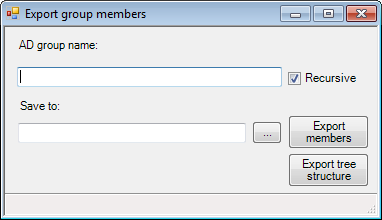
Also, I wrote a quick and simple GUI for this, which is available here, it looks like this:

exportadgroupmembers

The form makes it simpler for end users to use.

Both requires the Active Directory module and the GUI requires PowerShell v.3 or higher.

Check for potential token size issues

If a user is a member of too many groups they might run into authentication problems. Those problems are related to their kerberos token size.
An article describing this and potential workarounds/fixes are available at: http://support.microsoft.com/kb/327825.

I wanted an easy way to check what token size a user might have, so I created an advanced function for this.

It supports pipelining of the identity, you can specify a server (domain or domain controller) if you want to, and it will return the estimated token size of that user and some information on how many groups the user is a member of (including nested groups).

It uses a ldap filter to find all the groups (LDAP_MATCHING_RULE_IN_CHAIN). The “builtin” groups like Domain Users etc. are excluded when using this method, and obviously any local groups on a server, but it should be accurate enough to check if the user might have token size issues.

A usage example:

PS> Get-ADUser -Filter { DisplayName -eq 'Anders Wahlqvist' } | Get-ADTokenSize

DistinguishedName : CN=Anders Wahlqvist,OU=Users,DC=Domain,DC=com
EstimatedTokenSize : 1992
GlobalGroups : 55
UniversalGroups : 44
DomainLocalGroups : 0
GroupsWithSidHistory : 0
AllGroups : 99

The code is available here.

Is this AD group still used?

That’s a pretty hard question to answer, and it depends on how the group is used.

But one way of verifying this is to check when any of it’s members logged on last time. There is an obvious risk that the group is not used for anything in particular but it still might have users/computers in it, but it might give you a hint.

I therefor wrote an advanced function that can help you with this.

It’s pretty straight forward to use, just write:

Get-ADGroupLastUsed -Identity "Domain Admins" -Recursive

The “Recursive”-switch makes it resolve the members in all child groups. It works for both user and computer objects.

This can be pretty useful in certain scenarios, and I hope it might be of use for you too!

The code is available at this link.

Save thumbnailPhoto to file with PowerShell (Get-ADThumbnail)

A while back I wrote an advanced function for uploading a picture to Active Directory (ConvertTo-ADThumbnail), but I never wrote a function for downloading the picture and save it on disk, so here it is!

It has two parameters, Identity and Path. Identity is the SamAccountName, DistinguishedName, ObjectGUID or SID of the user(s) which photo you want to save on file, and Path is the folder path were it should be save. It saves the file with the name “SamAccountName.jpg”.

This can be useful if you want to verify which picture is actually uploaded to a certain user.

You could also download the pictures of all the people called ‘John’ in your Active Directory with the oneliner:

Get-ADUser -Filter "GivenName -eq 'John'" | Get-ADThumbnail -Path C:\Temp\

I hope someone might have use for this function which is available through this link.

Sending custom “password is about to expire” notifications with PowerShell

Sending out reminders to your users about changing their password before it expires could really take some load of the Helpdesk, and there are a few scripts available that does just that. What I found was that most of these scripts were assuming that everyone in the organization should get the same e-mail, which is not always true.

Therefore I wrote a new one where you could specify how the e-mail should look depending on where in your organization the user works. In our case, we needed to have different languages for different countries, the instructions were different aswell (some users needed to use a password change portal to change their passwords, others are using the classic “CTRL + ALT + DELETE”-method). We also have different contact information for the helpdesk in those countries and departments.

I will do a walk-through of this script to help you customize it to fit your organisation.

The first thing you need to do, is to decide when the users should receive a notification. This is done with these variables:

# Set when users should get a warning...

# First time
$FirstPasswordWarningDays = 14

# Second time
$SecondPasswordWarningDays = 7

# Last time
$LastPasswordWarningDays = 3

Users will then receive a warning 14 days, 7 days and finally 3 days before the password expires. Depending on how the number of days are rounded in the e-mail, it may differ a day from what you specify here.

You then need to set what smtp-server to use:

# Set SMTP-server
$SMTPServer = "MySMTP.Contoso.Com"

There is no need to change the next part of the code, it basically is just calculating when passwords will expire based on your domain policy and what you set in the variables above. It looks like this:

# Get the password expires policy
$PasswordExpiresLength = (Get-ADDefaultDomainPasswordPolicy).MaxPasswordAge

# Calculating when passwords would have been set if they expire today
$CurrentPWChangeDateLimit = (Get-Date).AddDays(-$PasswordExpiresLength.Days)

# Calculating all dates
$FirstPasswordDateLimit = $CurrentPWChangeDateLimit.AddDays($FirstPasswordWarningDays)
$SecondPasswordDateLimit = $CurrentPWChangeDateLimit.AddDays($SecondPasswordWarningDays)
$LastPasswordDateLimit = $CurrentPWChangeDateLimit.AddDays($LastPasswordWarningDays)

We are now ready to load the users, you might want to adjust the filter a bit depending on how your Active Directory design is. Just edit the first part of the filter (Mail -like ‘*@*’) to do this.

# Load the users
$MailUsers = Get-ADUser -Filter "(Mail -like '*@*') -AND `
(PasswordLastSet -le '$FirstPasswordDateLimit' -AND PasswordLastSet -gt '$($FirstPasswordDateLimit.AddDays(-1))' -OR `
PasswordLastSet -le '$SecondPasswordDateLimit' -AND PasswordLastSet -gt '$($SecondPasswordDateLimit.AddDays(-1))' -OR `
PasswordLastSet -le '$LastPasswordDateLimit' -AND PasswordLastSet -gt '$($LastPasswordDateLimit.AddDays(-1))') -AND `
(PasswordNeverExpires -eq '$false' -AND Enabled -eq '$true')" -Properties PasswordLastSet, DisplayName, PasswordNeverExpires, mail

We now got all the users, we just need to loop through them and send out the e-mails. This is where we need to specify which users should get which e-mail.

The comments should give you the information you need to customize it for your environment. Make sure you check out lines 13 and 19 below and change “MyOU1” and “MyOU2” to match your Organizational Units in Active Directory.

# Loop through them
foreach ($MailUser in $MailUsers) {

# Count how many days are left before the password expires and round that number
$PasswordExpiresInDays = [System.Math]::Round((New-TimeSpan -Start $CurrentPWChangeDateLimit -End ($MailUser.PasswordLastSet)).TotalDays)

# Write some status...
Write-Output "$($MailUser.DisplayName) needs to change password in $PasswordExpiresInDays days."

# Build the body depending on where in the organisation the user is

# Change MyOU1 to match your the OU you want your users are in.
if ($MailUser.DistinguishedName -like "*MyOU1*") {
$Subject = "Your password is expiring in $PasswordExpiresInDays days"
$Body = "Hi $($MailUser.DisplayName),

Your password is expiring in $PasswordExpiresInDays days. Please change it now!

Don't forget to change it in your mobile devices if you are using mailsync.

Helpdesk 1"
$EmailFrom = "Helpdesk 1 <[email protected]>"
}
# Change MyOU2 to match your environment
elseif ($MailUser.DistinguishedName -like "*MyOU2*") {
$Subject = "Your password is expiring in $PasswordExpiresInDays days"
$Body = "Hi $($MailUser.DisplayName),

Your password is expiring in $PasswordExpiresInDays days. Please change it now!

Don't forget to change it in your mobile devices if you are using mailsync.

Helpdesk 2"
$EmailFrom = "Helpdesk 2 <[email protected]>"
}
# This is the default e-mail
else {
$Subject = "Your password is expiring in $PasswordExpiresInDays days"
$Body = "Hi $($MailUser.DisplayName),

Your password is expiring in $PasswordExpiresInDays days. Please change it now!

Don't forget to change it in your mobile devices if you are using mailsync.

Helpdesk 3"
$EmailFrom = "Helpdesk 3 <[email protected]>"
}

# Time to send the e-mail

# The line below might need changing depending on what SMTP you are using (authentication or not)
Send-MailMessage -Body $Body -From $EmailFrom -SmtpServer $SMTPServer -Subject $Subject -Encoding UTF8 -BodyAsHtml -To $MailUser.mail

# E-mail is sent!
}

You also need to change the body/subject/mailfrom variables to match what you want to send out. Just add more “elseif”-clauses if you want to send out more versions, or remove them if you don’t need them.

And make sure you configure the “Send-MailMessage”-cmdlet correctly to use your smtp-server if you use authentication or a different port.

All you need to do after that is to schedule the script to run at the same time every day and you are done! (And some testing of course… πŸ™‚ )

Leave a comment if you have any questions!

The complete and uncut code is available here.

Set permissions on properties in Active Directory (Write Members in ACL) (Shared mailbox management)

This was one of the trickier tasks to accomplish. The first steps in creating the shared mailbox is not hard, just create the user (disabled) and groups (access group and owner group). But to delegate control of one the groups to the other is another thing. (setting the ManagedBy-attribute is not enough, you need the user(s) to be able to update the membership list aswell. In the GUI this setting is called “Manager can update membership list” which is a tickbox that actually just sets the “write” permission on the “Members” property.

I wrote a function for doing this, which is far from complete, but since it works well for us I thought I should share it.

The usual disclaimer is needed here:
Please make sure you test this before running it production! I have only tested this code for setting the write permission (allow/deny) on the Members property on Groups, nothing else!

When I get the time I will try to expand this to setting access rights on OUs etc. aswell, which would make automated delegation a lot easier. (And pipeline support etc…)

In the meantime, just take it for what it is πŸ™‚

An example on how to use the function is:

Add-ADGroupPropertyPermission -ADObject TheMailboxAccessGroup -MasterObject TheMailboxOwnerGroup -AccessRight WriteProperty -AccessRule Allow -Property Member

And you are done!

The code is available here.

Generating passwords for new user accounts

During our migration to Office 365, we first needed to make sure all the users had an account in Active Directory. In our case, a lot of them didn’t since they only used Notes-applications.

The provisioning/sync of these accounts is for another blog post (or several), but I thought I could share some of the code we use for setting passwords.

First of all, you need something to generate the passwords with. There are a lot of scripts written for this (a good blog post that helped me getting started is this one), but most of them I found are using the same process for creating the passwords.

For example:

Get-Random -Minimum 65 -Maximum 90 | % { [CHAR][BYTE]$_ }

This will generate a random upper case letter between A and Z. If you change the range you can generate any character you want using this method. If you would like some help in finding which character is corresponding to what number you can have a look here.

What most of the scripts I found were lacking was a method of making sure that the passwords generated is actually following the password complexity rules. The passwords generated were random, and of the correct length, but you didn’t know if the different characters required were actually in the password.

So I ended up with doing my own function for this. It’s pretty short so I’ll do a code walkthrough of the important parts in it.

First, we need to specify what characters must be included in the password. I did this by creating four different arrays. You might want to have some control of which special characters are included since some applications (if the password is not for Active Directory accounts) can’t handle some of them. And you might not want your users to have to change their keyboard layout to be able to log in πŸ™‚

You could do something like this:

# Set which characters should be used
$CapitalLetters=For ($a=65;$a –le 90;$a++) { [char][byte]$a }
$SmallLetters=For ($a=97;$a –le 122;$a++) { [char][byte]$a }
$Numbers=0..9
$SpecialCharacters="!","@","#","%","&","?","+","*","=","Β£","\"

$AllCharacters=$CapitalLetters+$SmallLetters+$Numbers+$SpecialCharacters

It is now time to actually build a password. I did this with a loop which will execute until it reaches $PasswordLength, which is a parameter for the function.

It looks like this:

# Loop until we reach the password length
for ($CharNr=$NrOfCharacterTypes;$CharNr -le $PasswordLength;$CharNr++) {

# If this is the first run, we should add one of every character type
if ($CharNr -eq $NrOfCharacterTypes) {
$CharacterString+=($CapitalLetters | Get-Random)
$CharacterString+=($SmallLetters | Get-Random)
$CharacterString+=($Numbers | Get-Random)
$CharacterString+=($SpecialCharacters | Get-Random)
}
# If not, start adding random characters.
else {
$CharacterString+=($AllCharacters | Get-Random)
}
}

$CharacterString now contains all the characters we need. But we don’t want the passwords to always have the character types in the same order (first a capital letter, then a small, then a number then a special character, and then random) since that would make the password a lot weaker.

To fix this we turn it into an array and then randomize the order of the characters, and finally send it back to the pipeline.

Like this:

# Create an char array of the characters
$TempPasswordArray=$CharacterString.ToString().ToCharArray()

# Randomize the order of them
$PasswordToReturn=($TempPasswordArray | Get-Random -Count $TempPasswordArray.length) -join ''

# Send it back to the pipeline
Write-Output $PasswordToReturn

This password will always contain all the character types we have specified. And they will always be random.

The complete code (which includes the $NrOfCharacterTypes and some other things), are available here.
Getting pictures converted for ThumbnailPhoto to be used in Lync/Outlook (ConvertTo-ADThumbnail)

There are obviously a lot of things that needs to be migrated when changing mail platform, one of those things that are a “very nice to have” is user pictures/thumbnails which shows up in Outlook, OWA, Lync and so on…

But this can be quite a challenge. The pictures are stored in the “ThumbnailPhoto”-attribute as a byte array, which needs the picture size to be less than 10 kb to work in lync/outlook (actually, the “Active Directory Users & Computers”-snapin wants it under 8 kb to be shown in the attribute editor so this is what we choose).

The pictures from Notes are “user generated”, they can be gif, jpg, png, bmp or something else, and I’m guessing this would be the case for many large organisations out there.

The solution we used was to add a step in our “Notes to Active Directory”-script to check if a picture is available, if it is, it uses a small “advanced function” I wrote to convert the picture to a byte array, and save a copy of the new file on disk, it’s called ConvertTo-ADThumbnail. It also output’s the changes in size if that’s needed.

It looks like this:

PS H:\> ConvertTo-ADThumbnail -PictureFile .\MyPrettyPicture.jpg

OrgFilename : .\MyPrettyPicture.jpg OrgFileSize : 33,748046875 OrgFileWidth : 400 OrgFileHeight : 300 NewFilename : H:\\MyPrettyPicture-ADThumbnail.jpg NewFileSize : 8,9111328125 NewFileWidth : 336 NewFileHeight : 252 ThumbnailByteArray : {255, 216, 255, 224…}


To actually write the “ThumbnailByteArray” to the user object you do something like this:


# Set the folder paths
$PictureFilePath = '.\Path\MyPrettyPicture.jpg'
$ADThumbnailPictureFolder = '.\TheFolderISave\ADThumbnails'

# Load the byte array
$UserPicture = [byte[]] $(ConvertTo-ADThumbnail -PictureFile $PictureFilePath -OutputDir $ADThumbnailPictureFolder | select -ExpandProperty ThumbnailByteArray)

# Write it to Active Directory
Set-ADUser -Identity 'MySamAccountName' -Replace @{ thumbnailPhoto = $UserPicture }

The cmdlet handles most picture formats, and shrinks them until they are small enough. You can set the file size, output folder path etc. with parameters.

I have tested the code on 1000+ pictures, so far so good πŸ™‚

If you missed the link above, the code is available here.