This can be quite hard in a large organisation. It’s one thing to migrate the ACLs to Office 365 one time, it’s another thing to keep them updated.
At least I was kind of lost on how to tackle this problem in the beginning.
This is probably not the perfect solution, but it saves us a lot of time!
Short version (everything in the list below is done by powershell):
- The shared mailbox user account gets created by a powershell script that reads the output of the order form (which currently gets approved/created by helpdesk).
- An access group gets created
- An owner group gets created
- The ACLs of the access group is changed so the owner group has access to change it’s members, and the “Managed By”-attribute is set.
- The owner group becomes a member of another group, which gives access to a powershell form published in our Citrix-farm. This form is used for managing the membership of the mailbox access group.
- The owner (typically the person who ordered the mailbox) gets added to Owner-group and Access-group.
- Another script looks for new access groups and shared mailboxes, finds it in Exchange Online/Azure, creates the shared mailbox and assigns the “Full Access/Send As”-rights to the “access group”.
- All the ACLs are verified to make sure everything went according to plan.
- If everything has been done correctly, an e-mail gets sent to the members of the “owner-group” with a link to a guide explaining where to find the Citrix app (PowerShell form), how to add the new mailbox in outlook etc….
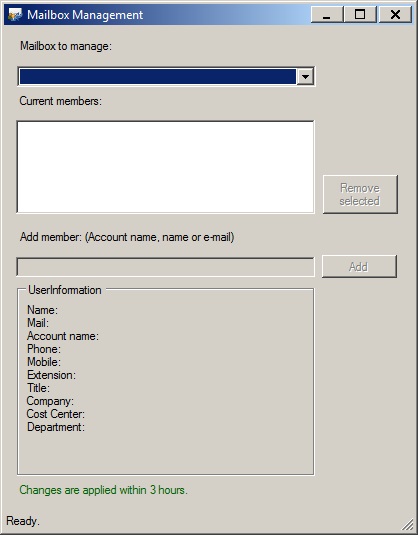
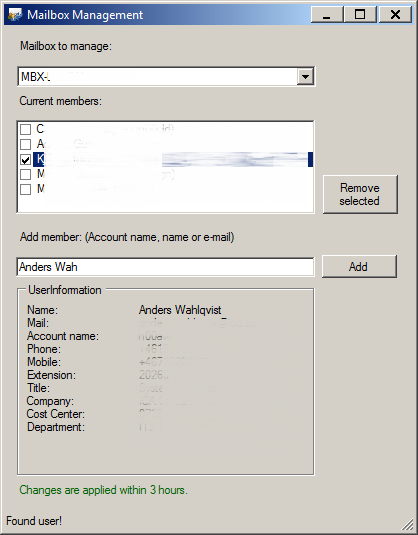
The PowerShell-form, when started by a user, finds all the “Owner-groups” the current user is a member of and lists the corresponding mailboxes in a droplist. When a mailbox is selected, it lists the members and allows the user to add new ones and remove current ones.
You search by entering a Name, E-mailaddress or SamAccountName, the search goes off “in real time” (OnChange), no search button.
Here’s a screenshot of the form when started:
This is how it looks when a mailbox is selected: (sorry for all the blurring…)
This allows any user to manage their own mailbox in an easy and userfriendly way, and they dont need to contact helpdesk everytime someone else needs access to the mailbox, or needs to be removed.
And that’s it! 🙂
I will try to do some blog posts on the steps involved in this process, at least those who were kind of tricky to achieve. (Setting ACLs in AD was not as straightforward as I thought…)
Any code that I think is applicable for someone else will of course be published!
Stay tuned!