Category Archives: PowerShell

Automate discount coupons with Azure Automation and Microsoft Flow

Some background…
We’ve been buying our groceries online for a few years now. We find it super convenient and it saves us a lot of time. I even created a PowerShell module for it some time ago!

There is one (very minor) annoyance with it though, remembering to use the discount coupons you get after you’ve bought groceries for a certain amount. These coupons or codes get’s sent out before your current order has been delivered which means that you cant add them for your next order (can’t reach checkout while you have an active order waiting for delivery).

This means I have to wait for my order to be delivered and then add to it at the checkout step for my next order, at which point I’ve forgot all about it and maybe even deleted/archived the e-mail containing the pdf-file with the coupon.

I thought of this as the perfect scenario to check out a (relatively) new service from Microsoft called Flow, the idea behind Flow is to make it simple to automate things without the need of writing any code, but that doesn’t mean you can’t do that as well 🙂

How to achieve this?
When building automation I usually try to write down the steps needed to achieve the “end-to-end automation”. In this case that would be:

  1. Make sure the e-mails containing the coupons can be found automatically
  2. Get the coupon from the e-mail moved somewhere where it can be accessed by a PowerShell runbook in Azure Automation
  3. Create a PowerShell function that can parse pdf-files so the code inside can be retrieved
  4. Create another PowerShell function that can post the code to the online grocery store
  5. Profit! 🙂

These steps have now been achieved, and here’s how I did it:

Fetching the E-mail and the attachments (Step 1 and 2)
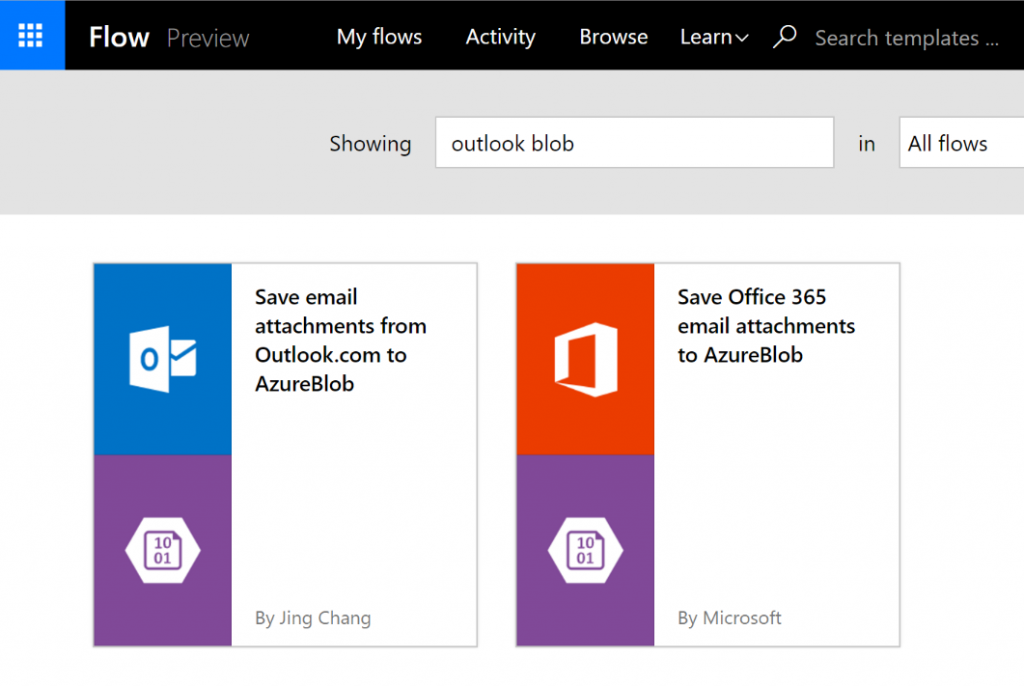
This is amazingly simple using Microsoft Flow. After you’ve signed up and logged in, just go to “My Flows” and click “Create from template”. There are quite a few to pick from so the easiest way to achieve this is to use the search function at the top of page, since I’m using Outlook.com as my personal e-mail provider, and thought the simplest way to store the attachments was using blob storage, I simply searched for “outlook blob” and found these templates I could use:

serachforoutlookblob

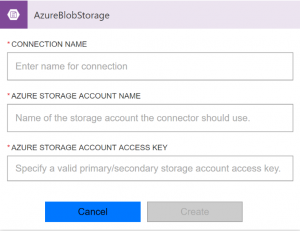
In my case, the first one fits perfectly so that’s the one I chose as a starting point. Click on it, pick “choose this template” and first connect your Azure storage account (needs to be created in advance):

connectazurestorage

Then connect your e-mail account by logging in:

connectoutlookaccount

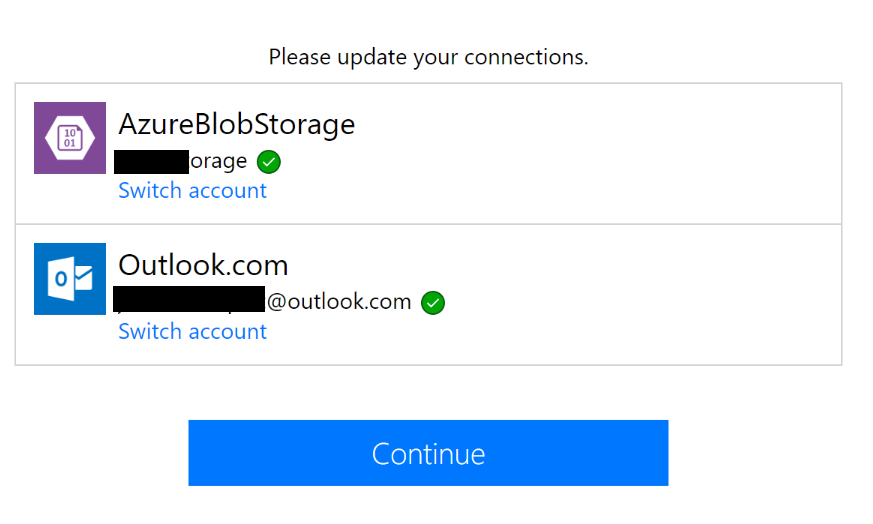
If everything worked, you can go on and press “Continue”


connectedaccounts

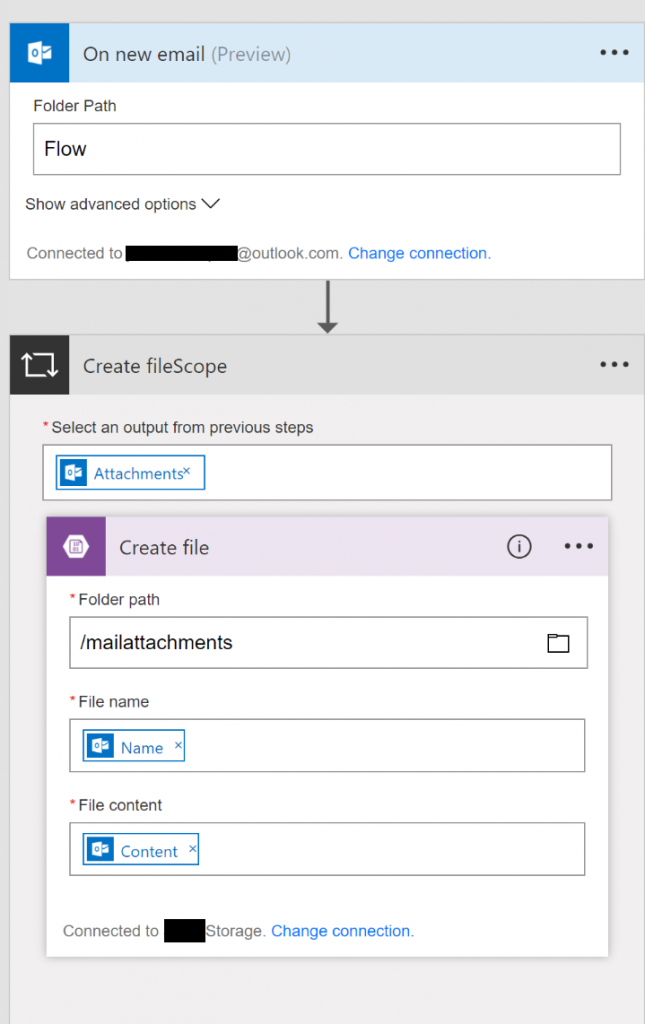
You’ll then arrive at the page where you can configure the different steps in your flow, and if you want to, add some conditions. After you’ve clicked “edit” on both steps and updated them they should look something like this:
floweditmodeupdated

As you can see, I changed the folder this flow should look in from “Inbox” to “Flow” to prevent it from harvesting all the attachments I receive. I can then simply add a mail rule to put the e-mails I want in that folder.

Same thing for the “Create file”-step, “mailattachments” should correspond to a container on your storage account.

That’s it for parsing the e-mails. If you would like to, you could also add a http request after these steps to trigger the runbook automatically (webhook) as soon as a new attachment has been saved to the blob storage, but in this case, I’ll just schedule that to run at a regular intervall.

Parsing the pdf-file and posting the discount code (step 3, 4 and 5!)
To be able to get text out of the pdf-file I used the iTextSharp library. Then wrap that up in a PowerShell function, which in it’s simplest form might look something like this:

(Code example found at: https://powershell.org/forums/topic/convertfrom-pdf-powershell-cmdlet/)

Add-Type -Path "$PSScriptRoot\itextsharp.dll"

function Get-PdfText
{
    [CmdletBinding()]
    [OutputType([string])]
    param (
        [Parameter(Mandatory = $true)]
        [string]
        $Path
    )

    $Path = $PSCmdlet.GetUnresolvedProviderPathFromPSPath($Path)

    try
    {
        $reader = New-Object iTextSharp.text.pdf.pdfreader -ArgumentList $Path
    }
    catch
    {
        throw
    }

    $stringBuilder = New-Object System.Text.StringBuilder

    for ($page = 1; $page -le $reader.NumberOfPages; $page++)
    {
        $text = [iTextSharp.text.pdf.parser.PdfTextExtractor]::GetTextFromPage($reader, $page)
        $null = $stringBuilder.AppendLine($text) 
    }

    $reader.Close()

    return $stringBuilder.ToString()
}

I’ve also added a function called “Add-MatHemBonusCode” to my “Grocery shopping PowerShell module“, because that got to exist, right? 😉

Finally, it’s time to wrap those functions up in a runbook.

The runbook could look something like this (dont look at this as a runbook best practice template, it’s not 🙂 ):

# Load the credentials needed
$AzureCredential = Get-AutomationPSCredential -Name 'AzureCred'
$MatHemCredential = Get-AutomationPSCredential -Name 'MatHem'

# Log into to Azure
Add-AzureRmAccount -Credential $AzureCredential

# Set a few parameters and fetch the storage information
$ResourceGroupName = 'MyResourceGroup'
$StorageAccountName = 'MyStorageAccount'
$ContainerName = 'mailattachments'
$StorageAccountKey = Get-AzureRmStorageAccountKey -ResourceGroupName $ResourceGroupName -Name $StorageAccountName

$StorageContext = New-AzureStorageContext -StorageAccountName $StorageAccountName -StorageAccountKey $StorageAccountKey[0].Value

$Blobs = Get-AzureStorageBlob -Context $StorageContext -Container $ContainerName

# Filter out the attachment needed for this specific flow, only
# needed if you run multiple flows that look at attachments in the
# same container
$TargetedBlobs = $Blobs | Where-Object { $_.Name -match '^kvitto|^bonus' }

foreach ($MatHemBlob in $TargetedBlobs) {

    if ($MatHemBlob.Name -match '^kvitto') {
        # These are not needed so let's just remove them
        Remove-AzureStorageBlob -Blob $MatHemBlob.Name -Context $StorageContext -Container $ContainerName -Force
    }
    elseif ($MatHemBlob.Name -match '^bonus') {
        # These contain the actual bonus or discount codes, so lets download those
        $LocalFileName = [System.IO.Path]::GetTempFileName()
        Get-AzureStorageBlobContent -Blob $MatHemBlob.Name -Container $ContainerName -Context $StorageContext -Destination $LocalFileName -Force

        # Fetch the text from the file
        $BonusPdfText = (Get-PdfText -Path $LocalFileName) -split "`n"

        # parse out the code itself
        $BonusCode = ((($BonusPdfText -match '^Värdekod:') -split 'Värdekod: ')[1]).trim()

        # Connect to the online grocery store and post the code (+some error handling and notifications)
        if (-not $Global:MathemSession) {
            Connect-Mathem -Credential $MatHemCredential
        }

        if ($BonusCode) {
            try {
                $Results = Add-MatHemBonusCode -BonusCode $BonusCode -ErrorAction Stop
            }
            catch {
                if ($_.ToString() -like '*Bonuskoden har redan använts i en annan order*' ) {
                    Write-Warning "Bonus code $BonusCode have already been used. Cleaning up blob..."
                    Send-PushNotification -Message "Bonus code $BonusCode from $($MatHemBlob.Name) have already been used. I'm cleaning up the blob."
                    Remove-AzureStorageBlob -Blob $MatHemBlob.Name -Context $StorageContext -Container $ContainerName -Force
                    Continue
                }
                elseif ($_.ToString() -like '*Felaktig bonuskod*' ) {
                    Write-Warning "Bonus code $BonusCode is invalid. Notifying master..."
                    Send-PushNotification -Message "The bonus code $BonusCode from $($MatHemBlob.Name) was invalid. Please take care of this for me!"
                    Remove-AzureStorageBlob -Blob $MatHemBlob.Name -Context $StorageContext -Container $ContainerName -Force
                    Continue
                }
                else {
                    Write-Warning "Failed to add bonus code $BonusCode from $($MatHemBlob.Name). The error was $($_.ToString())"
                    Send-PushNotification -Message "Failed to add bonus code $BonusCode from $($MatHemBlob.Name). The error was: $($_.ToString())"
                    Continue
                }
            }

            Send-PushNotification -Message "Bonus code $BonusCode from $($MatHemBlob.Name) have been added with the response: $Results"
        }
    }
}

Time to schedule that in Azure Automation, and make sure all the modules needed are available for it when it runs! (I run this on a hybrid worker)

Conclusion
While I have had a few issues with Microsoft Flow along the way (it is still in preview after all), it seems like a really cool service. And since you can make a http request to a webhook in Azure Automation, and/or just integrate them through some other service like the blob storage example in this post, the possibilities are pretty much endless.

So, as always… Keep automating anything!
How many cmdlet-characters per minute can you type?

So, there are a lot of PowerShell “scripting games” around recently, which is great. But are they really games? 😉

Let’s do something a bit different, let’s measure how fast we can type out cmdlet names!

Tab completion cannot be used, and the input will be compared in a case sensitive way (yes, I know, this is by no means a measure on how good your PowerShell skills are, like, at all. But hey, it’s just a game 🙂 ), the code for the function that can measure this follows (download link):

function Measure-CmdletTypingSpeed {

    <#
    .SYNOPSIS
    Measure the speed and accuracy of typing cmdlet-names.

    .DESCRIPTION
    This function will load a number of random cmdlets from the ones available on
    the local system and measure the speed and accuracy of how they are typed.

    The input and cmdlet names are compared with case sensitivity.

    Yes, this is quite stupid since we all use tab completion "in real life", but
    this is just meant as a game, so try not to get too upset!

    .EXAMPLE
    Measure-CmdletTypingSpeed

    Runs this function.

    .EXAMPLE
    Measure-CmdletTypingSpeed -NumberOfCmdlets 20

    Runs this function. Will load 20 cmdlets that needs to be typed. (Default is 10)

    .PARAMETER NumberOfCmdlets
    Specify how many cmdlets you want to type before the result is posted. Default
    and minimum is 10, maximum 100.
    
    #>

    [cmdletbinding()]
    Param(
        [ValidateRange(10,100)]
        [int] $NumberOfCmdlets = 10)

    # Load a selection of random commands
    $Commands = Get-Command | Where-Object { $_.CommandType -eq 'Cmdlet' } | Get-Random -Count $NumberOfCmdlets

    # Initialize the arrays
    $CorrectlyTypedCommands = @()
    $IncorrectlyTypedCommands = @()

    $StartTime = Get-Date

    # Time to loop through the commands and ask for input
    foreach ($Command in $Commands) {
        $Result = Read-Host -Prompt "Type command: $($Command.Name)"

        if ($Command.Name -ceq $Result) {
            $CorrectlyTypedCommands += $Command.Name
        }
        else {
            $IncorrectlyTypedCommands += $Command.Name
        }
    }

    $EndTime = Get-Date

    # Calculate the time it took
    $TimeSpan = New-TimeSpan -Start $StartTime -End $EndTime

    # Figure out the length (number of characters) of the correctly typed commands
    $LengthOfAllCorrectlyTypedCommands = $CorrectlyTypedCommands | ForEach-Object { $_.ToCharArray() } | Measure-Object | Select-Object -ExpandProperty Count

    # Calculate the results
    $CmdletCharactersPerMinute = [Math]::Round($LengthOfAllCorrectlyTypedCommands/$TimeSpan.TotalMinutes)
    $CmdletsPerMinute = [Math]::Round($CorrectlyTypedCommands.Count/$TimeSpan.TotalMinutes)
    $Accuracy = [Math]::Round($CorrectlyTypedCommands.Count/$Commands.count*100)

        Write-Verbose "Your manage to type $CmdletCharactersPerMinute cmdlet-characters per minute ($CmdletsPerMinute cmdlets/minute). You typed $Accuracy% of the cmdlets correctly!"

        $TypeSpeedResults = New-Object System.Object
        $TypeSpeedResults | Add-Member -Type NoteProperty -Name CmdletCharactersPerMinute -Value $CmdletCharactersPerMinute
        $TypeSpeedResults | Add-Member -Type NoteProperty -Name CmdletsPerMinute -Value $CmdletsPerMinute
        $TypeSpeedResults | Add-Member -Type NoteProperty -Name TotalLengthTypedCorrectly -Value $LengthOfAllCorrectlyTypedCommands
        $TypeSpeedResults | Add-Member -Type NoteProperty -Name Accuracy -Value $Accuracy
        $TypeSpeedResults | Add-Member -Type NoteProperty -Name MisspelledCmdletNames -Value $IncorrectlyTypedCommands

        Write-Output $TypeSpeedResults
}

Download as txt-file.

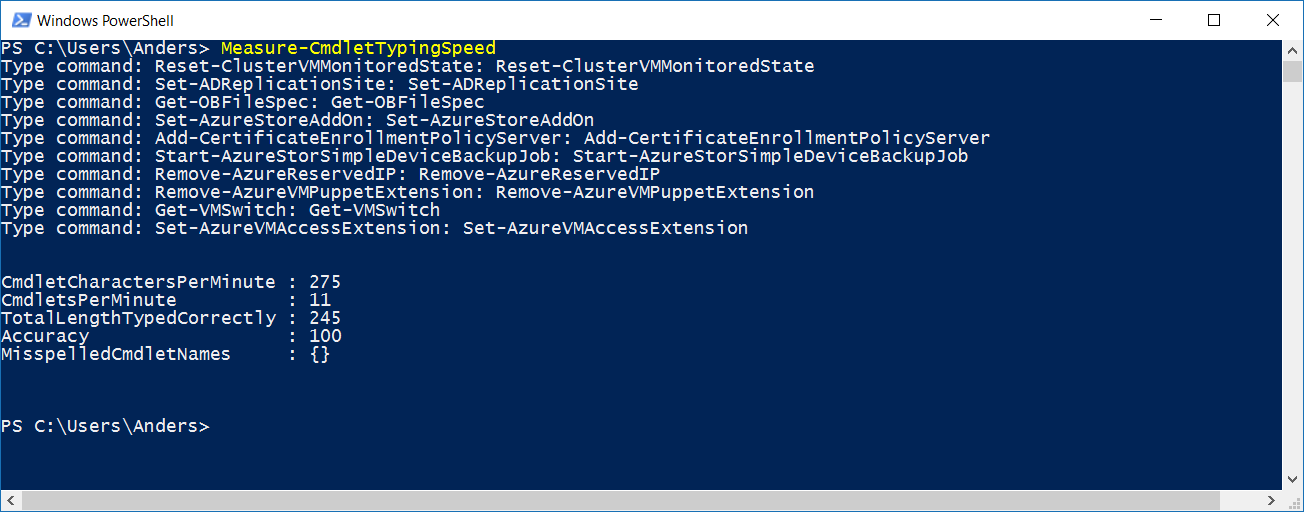
Screenshot of it in action:
CmdletTypingSpeedDump

Feel free to post suggestions on improving it. And if you want to, share your results in the comments! 🙂

Brewing coffee with Azure Automation

Can you automate anything with Azure Automation?
While there are some limitations on what it can and cannot do, I thought I could have a bit of fun using some of the fairly new features in Azure Automation to show that even though the main purpose of this service is to automate management tasks in the cloud (and in your local datacenter using hybrid workers), since it’s built on PowerShell, there really isn’t that much you cannot do.

I’ve been trying to come up with a scenario that is a bit of fun, and at the same time shows how you can use features like hybrid workers and webhooks to overcome almost any obstacles you have when automating something that spans over different services and locations.

This is what I came up with:
Let’s say I’m on my way home from work, it’s autumn and the rain is pouring down. I feel tired, cold, and just want to come home and grab a nice cup of coffee. To detect if something is running out of resources (in this case me), and to trigger something that can fix it (in this case, coffee) is a pretty common scenario in IT.

And to simulate that a process like this might span over multiple services where some are in the cloud (in this case iCloud, twitter and a weather service), while others are in your local datacenter (or in this case the coffee brewer in my kitchen), we are going to run parts of the code in Azure Automation and parts of it on a hybrid worker, everything orchestrated with Azure Automation.

The steps involved, at a high level, will be:

  • Fetch the location of my phone through iCloud
  • Use that information to fetch the weather data at that location, and check if it’s going to rain
  • If rain was detected, start with sending out a tweet asking if I would like some coffee, if the reply is positive, brew some coffee.
  • If no reply to the tweet is detected, it will send out an e-mail with a link to a page where the coffee brewer can be started with a button (that calls a runbook through a webhook)

So let’s get started!

So, where am I? And how’s the weather?
I don’t work at the same place everyday, so I don’t want to hard code the location where the weather is checked. Wouldn’t it be great if I could just fetch this information dynamically somehow? Well, with Azure Automation and some PowerShell, I can.

Since I carry around a smartphone with a GPS all day long, I thought that would be a good source for location details, and since you can fetch your location information through iCloud when you have an iPhone, this was the method I chose to do it.

Disclaimer: This code is for educational purposes ONLY, I do not take any responsibility if you use this outside of the ToS for the different services utilized here.

So I started with creating a PowerShell-function that could fetch my phones location through iCloud, if you want to take a look at it, it’s available here.

We then need to fetch some weatherdata at that location, luckily, I’ve already built a function like that before, blog post available here.

So, I have the tools to fetch my current location and the weather at that location. But how do to use this in Azure Automation?

Importing custom modules in Azure Automation
This is actually really simple! You can import almost any PowerShell module into Azure Automation, as long as you zip it up in folder with the same name as your module file. So I took my two functions above and put them into a WebUtilities.psm1-file. I then put that file into a WebUtilities-folder, and finally zipped it all up as “WebUtilities.zip”. If you want to learn more about how to create integration modules for Azure Automation, including creating an optional file containing information about a Azure Automation connection-variable, more information about that is available here.

We then need to import this into Azure Automation. The screenshots that follows are from the “classic portal”, but you can do this in the preview portal as well:

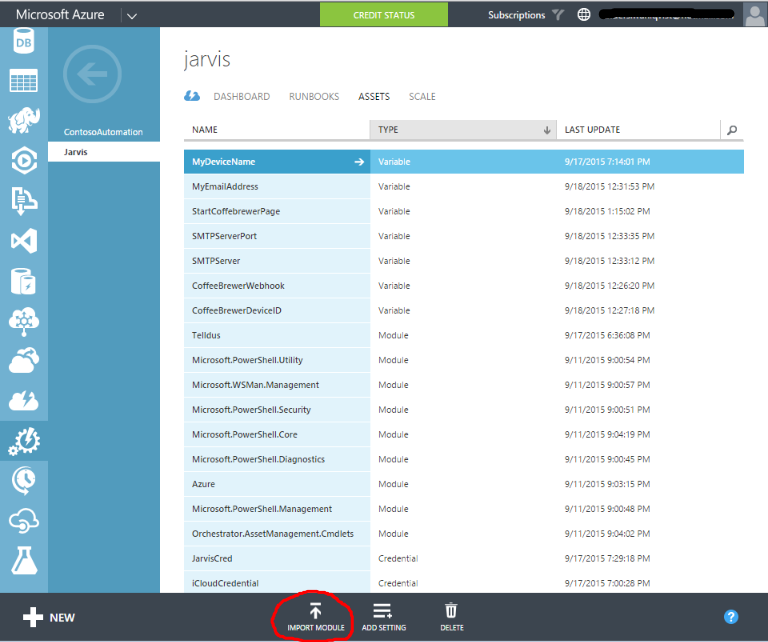
First find the automation account you want to use, go to assets, and then click “Import Module” at the bottom:

AzurePortal_ImportModule

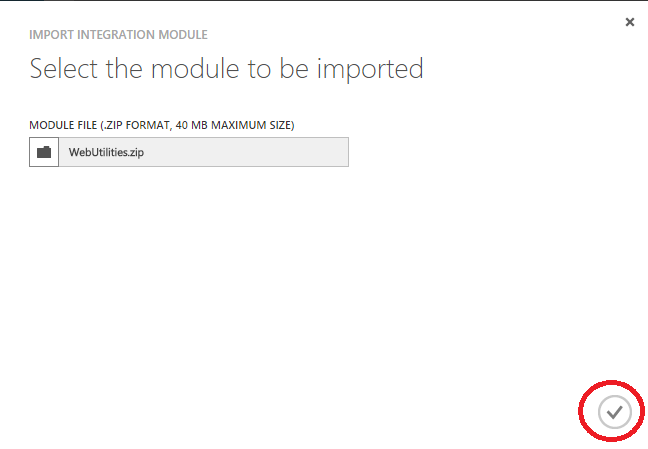
Browse to your zip-file and click open to select it and press “Complete” down in the right corner:
BrowsedToModuleFile

Azure Automation will then begin to import the module and extract the activities it contains, you can follow the process at the bottom of the page:
ModuleIsImportingToAzure

These functions are now available in our PowerShell Workflows and PowerShell runbooks. Neat huh?

(The custom modules you import will not, at the time I’m writing this, be pushed to your hybrid runbook workers automatically. The Azure Automation team is working on that though, so it will happen eventually. In the meantime, you need to do this yourself.)

Writing the code…
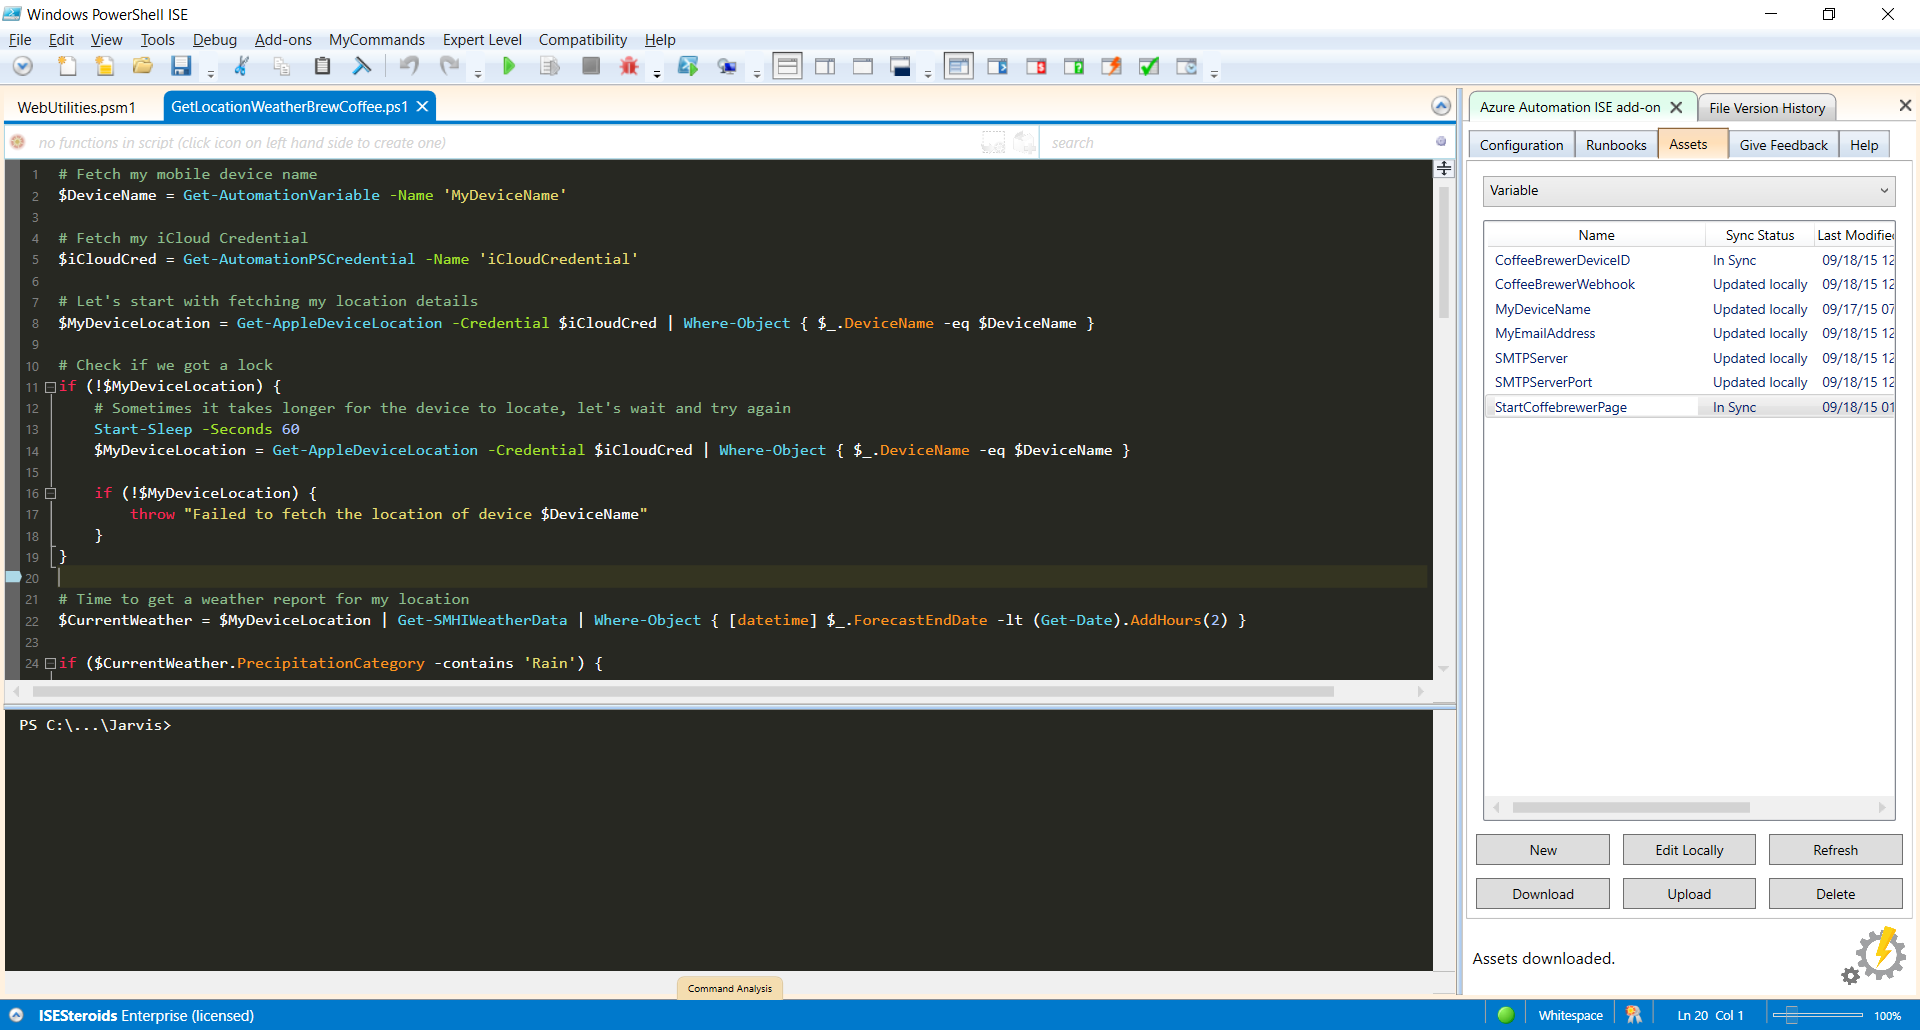
It is now time to use the functions and actually write the code needed to tie everything together. There are many cool new features regarding Azure Automation but one of my favorites are the PowerShell ISE AddOn the Azure Automation team is working on, if you work with Azure Automation I can’t recommend you to check out the GitHub repository for it enough, and ever since I did the build straight from the source it has been working pretty well considering it’s still a very early release.

This is how my setup looks (ISESteroids, another great product, is also used here):
PowerShell_ISE_AA_AddOn

In addition to enabling you to use all of the features of the PowerShell ISE (and ISESteroids if you use that), this AddOn enables you to for example; fetch your runbooks straight from Azure, upload changes, run the code locally with emulated activities, test the code in Azure, and manage your assets so they are available when you test the code locally.

The productivity boost you get from this in comparison to the text authoring and testing experience in the portal, at least in my experience, is huge. So go ahead and try it out!

So, back to the code itself. As stated above, the steps involved here will be:

  • Fetch the location of my phone through iCloud
  • Use that information to fetch the weather data at that location, and check if it’s going to rain
  • If rain was detected, start with sending out a tweet asking if I would like some coffee, if the reply is positive, brew some coffee.
  • If no reply to the tweet is detected, it will send out an e-mail with a link to a page where the coffee brewer can be started with a button (that calls a runbook through a webhook)

Regarding tweeting from PowerShell, I want to give full credit of that to Adam Bertram‘s MyTwitter-module, thank you Adam! 🙂

And since the PowerShell community is so awesome, this is a pretty common scenario aswell, you build a few functions of your own, and you find some from others. Just zip it up and import it in the same way as the above functions. To use the MyTwitter-module, you also need to add API keys, just follow Adam’s instructions and you’ll be fine!

The code for the runbook, which I haven’t put too much effort into since it’s mostly a proof of concept, looks like this (native PowerShell script runbook!):

# Fetch my mobile device name
$DeviceName = Get-AutomationVariable -Name 'MyDeviceName'

# Fetch my iCloud Credential
$iCloudCred = Get-AutomationPSCredential -Name 'iCloudCredential'

Write-Output 'Fetching device location...'

# Let's start with fetching my location details
$MyDeviceLocation = Get-AppleDeviceLocation -Credential $iCloudCred | Where-Object { $_.DeviceName -eq $DeviceName }

# Check if we got a lock
if (!$MyDeviceLocation) {
    # Sometimes it takes longer for the device to locate, let's wait and try again
    Start-Sleep -Seconds 60
    $MyDeviceLocation = Get-AppleDeviceLocation -Credential $iCloudCred | Where-Object { $_.DeviceName -eq $DeviceName }

    if (!$MyDeviceLocation) {
        throw "Failed to fetch the location of device $DeviceName"
    }
}

Write-Output "The following data was fetched from the device:`nLong: $($MyDeviceLocation.Longitude)`nLat: $($MyDeviceLocation.Latitude)"


# Time to get a weather report for my location
$CurrentWeather = $MyDeviceLocation | Get-SMHIWeatherData | Where-Object { [datetime] $_.ForecastEndDate -lt (Get-Date).AddHours(2) }

if ($CurrentWeather.PrecipitationCategory -contains 'Rain') {

    Write-Output "Rain is predicted soon, I'm gonna ask if he wants a cup of coffee. Sending out a tweet..."

    $SourceTweetHandle = Get-AutomationVariable -Name 'SourceTweetHandle'
    $TargetTweetHandle = Get-AutomationVariable -Name 'TargetTweetHandle'
    New-MyTwitterConfiguration

    $Tweet = Send-Tweet -Message "@$TargetTweetHandle I got a feeling you would you like some coffee. Want me to fix it for you?"

    $NoReply = $true

    $NrOfLoops = 0
    $MaxNrOfLoops = 20

    while ($NoReply -AND $NrOfLoops -lt $MaxNrOfLoops) {

        $NrOfLoops++

        Remove-Variable ReplyTweet -ErrorAction SilentlyContinue
        $TweetTimeline = Get-TweetTimeline -Username $TargetTweetHandle -IncludeReplies -MaximumTweets 20

        if ($TweetTimeline.in_reply_to_status_id_str -contains $Tweet.id_str) {
            $ReplyTweet = $TweetTimeline | Where-Object -FilterScript { $_.in_reply_to_status_id_str -eq $Tweet.id_str -AND $_.user.screen_name -eq $TargetTweetHandle }

            # Make sure we got a reply
            if ($ReplyTweet) {
                Write-Output 'Got a reply!'
                $NoReply = $false
            }
        }
        else {
            Write-Output 'Waiting for a reply...'
            Start-Sleep -Seconds 60
        }
    }

    # Make sure we got a reply and didn't just time out
    if ($ReplyTweet) {
        $PositiveReply = Get-AutomationVariable -Name 'PositiveReplyRegex'

        if ($ReplyTweet.text -match $PositiveReply) {
            Write-Output 'The reply was positive. Sending confirmation tweet and starting coffee brewer!'

            $ConfirmationTweet = Send-Tweet "@$TargetTweetHandle Consider it done."

            $AzureCred = Get-AutomationPSCredential -Name 'JarvisCred'
            $null = Add-AzureAccount -Credential $AzureCred
            Select-AzureSubscription -SubscriptionName 'Main Azure Subscription'

            $JobInfo = Start-AzureAutomationRunbook -Name 'Start-CoffeeBrewer' -AutomationAccountName Jarvis -RunOn 'JarvisGroup'

            Write-Output "Runbook started on hybrid worker group. I'm done here!"
        }
        else {
            Write-Output 'The reply was negative. Sending confirmation tweet.'
            $ConfirmationTweet = Send-Tweet "@$TargetTweetHandle Alright, I wont do it then..."
        }
    }
    else {

    Write-Output "No reply on tweet detected, let's send out an e-mail instead."

    $WepageLink = Get-AutomationVariable -Name 'StartCoffeeBrewerPage'

# Set the body
$body = @"
Hi,<BR>
<BR>
Since the weather seems to be bad at your current location, I thought you might feel a bit cold.<BR>
<BR>
If you feel a nice cup of coffee would help, just follow <a href='$WepageLink'>this link</A> and press the button on the page and I'll start the coffee brewer for you!<BR>
<BR>
Kind regards,<BR>
Jarvis, running in Azure Automation<BR>
<BR>
PS. I tried to tweet you but didn't get a reply, so I sent you this e-mail instead. DS.
"@

    $SMTPCred = Get-AutomationPSCredential -Name 'SMTPAuthCredential'

    $MailMessageParams = @{
        'To' = Get-AutomationVariable -Name 'MyEmailAddress'
        'From' = "Jarvis <$($SMTPCred.UserName)>"
        'Subject' = 'Would you like some coffee?'
        'Body' = $body
        'UseSsl' = $true
        'Port' = Get-AutomationVariable -Name 'SMTPServerPort'
        'SmtpServer' = Get-AutomationVariable -Name 'SMTPServer'
        'Credential' = $SMTPCred
        'BodyAsHtml' = $true
    }

    Send-MailMessage @MailMessageParams

    Write-Output 'E-mail is sent.'
    }
}
else {
    Write-Output 'Seems the weather is fine, you have to make your own coffee!'
}

If you have read some posts at this blog before, you probably know that I enjoy creating home automation scripts quite a lot, and I’ve named this little project Jarvis after the famous AI, the ‘JarvisGroup’ specified above (Start-AzureAutomationRunbook cmdlet) is the hybrid worker group that runs some of these scripts. If you want to learn more about hybrid runbook workers and how to deploy them, check out this link.

Currently, you can’t use webhooks to trigger runbooks on a hybrid worker, as a workaround, I have another runbook that uses the Start-AzureAutomationRunbook cmdlet to trigger it on the hybrid worker instead, the code of that looks like this:

workflow Start-CoffeeBrewerThroughAzure
{
    $AzureCred = Get-AutomationPSCredential -Name 'JarvisCred'
    Add-AzureAccount -Credential $AzureCred
    Select-AzureSubscription -SubscriptionName 'Main Azure Subscription'

    Start-AzureAutomationRunbook -Name 'Start-CoffeeBrewer' -AutomationAccountName Jarvis -RunOn 'JarvisGroup'
}

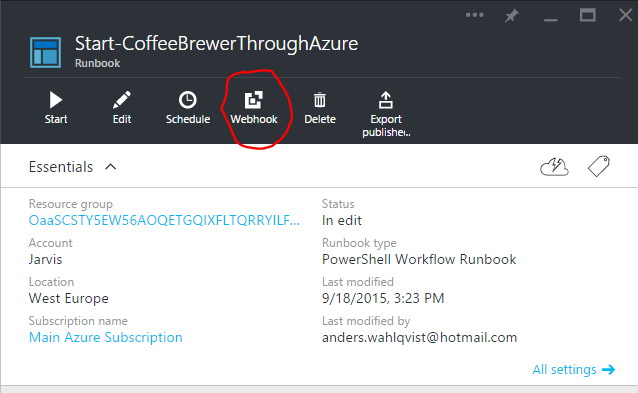
To add a webhook to that runbook, you need to be in the Azure Preview portal, when you open the runbook details you’ll see the icon for creating a webhook, it looks like this:
WebhookButton

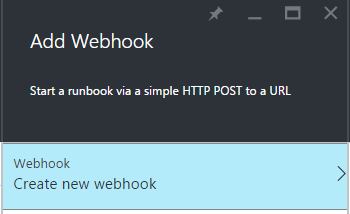
Click on it, select “Create a new webhook”:
CreateANewWebhook

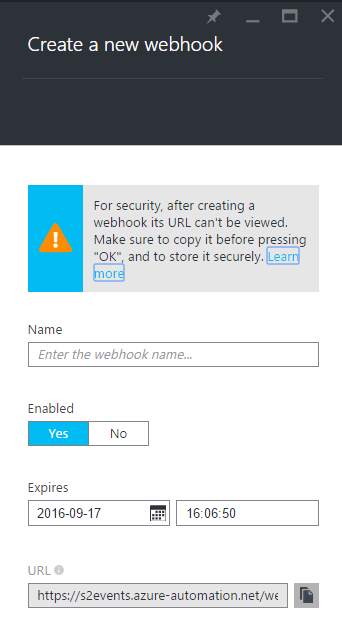
This will get you to this page:
NewWebhookPage

Fill out the details of your new webook, and don’t forget to copy the link before clicking OK!

Voila, you’ve created a webhook! If you want to get more information regarding webhooks, check out this link.

The final thing we need now is the code for starting the coffee brewer (Start-CoffeeBrewer), I’m using the Home Automation Module I’ve written to achieve this. The runbook code looks like this:

workflow Start-CoffeeBrewer
{
	$TelldusCred = Get-AutomationPSCredential -Name 'TelldusCred'
	$CoffeeBrewerDeviceID = Get-AutomationVariable -Name 'CoffeeBrewerDeviceID'
	
	InlineScript {
		
		Write-Output 'Connecting to Home Automation Service...'
		Connect-TelldusLive -Credential $using:TelldusCred
		
		Write-Output 'Turning on the coffee brewer...'
		Set-TDDevice -Action turnOn -DeviceID $using:CoffeeBrewerDeviceID
	}
}

The module containing the Connect-TelldusLive and Set-TDDevice cmdlets are installed on the target hybrid worker since that’s where it will execute (and as stated above, the module won’t be pushed out to hybrid workers automatically from Azure Automation even if you have imported them there, but that will be fixed in the future).

So, we’re all set now…

But, does it all work?
Well, you’d obviously have to come by for coffee some time to see this for yourself, but yes, it actually does! 🙂

Here are some screenshots of the first runbook in action:

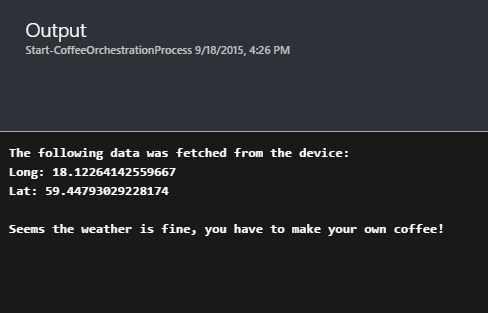
When it’s not raining, test ran in the portal:
WeatherIsFine

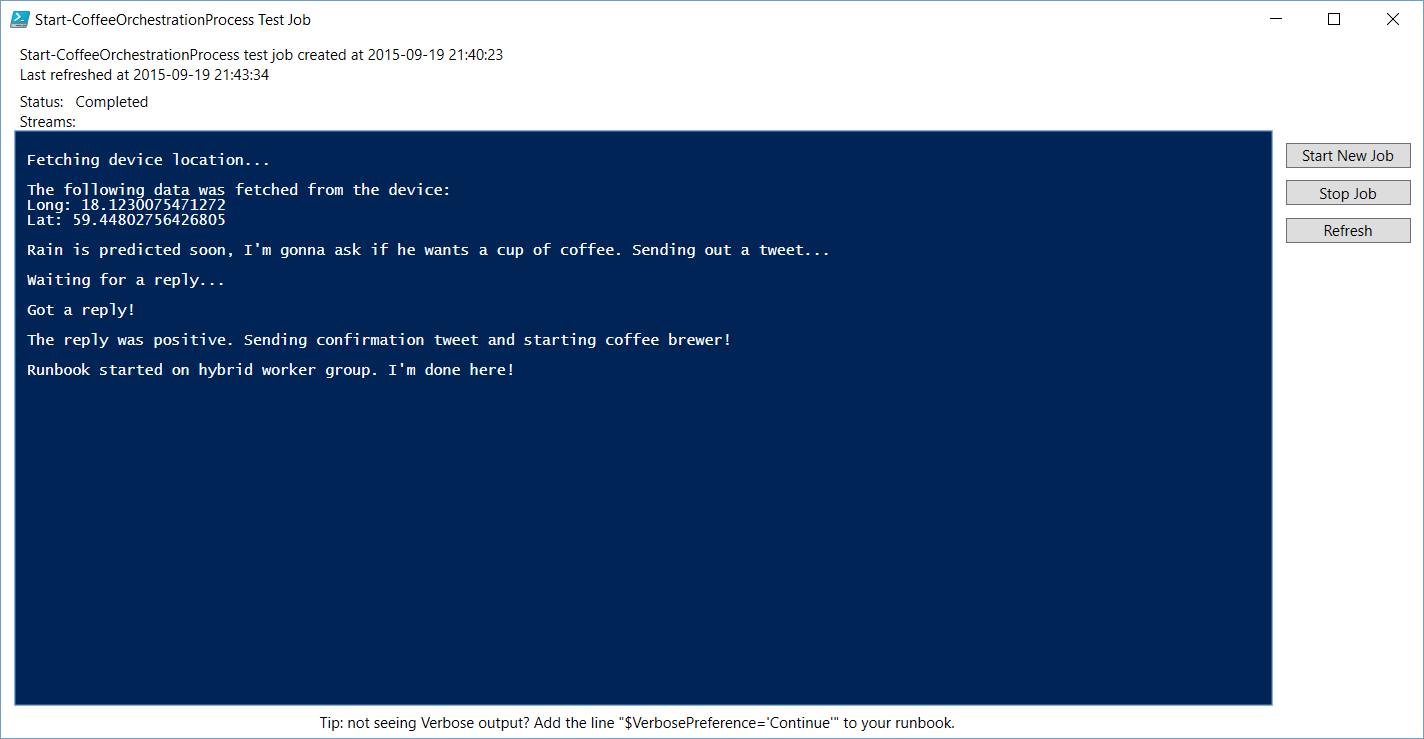
When rain is detected, test ran from the PowerShell ISE AddOn:
ISERunbookTestScreenshot

Tweet screen shot:
TweetScreenShot

And confirmation tweet:
ConfirmationTweet

You can also view the tweets at this link.

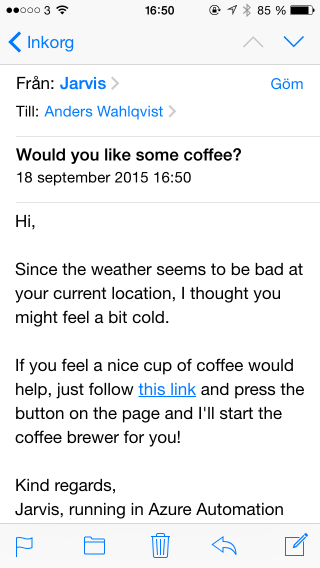
Mailmessage in phone:
iPhoneScreenShot

The webpage form for starting a runbook through a webhook:
CoffeBrewerSite

The code for that form with the token masked (be aware that posting a form like this on a public website without authentication is a MAJOR security risk depending on the runbook type, it’s only for demo purposes in this case):

<HTML>
<HEAD><TITLE>Coffee brewer start!</TITLE>
</HEAD>
<BODY>
<form action='https://s2events.azure-automation.net/webhooks?token=***************************' method='post'>
<FONT size ='4'>Press this button to start the coffee brewer:</FONT>
   <button type='Submit'>Brew Coffee</button>
</form>
</BODY>
</HTML>

And finally, a short video of the Coffee brewer being started through Azure Automation (including a fuzzy reflection of my tired self being mesmerized by the coffee (first cup of the day 😉 )):

Brewing coffee through Azure Automation from Anders Wahlqvist on Vimeo.

Summary
I hope this post have helped you to see how flexible Azure Automation actually is. PowerShell is truly versatile and a great “glue-language” to tie different services together. Even though using Azure for turning on a coffee brewer might be a bit overkill, if it’s possible to integrate a weather service, an iPhone, e-mail, twitter and a coffee brewer using it, it can probably manage your IT environment aswell, don’t you think? 🙂

As always, happy automating anything!
Configure PowerShell remoting access remotely

Only administrators can connect through PowerShell remoting (WinRM) with the default configuration, and if you are running a version older than Windows 8/Server 2012 you wont have the “Remote Management Users” local group to add non-admins to if you want to give them access to PowerShell remoting (WinRM).

You can configure the access list of the endpoint(s) using “Set-PSSessionConfiguration -Name Microsoft.PowerShell -ShowSecurityDescriptorUI”, but it only runs locally and if you don’t want to build the SDDLs yourself the only alternative is to use the UI enabled by the switch in that example.

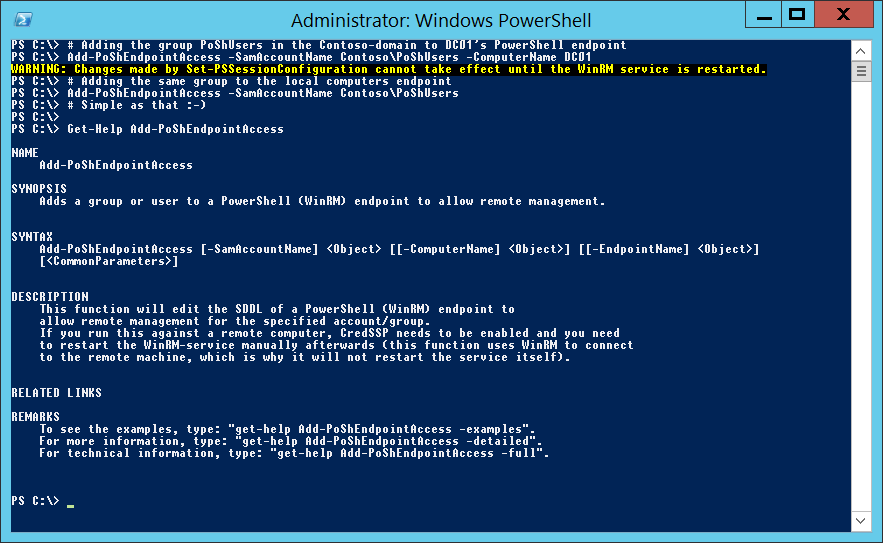
So I put together a function to enable you to simply pass an account (user or group) by name, and if you want to run it remotely, a computer name. It is really simple to use. It looks like this in action:
PoShEndpointFunction

The code for this function as been uploaded here.

Retrieving certificates from ADCS (for securing credentials used in DSC resources)

If you need to specify credentials in a DSC resource and don’t want it to be stored in plain text (you don’t!) you need to encrypt it using the public key of a certificate. That overall process is described here, it is also shown in module 6 of the Getting Started with PowerShell Desired State Configuration (DSC) MVA event.

What I want to address with this post is the process of obtaining the public key and thumbprint of the certificate used for encryption. A lot of examples I’ve seen are following the basic concept of retrieving the certificate from the local server where the mof will be deployed, but that requires firewall openings to all servers and credentials to them, and I think this might be a better/simpler alternative to that, at least in some cases.

So I’ve written a function (link at the bottom of this post) that gets the information needed straight from a Microsoft Certificate Authority (aka Active Directory Certificate Services) instead of all the different servers, which I think simplifies the process a bit.

I’ve also added some other properties to the returned objects to make it possible to use this advanced function for monitoring expiring certificates.

I’ll give you some examples on how to use this function below!

I’d also like to point out that I found a lot of parts of this code on the internet, I’ve just added a few extra things to it and wrapped it in an advanced function. I’m not sure who is the original author of this code though, if anyone knows, please add a comment below so I can give credit where credit is due! Thanks to whoever you are! 🙂

So, the process itself is pretty straight forward, specify your CA instance and what certificates you are interested in and the function will return them for you. You could for example do this:

PS> Get-CACertificateDatabase -CertificationAuthority "contoso.com\Issuing CA" -IncludeBinaryCertificate

All issued certificates valid today and up to two years ahead will be returned, including their public key. To save them all to disk you could do this:

PS> Get-CACertificateDatabase -CertificationAuthority "contoso.com\Issuing CA" -IncludeBinaryCertificate | ForEach-Object { $_.BinaryCertificate | Out-File "$($_.IssuedCommonName).cer" -Encoding default }

You might want to filter the returned certificates on the template you use for encrypting credentials in DSC if you don’t want all your certificates saved locally.

I hope someone might find this useful! If you need help getting started with DSC, check the links at the top of this post.

The code for this function as been uploaded here.

Specifying a single domain controller while keeping redundancy in a PowerShell script

When scripting against Active Directory I usually specify a domain controller for the “-Server” parameter of the AD cmdlets to prevent potential issues with replication.

For example, say you are creating a new group, and then want to change the ACLs of that group, for example the “WriteMembers”-permission. You probably want to specify the same domain controller on these two requests to make sure the newly created group is actually available when changing the ACL.

But hard coding things are usually not a good idea, and if that DC happens to go offline while a script is running, a lot of requests might fail. So what I did was to create a function that checks if the specified DC is online, and if it isn’t, it retrieves a lists of all the DCs that exists in the same site as the server where the script is executing, and picks the next available one after verifying it works.

Usage example:

PS> Get-ScriptDC -PreferedDC MyDC01.MyDomain.local
WARNING: Failed to connect to MyDC01.MyDomain.local.
MyDC02.MyDomain.local

In this case, MyDC01.MyDomain.local was offline and didn’t work, so the function instead returned MyDC02.MyDomain.local which has been verified by issuing a AD-query to it. It is simply returned as a string, so to use it in a script you could do something like this (with some errorhandling added):

$MyPreferedDC = 'MyDC01.MyDomain.local'
$DCToUse = Get-ScriptDC -PreferedDC $MyPreferedDC

Get-ADUser JohnDoe -Server $DCToUse

If you put this first in the script, you’ll know that the DC used will be online when the script starts, if you want to, you could of course run this function again within in a catch-statement to be able to “failover” to another DC during script execution.

The code for this function has been uploaded here.

The ActiveDirectory-module must be available for it to work.

Ordering pizza with PowerShell (web scraping guide) – Part 2

So, we have created our Connect-OnlinePizza function and now have access to parts of the site that are only available when logged in. But how?

Remember the Invoke-WebRequest-cmdlet in the last post?
We specified a session variable in the Global scope, and that variable contains cookies and data to keep our session with the site consistent over multiple webrequests, and that’s what we’ll use in our next function, Get-MyOnlinePizzaAccountInfo.

Get-MyOnlinePizzaAccountInfo
First of all, we need to find what page holds the information we want. In this case, the page containing the account information was located at http://onlinepizza.se/?view=andraKonto (it requires you to be logged in).

Make sure you ran the “Connect-OnlinePizza”-function first, that way the “$OnlinePizzaSession”-variable will be available and make it possible for us to reach this page and see the details of our account.

To fetch the page and load it into a variable you could do this (we save it to file because of the issue with the encoding name, see part 1 of this guide):

Invoke-WebRequest -Uri "http://onlinepizza.se/?view=andraKonto" -Method Get -WebSession $Global:OnlinePizzaSession -OutFile .\dump.htm
$AccountInfo = Get-Content .\dump.htm -Encoding UTF8

If this worked, we should start looking in the “dump.htm”-file for where the name is, use Select-String or just open the file in notepad and search for it.

When you’ve found the line, you need to figure out how to trim away all the parts of the line that you don’t want. In my case, it looks like this:

<input type=text name=namn id=namn class="input-medium" maxlength=100 value="Anders Wahlqvist"/>

I’m by no means an expert in string manipulation or regex, so there is probably a better way of doing this, but I usually use the Split-operator to get the part I want. In this case we need to split the string after value=” and before “/> (or remove it). We also need to fetch this particular line from the sites html code.

Take a look at this line:

$AccountHolderName = ((($AccountInfo | Select-String -Pattern "name=namn id=namn") -split "value=`"")[1] -split "`"/>")[0]

That might look like a complete mess, but we’ll break it down! We first need to fetch the correct line that contains the name which we can do with:

$AccountInfo | Select-String -Pattern "name=namn id=namn"

We want to do the “splitting” on the results of that, and therefore we need to put parentheses around that command before we add the “-split” operator. So let’s split that up and see what happens:

PS> ($AccountInfo | Select-String -Pattern "name=namn id=namn") -split "value=`""
input type=text name=namn id=namn class="input-medium" maxlength=100 
Anders Wahlqvist"/>

As you can see, we get two tokens back, and we need the second one. This can easily be done by putting everything in another pair of parentheses and then just specify which one we want. Since the first one will be identified as 0, and the one we want 1, we will end up with this:

PS> (($AccountInfo | Select-String -Pattern "name=namn id=namn") -split "value=`"")[1]
Anders Wahlqvist"/>

To get rid of that last part, we could either use the "replace"-operator or do another split. In this case, the "replace"-operator might be the better choice, but in my experience the split-operator will provide a more robust and consistent result. The site might change and add something else after "/> on the same line, or there might be some white space that you didn't see, so let's just do another split, wrap that up in a new set of parentheses and
and select token 0 (first one), which will get us our original line:

$AccountHolderName = ((($AccountInfo | Select-String -Pattern "name=namn id=namn") -split "value=`"")[1] -split "`"/>")[0]

Hopefully this line doesn't seem as messy anymore 🙂

Now we repeat that for all the information we want, like this:

$Username = ((($AccountInfo | Select-String -Pattern "name=username id=username") -split "value=`"")[1] -split "`" />")[0]
$AccountHolderName = ((($AccountInfo | Select-String -Pattern "name=namn id=namn") -split "value=`"")[1] -split "`"/>")[0]
$AccountHolderMail = ((($AccountInfo | Select-String -Pattern "name=epost id=epost") -split "value=`"")[1] -split "`"/>")[0]
$AccountHolderStreet = ((($AccountInfo | Select-String -Pattern "name=adress1 id=adress1") -split "value=`"")[1] -split "`"/>")[0]
$AccountHolderPostalCode = ((($AccountInfo | Select-String -Pattern "name=postnummer id=postnummer") -split "value=`"")[1] -split "`"/>")[0]
$AccountHolderPhone = ((($AccountInfo | Select-String -Pattern "name=telefon id=telefon") -split "value=`"")[1] -split "`"/>")[0]

And finally, we create an object for it and send it to the pipeline:

$returnObject = New-Object System.Object
$returnObject | Add-Member -Type NoteProperty -Name Username -Value $Username
$returnObject | Add-Member -Type NoteProperty -Name Name -Value $AccountHolderName
$returnObject | Add-Member -Type NoteProperty -Name Email -Value $AccountHolderMail
$returnObject | Add-Member -Type NoteProperty -Name Address -Value $AccountHolderStreet
$returnObject | Add-Member -Type NoteProperty -Name PostalCode -Value $AccountHolderPostalCode
$returnObject | Add-Member -Type NoteProperty -Name Phone -Value $AccountHolderPhone

Write-Output $returnObject

So far so good, time to wrap this up in a function, we've already looked at that in the last post, so I'll just add the complete code here:

function Get-MyOnlinePizzaAccountInfo
{
    [cmdletbinding()]
    param()

    BEGIN {
        if ($OnlinePizzaSession -eq $null) {
            Write-Error "You must first connect using the Connect-OnlinePizza cmdlet"
            break
        }
    }

    PROCESS {

        Invoke-WebRequest -Uri "http://onlinepizza.se/?view=andraKonto" -Method Get -WebSession $Global:OnlinePizzaSession -OutFile .\dump.htm

        $AccountInfo = Get-Content .\dump.htm -Encoding UTF8

        Remove-Item .\dump.htm -Force -Confirm:$false -ErrorAction SilentlyContinue

        $Username = ((($AccountInfo | Select-String -Pattern "name=username id=username") -split "value=`"")[1] -split "`" />")[0]
        $AccountHolderName = ((($AccountInfo | Select-String -Pattern "name=namn id=namn") -split "value=`"")[1] -split "`"/>")[0]
        $AccountHolderMail = ((($AccountInfo | Select-String -Pattern "name=epost id=epost") -split "value=`"")[1] -split "`"/>")[0]
        $AccountHolderStreet = ((($AccountInfo | Select-String -Pattern "name=adress1 id=adress1") -split "value=`"")[1] -split "`"/>")[0]
        $AccountHolderPostalCode = ((($AccountInfo | Select-String -Pattern "name=postnummer id=postnummer") -split "value=`"")[1] -split "`"/>")[0]
        $AccountHolderPhone = ((($AccountInfo | Select-String -Pattern "name=telefon id=telefon") -split "value=`"")[1] -split "`"/>")[0]

        $returnObject = New-Object System.Object
        $returnObject | Add-Member -Type NoteProperty -Name Username -Value $Username
        $returnObject | Add-Member -Type NoteProperty -Name Name -Value $AccountHolderName
        $returnObject | Add-Member -Type NoteProperty -Name Email -Value $AccountHolderMail
        $returnObject | Add-Member -Type NoteProperty -Name Address -Value $AccountHolderStreet
        $returnObject | Add-Member -Type NoteProperty -Name PostalCode -Value $AccountHolderPostalCode
        $returnObject | Add-Member -Type NoteProperty -Name Phone -Value $AccountHolderPhone

        Write-Output $returnObject

    }

    END { }
}

Take a look at line 7 through 10, here we check if there is a variable called "$OnlinePizzaSession" available, if not, the user running this function probably didn't run the "Connect-OnlinePizza"-function, and this function won't work. Therefor, we write an error and exit the function. This is a pretty good method to ensure that the functions are used correctly.

So, finally time for our last function!

Get-PizzaRestaurant
Most parts of this function will be created more or less in the exact same way as the last one, so I'll just go through the differences.

First of all, we want these cmdlets to work together in a good way to give them that "module"-feeling 🙂

One way of doing that is to add pipeline support, but how?

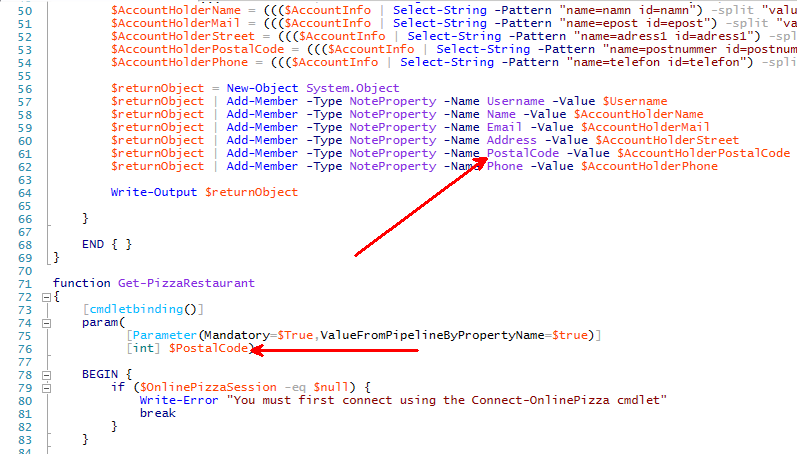
Well, this function will return a list of restaurants based on our location, and the location is based on our postal code (zip code). If you check our last function we actually return a property value called "PostalCode" which would be perfect for pipelining, and it's really easy to do!

All we need is "ValueFromPipelineByPropertyName=$true" when declaring the parameter, like this:

    param(
          [Parameter(Mandatory=$True,ValueFromPipelineByPropertyName=$true)]
          [int] $PostalCode)

And we need to verify that the property in object we output match the parameter name:
pipeline_pizza

Also, as you can see, we are declaring the parameter data type as an int, this way, no one will give as a postal code with spaces in it. If we want to, we could also validate that it really is a postal code, but again, this guide is not as much about writing advanced functions in general but has more to do with web scraping, so we'll just let it be.

Let's look at the rest of this function:

function Get-PizzaRestaurant
{
    [cmdletbinding()]
    param(
          [Parameter(Mandatory=$True,ValueFromPipelineByPropertyName=$true)]
          [int] $PostalCode)

    BEGIN {
        if ($OnlinePizzaSession -eq $null) {
            Write-Error "You must first connect using the Connect-OnlinePizza cmdlet"
            break
        }
    }

    PROCESS {

        Invoke-WebRequest -Uri "http://onlinepizza.se/postnummer/$PostalCode" -Method Get -WebSession $Global:OnlinePizzaSession -OutFile .\dump.htm

        $ResturantList = ((Get-Content .\dump.htm) -join "`n") -split "<UL>" | select -Skip 1

        Remove-Item .\dump.htm -Force -Confirm:$false -ErrorAction SilentlyContinue

        foreach ($Restaurant in $ResturantList) {

            $RestaurantName = (($Restaurant -split "<h4>")[1] -split "</h4>")[0]

            if ($RestaurantName -eq '') {
                Continue
            }

            $RestaurantStreet = (($Restaurant -split "<address>")[1] -split "</address>")[0]
            $OpeningHoursDelivery = ((($Restaurant -split "Utkörning:</strong><br />")[1] -split "<br />")[0]).Trim()
            $OpeningHoursTakeAway = ((($Restaurant -split "Avhämtning:</strong><br />")[1] -split "<br />")[0]).Trim()
            $RestaurantLink = ((($Restaurant -split "meny")[0] -split "href=`"")[1] -split "`"")[0]

            $returnObject = New-Object System.Object
            $returnObject | Add-Member -Type NoteProperty -Name RestaurantName -Value $RestaurantName
            $returnObject | Add-Member -Type NoteProperty -Name RestaurantStreet -Value $RestaurantStreet
            $returnObject | Add-Member -Type NoteProperty -Name OpeningHoursDelivery -Value $OpeningHoursDelivery
            $returnObject | Add-Member -Type NoteProperty -Name OpeningHoursTakeAway -Value $OpeningHoursTakeAway
            $returnObject | Add-Member -Type NoteProperty -Name RestaurantLink -Value $RestaurantLink

            Write-Output $returnObject

            Remove-Variable RestaurantName, RestaurantStreet, OpeningHoursDelivery, OpeningHoursTakeAway, RestaurantLink -ErrorAction SilentlyContinue
        }
    }

    END { }
}

A few more comments might be needed here, if you look at line 19, we use the opposite of split, the join-operator. Why? Well, when looking at the html-code of the site the information is spanning over multiple lines, by joining on linefeeds (`n = linefeed) we can get all the information for each restaurant as "one part" instead of multiple lines, which helps a lot!

Also, at line 32 and 33, we call a method called Trim(), this method removes all leading and trailing white-space characters from the string we're working on.

Finally, at line 45 we remove all the variables to prevent them from being "reused" on the next iteration of the loop if the next restaurants data is different or missing. Clear-Variable would work perfectly here aswell.

And that's it!

Result
We have now created functions to connect to a site, utilize functions that are only available when logged in and we have also made the functions work together in a nice way.

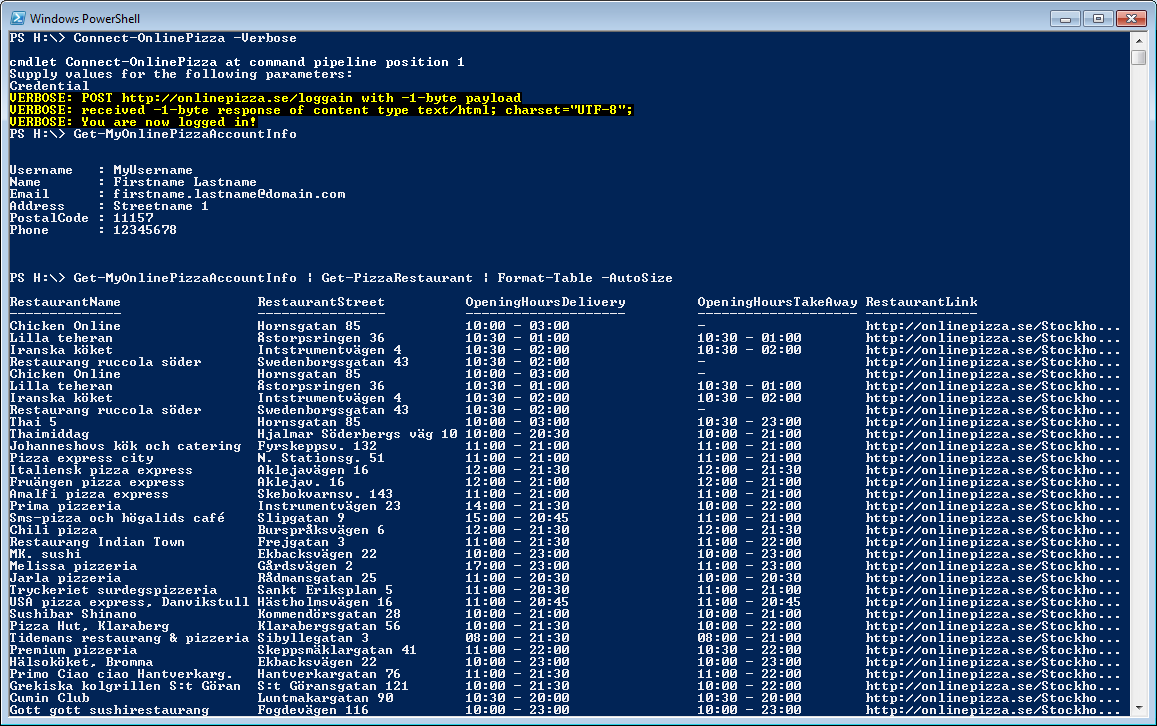
This is how they look in action:
finally

Pretty neat, huh? 🙂

The code for all of these functions have been uploaded here.

I hope you enjoyed this little guide, and if you have any questions, feel free to ask them in the comments or drop me an e-mail!

And keep automating anything 🙂

Ordering pizza with PowerShell (web scraping guide) – Part 1

Since I’ve gotten some positive feedback regarding the web scrape related posts on this blog, I thought I should write a guide on how to build PowerShell functions that interacts with a website. To make it a bit more fun, I thought it should be about ordering pizza!

The site in question is a Swedish site called OnlinePizza.

Since the actual code won’t be used for anything serious, you will see a few shortcuts here and there, the goal is to give you an idea on how to do something similar, not to create the perfect pizza automation module. In fact, we’ll only create a few functions, one for logging in, one for checking our account information and one for listing restaurants. Hopefully, the process and steps we will go through when creating these functions will teach you the basics of web scraping. To create a whole module that can handle the complete process of ordering pizzas seems a bit overkill, but feel free to keep working on it if you want to 🙂

So with no further ado, let’s get to it…

Figuring out how the site works and logging in
The first thing we need to do is figuring out how to log in. The easiest way to do this is to open a web browser with some developer features, since I’ve used Chrome before I thought I could use Internet Explorer in this example.

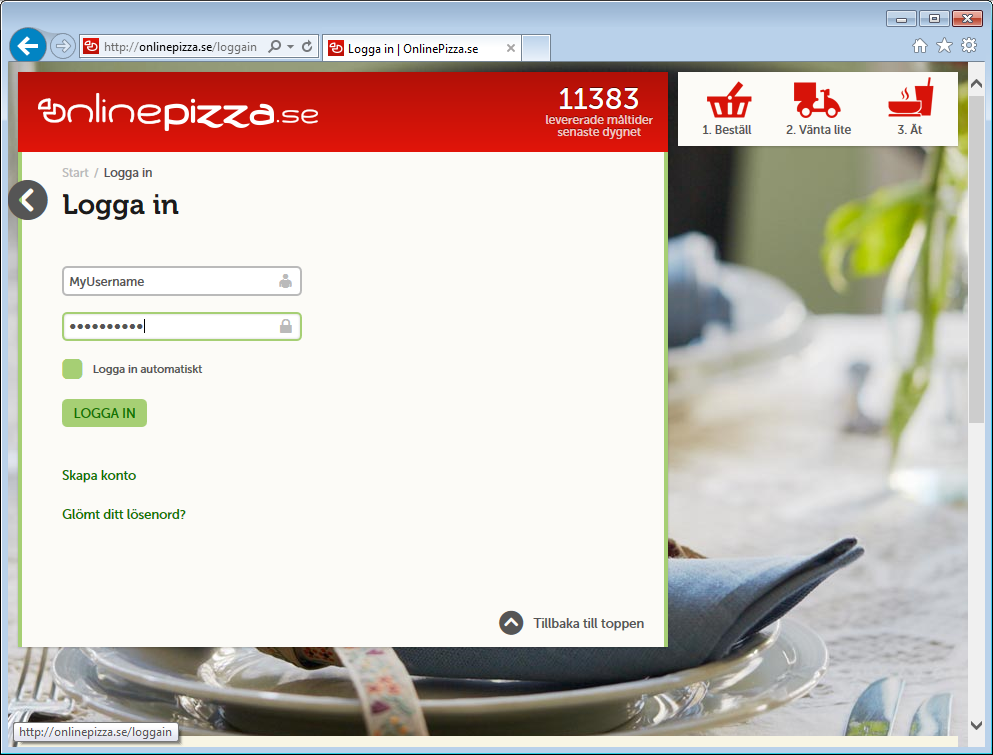
Begin with locating the loginpage for the site, which in this example is: http://onlinepizza.se/loggain as shown below:
press_login
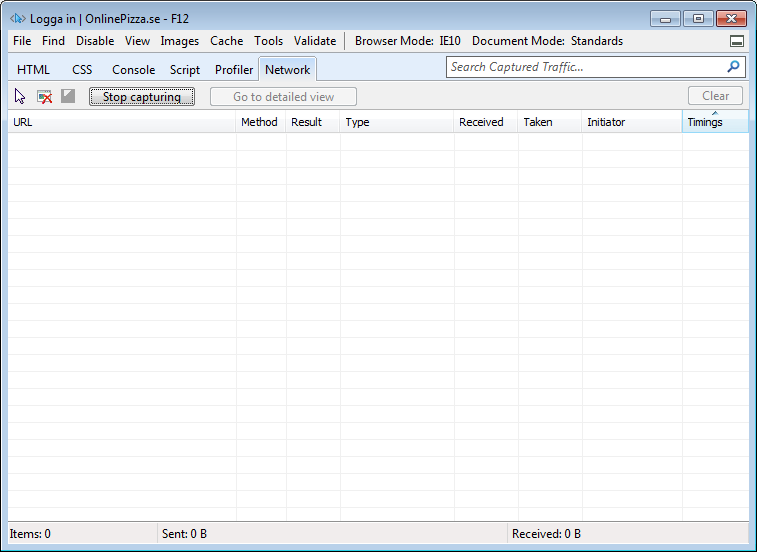
After you’ve browsed to that page and filled in your username/password, you press F12 (Ctrl+Shift+i if you’re using Chrome) and select the “Network”-tab and press the “Start capturing”-button.

Should look something like this if using IE:
network_capture_started

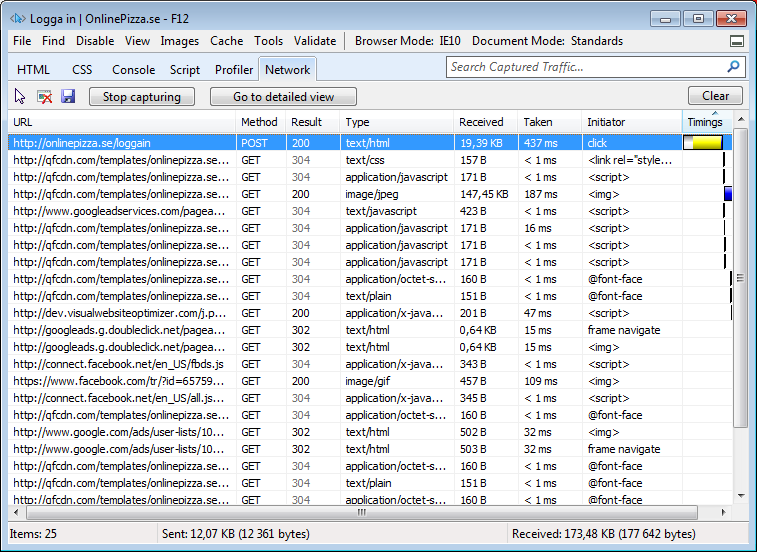
Go back to the site and press the “login” button (“Logga in” in Swedish), and when it’s done, go back to the “network”-tab again and check the first request which is usually a Get or a Post request, in this case a Post-request:
login_pressed

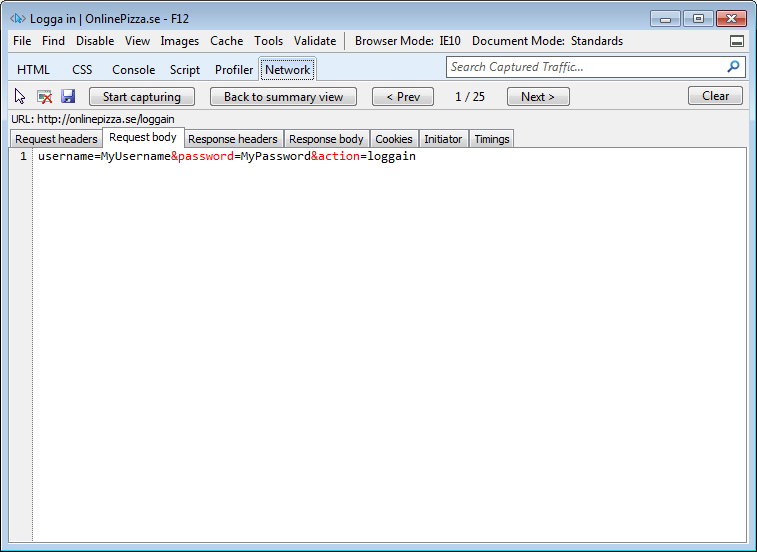
Double click on the first row and select the “Request body”-tab. This is how the webrequest looked when it got sent to the webserver, so this is what we need to mimic from PowerShell:

login_post

This can be done in different ways, you could either basically download the site, try to manipulate the fields and then post the form, or create a hashtable with the required keys (username, password and action) and send that. The later is quickest since it only needs one request, so that’s what we’ll do here (this might not always work though).

To create the hashtable you can do this:

$Request = @{'username' = 'MyUsername'
             'password'= 'MyPassword'
             'action'= 'loggain'}

We now need to send it to the web server. The easiest way to do this is usually to use the “Invoke-WebRequest”-cmdlet that came with PowerShell v3, so that’s what we’ll do here. There are a few scenarios where this will give you issues, as is the case with this site, so we’ll need to use a workaround. When trying to download the site with the “Invoke-WebRequest”-cmdlet it will give you the error: “Invoke-WebRequest : ‘”UTF-8″‘ is not a supported encoding name.”

This leaves you two options as far as I know, you either skip the “Invoke-WebRequest”-cmdlet altogether and use the .Net WebClient Class instead, or you can fix this error by sending the output of the cmdlet to a file instead of the pipeline. We’ll do the latter here and save the .Net-method for another post.

Note: As stated above, this is mostly to give you and idea on how to create a “web scraping function” in PowerShell so we’ll do a few shortcuts. If this was a to become a serious module that would later be used in production, make sure the output-file is written to a place where the user will have write access and that it has a name that won’t damage (overwrite) anything.

The command itself is pretty simple, it looks like this:

Invoke-WebRequest -Uri "https://onlinepizza.se/loggain" -Method Post -Body $Request -SessionVariable Global:OnlinePizzaSession -OutFile .\dump.htm

I’ll break it down a bit so you’ll know what each parameter does:

  1. Uri – This specifies where to send the request. This should be the URL you saw in the screenshot of the “Request body” above, this can differ from the actual loginpage depending on the site.
  2. Method – This should match the method you saw in the loginrequest, in this case it was a “Post”-request.
  3. Body – This is what the request will actually contain, in our case the hashtable we created.
  4. SessionVariable – The variable we specify here (no leading $!) will contain cookies and other data needed to keep the session consistent through the rest of the commands we will run (this will for example keep us logged in). I’ve specified it in the “Global” scope since we want to use it together with other functions later on, and to make that work, it can’t be in the functions scope (since that will be gone before the next function will execute).
  5. OutFile – Our workaround. Specify a file where the output from the command (the html of the site) should be saved.

Alright, so the request is sent and we should now be logged in, you can verify this by looking in the “dump.htm”-file, it will usually contain a “You have been logged in!”-message of some sort. In this case that message is in Swedish though.

So, we have figured out how to log in, we now need to wrap a function around this, which will be our next step in this process!

Creating the function
To create this function we need to ask for a parameter, the only one we need in this case is the credential, which should be of the type PSCredential.

The code for defining the function name and the parameter looks like this:

function Connect-OnlinePizza
{
    [cmdletbinding()]
    param(
          [Parameter(Mandatory=$True)]
          [System.Management.Automation.PSCredential] $Credential)

As you can see, we also add the almost magical “cmdletbinding”-keyword aswell to get all the wonderful features that gives us. We also state the Credential-parameter as mandatory, and we define its data type, which will make the function ask for the credential in the same way as “Get-Credential” works if the user didn’t specify any.

We now need to place the credential in our request, which we can do this way:

$Username = $Credential.UserName
$Password = $Credential.GetNetworkCredential().Password

$Request = @{'username' = $Username
             'password'= $Password
             'action'= 'loggain'}

We then add our “Invoke-WebRequest”-command again:

Invoke-WebRequest -Uri "https://onlinepizza.se/loggain" -Method Post -Body $Request -SessionVariable Global:OnlinePizzaSession -OutFile .\dump.htm

And we should be logged in. When building something like this we should make sure though. This can easily be done by looking for that “You have been logged in!”-text in the dump.htm-file, for example with the “Select-String”-cmdlet.

And while we’re at it, why not delete the dump.htm-file to clean up a bit. That would look like:

$LoggedIn = Select-String -Path .\dump.htm -Pattern "inloggad som $Username" -Quiet

Remove-Item .\dump.htm -Force -Confirm:$false -ErrorAction SilentlyContinue

if ($LoggedIn) {
    Write-Verbose "You are now logged in!"
}
else {
    Write-Error "Login failed!"
}

And that’s it! When put together, the code looks like this:

function Connect-OnlinePizza
{
    [cmdletbinding()]
    param(
          [Parameter(Mandatory=$True)]
          [System.Management.Automation.PSCredential] $Credential)

    $Username = $Credential.UserName
    $Password = $Credential.GetNetworkCredential().Password

    $Request = @{'username' = $Username
                 'password'= $Password
                 'action'= 'loggain'}

    Invoke-WebRequest -Uri "https://onlinepizza.se/loggain" -Method Post -Body $Request -SessionVariable Global:OnlinePizzaSession -OutFile .\dump.htm

    $LoggedIn = Select-String -Path .\dump.htm -Pattern "inloggad som $Username" -Quiet

    Remove-Item .\dump.htm -Force -Confirm:$false -ErrorAction SilentlyContinue

    if ($LoggedIn) {
        Write-Verbose "You are now logged in!"
    }
    else {
        Write-Error "Login failed!"
    }
}

And this is how it looks in action:
Connect-OnlinePizza_screenshot

That’s it for this post. In the next one, we’ll create the function for fetching our account information and one for getting a list of what restaurants are available in our location.

Export nested group structures with PowerShell

I got a request the other day for a script that can export members of nested Active Directory groups.

They wanted the export to be more or less in the same format as a file structure.

The results are therefor returned as strings in the following format:
Group \ SubGroup1 \ SubGroup2 \ User1 (SamAccountName)
Group \ SubGroup1 \ SubGroup2 \ User2 (SamAccountName)
Group \ SubGroup1 \ SubGroup2 \ User3 (SamAccountName)

and so on. I thought that someone else might try to achieve a similiar task so I uploaded the code here.

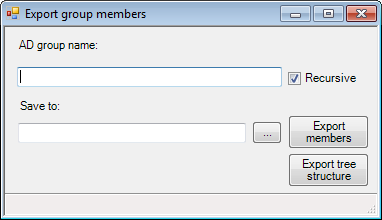
Also, I wrote a quick and simple GUI for this, which is available here, it looks like this:

exportadgroupmembers

The form makes it simpler for end users to use.

Both requires the Active Directory module and the GUI requires PowerShell v.3 or higher.