Category Archives: PowerShell

Hacking multimedia equipment with PowerShell

I just started on a new part of my home automation project, controlling my receiver (Onkyo TX-NR616).

I thought that this might be a good opportunity to do a “walk-through” on how to create a script for something that clearly was not meant to be controlled with PowerShell, in this case a surround receiver.

The basic methods and principles used here should be applicable to more or less anything you want to automate and I hope someone might find it useful!

Small disclaimer:
I take no responsibility in how you use the information in this post, make sure you know what you are doing! Even though any damage to a receiver or other equipment should be unlikely, I wont give you any guarantees…

So… The steps involved are basically:

  1. Figure out how the item (website, device, software…) is controlled. Does it have a documented API? Is it using REST? Website? Mobile app?
  2. Figure out how to utilize this with PowerShell. If it is a REST-based API, you are lucky, websites or webservices are also highly automatable (always check ToS before doing it though…), if it has a mobile app or similar, it most definitely is using some sort of API which may or may not be easy to figure out.
  3. I usually build a simple script to start doing some testing. Once I figured out how the API works, I turn that into an advanced function.
  4. Enjoy doing yet another thing with the blue console of wonder!

I will now try to describe how I used this basic approach to control my receiver!


So, how is it controlled?

In this case, I knew there was a mobile app available, and therefore, there must be some kind of API. After some research I found out that they are using something called “Integra Serial Communication Protocol”, or eISCP as it is called when used over an ethernet connection.

After some “intense googling” I found some documentation of this protocol at http://blog.siewert.net/?p=37.

Now we know it has an API and we can figure out how it works!

But what if we didn’t have any documentation? Or if we just want to use a few commands (like power on/off), do we really need to learn the complete documentation?

That depends, sometimes you can just “copy -> paste” the commands from a trace. That will be described under the next part of this post; “Using a network trace”.


Using a network trace
Documentation obviously helps a lot, but if we pretend there was none available, should you just give up? Of course not! 🙂

One approach if that is the case is to basically just sniff the network traffic. You can do this with whatever tool you prefer, two free examples are Wireshark and Microsoft Network Monitor.

If you can find a windows application for the device, that helps since you can just sniff your local network traffic. Another alternative if you want to stick to a windows computer but all you can find to control your devices is a mobile app, you could try to run routing and remote access (or internet connection sharing) to just make the traffic go through your PC, which then acts as a router. After that, your network analyzer/sniffer should pick up the traffic, which hopefully will not be encrypted (there are ways of solving that too, but we’ll stick to the simpler scenarios here…).

When you got this ready, just start your sniffer and your application used to control your device, and record whatever command you want to be able to automate.

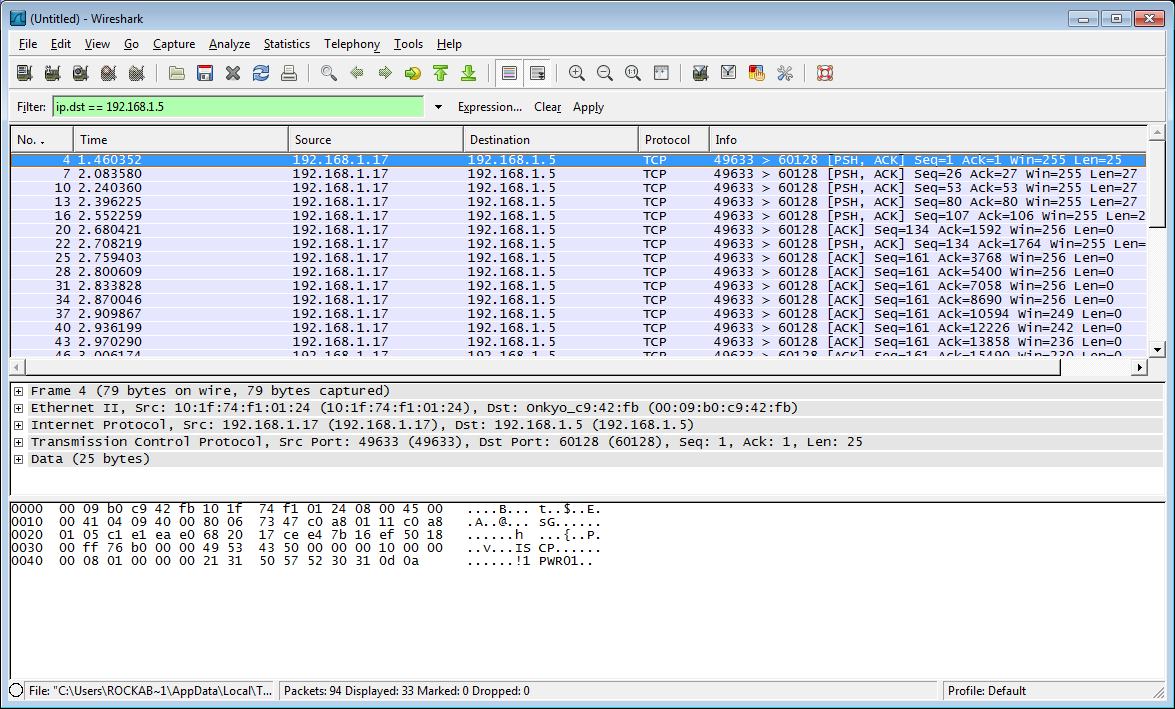
This is a screenshot of a Wireshark trace recording a “power on” command sent to the Onkyo receiver:

wireshark_capture

Right click the first package sent to receiver and choose “follow TCP stream”. That makes it a bit easier to see what is happening, it looks like this:
follow_trace

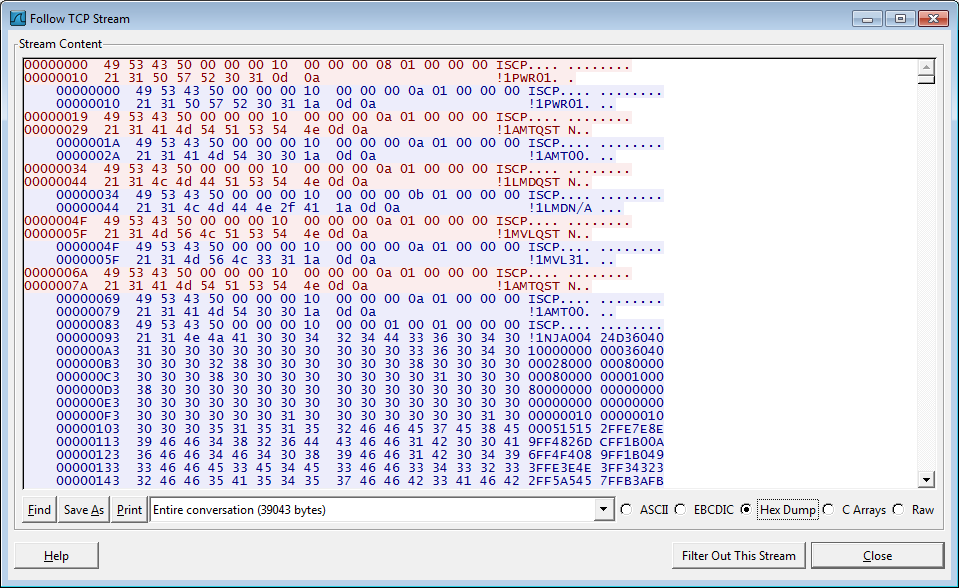
The colouring makes it easier to see what gets sent to the receiver and what gets sent back, the first command (light red colouring above) shows what the app sent to turn on the receiver, the dots just represent “non printable characters”, so the command looks somewhat like “ISCP !1PWR01” which does seem like a “power on” command!

Now select “C Arrays” instead of Hex Dump, select the package you want and copy the text, like this:

follow_trace_c_arrays

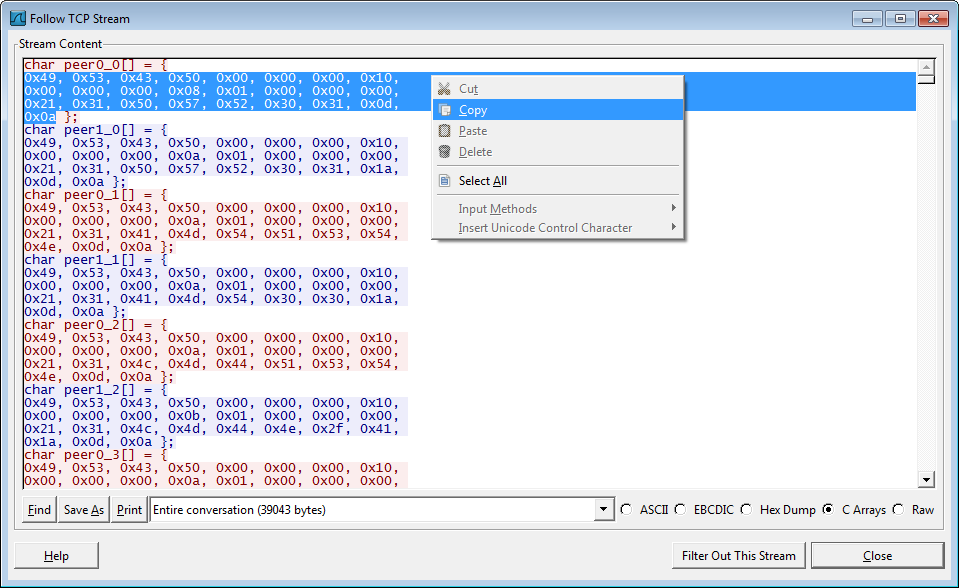
You now have the whole command needed to turn the device on! Since what you will be sending is byte arrays and not HEX, you need to convert the HEX to Bytes instead. To do this, open a PowerShell prompt, paste the text you copied, add a pipe and write “% { [BYTE]$_ }”, press enter two times and they are converted! Should look like this:
convert_to_bytes

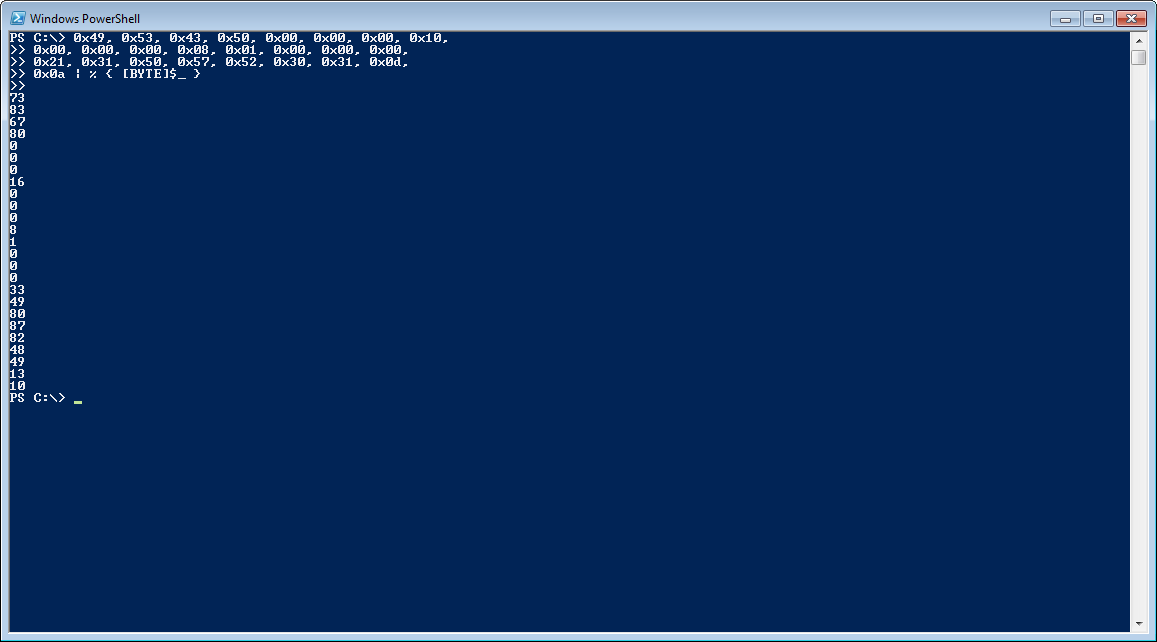
Those bytes are what you need to send using the Send-method of System.Net.Sockets.Socket. More on that follows under the next part of this post!


Sending TCP streams with PowerShell
We now know what we should send, but how?
There are many examples around on how to do this, I will post one that at least I thought was fairly straight forward.

The code looks like this: (Credit to this thread for getting me started!)

# First we need to specify the port and IP-address to device. Both are visible in the wireshark trace above
[int] $Port = 60128
$DeviceAddress = [system.net.IPAddress]::Parse("192.168.1.5")

# Create the IP Endpoint
$Endpoint = New-Object System.Net.IPEndPoint $DeviceAddress, $Port

# Create a socket
$Saddrf = [System.Net.Sockets.AddressFamily]::InterNetwork
$Stype = [System.Net.Sockets.SocketType]::Stream
$Ptype = [System.Net.Sockets.ProtocolType]::TCP
$Socket = New-Object System.Net.Sockets.Socket $saddrf, $stype, $ptype
$Socket.TTL = 32

# Connect the socket to the endpoint
$Socket.Connect($Endpoint)

# Create the byte array
[Byte[]] $ByteArray = 73,83,67,80,0,0,0,16,0,0,0,8,1,0,0,0,33,49,80,87,82,48,49,13,10

# And send it!
$Sent = $Socket.Send($ByteArray)

And the receiver turns on! This code lacks quite a lot, like a method of reading the reply, closing the socket, error handling etc., but it will hopefully give you an idea on how to tackle something like this! If you want something slightly more polished, check the last part of this post…

But I want to do a lot of different things, not just turn it on/off!
I will fix a module for controlling Onkyo receivers as soon as I get more time, in the meantime I have made a “quick and dirty” advanced function that allows you to add the command to a parameter. To give you an idea:
example_of_cmdlet

If you look in the documentation I linked to above, you will probably figure out the commands for more or less anything. I have tested this on my receiver to for example use Spotify, change volume, change inputs and so on…

The module will probably include something like this function to enable a wider range of commands, but will also have cmdlets prepared for powering on, selecting different inputs (including subcategories under “Network”).

This function should just be considered an example on how you can do something like this with PowerShell, and was made since most of you might not be using Onkyo-receivers but still would like some sample code.

The code is available here.

Checking the weather with PowerShell

As a part of my home automation project I wanted to be able to check the weather, and since I’m trying to do as many parts of the automation as possible with PowerShell, I needed to write a cmdlet for this. But where to get the data?

I was very happy to find out that the Swedish Meteorological and Hydrological Institute (SMHI) actually has a published API, open and free to use!

The API is very simple, after you send a request with longitude and latitude it sends back a json-object with weather data for that location (tagged with the location of the closest weather station used for the report) for up to 10 days.

Note: As a visitor pointed out in the comments, SMHI does not have weather data for all countries, I’ve tested a couple of locations in Europe which seems to work fine though. You will get a “error 400 bad request” error if the location is out of scope.

The cmdlet does some small changes to the returned object (expands a few properties and changes some shortnames to something that is easier to understand, converting some values to percentages and so on…) and returns each forecast as a separate object. The forecasts can cover anything from 1 hour to a day or so, so make sure you check the start/end dates.

This is how Get-SMHIWeatherData looks in action:
SMHIWeather

The code for this cmdlet is available here. (Updated 2016-10-24)

Home Automation Module Updated

The home automation module for the Tellstick Net is now updated.

The main difference is that some executing cmdlets dont generate output if you dont use “-Verbose” and that authentication is set up by the “Connect-TelldusLive”-cmdlet (Which uses a PSCredential). That means that the Username and Password parameters are removed from all other cmdlets. This makes the usage a lot simpler and also a lot quicker.

A screenshot to get you an idea on how to use it: (Device names are in Swedish, sorry…)
telldusmodule

This module is now published at the PowerShell Gallery. You can get the latest version at this link.

Set permissions on properties in Active Directory (Write Members in ACL) (Shared mailbox management)

This was one of the trickier tasks to accomplish. The first steps in creating the shared mailbox is not hard, just create the user (disabled) and groups (access group and owner group). But to delegate control of one the groups to the other is another thing. (setting the ManagedBy-attribute is not enough, you need the user(s) to be able to update the membership list aswell. In the GUI this setting is called “Manager can update membership list” which is a tickbox that actually just sets the “write” permission on the “Members” property.

I wrote a function for doing this, which is far from complete, but since it works well for us I thought I should share it.

The usual disclaimer is needed here:
Please make sure you test this before running it production! I have only tested this code for setting the write permission (allow/deny) on the Members property on Groups, nothing else!

When I get the time I will try to expand this to setting access rights on OUs etc. aswell, which would make automated delegation a lot easier. (And pipeline support etc…)

In the meantime, just take it for what it is 🙂

An example on how to use the function is:

Add-ADGroupPropertyPermission -ADObject TheMailboxAccessGroup -MasterObject TheMailboxOwnerGroup -AccessRight WriteProperty -AccessRule Allow -Property Member

And you are done!

The code is available here.

Shared Mailbox Management – Automated!

This can be quite hard in a large organisation. It’s one thing to migrate the ACLs to Office 365 one time, it’s another thing to keep them updated.

At least I was kind of lost on how to tackle this problem in the beginning.

This is probably not the perfect solution, but it saves us a lot of time!

Short version (everything in the list below is done by powershell):

  1.  The shared mailbox user account gets created by a powershell script that reads the output of the order form (which currently gets approved/created by helpdesk).
  2.  An access group gets created
  3.  An owner group gets created
  4.  The ACLs of the access group is changed so the owner group has access to change it’s members, and the “Managed By”-attribute is set.
  5. The owner group becomes a member of another group, which gives access to a powershell form published in our Citrix-farm. This form is used for managing the membership of the mailbox access group.
  6. The owner (typically the person who ordered the mailbox) gets added to Owner-group and Access-group.
  7.  Another script looks for new access groups and shared mailboxes, finds it in Exchange Online/Azure, creates the shared mailbox and assigns the “Full Access/Send As”-rights to the “access group”.
  8. All the ACLs are verified to make sure everything went according to plan.
  9. If everything has been done correctly, an e-mail gets sent to the members of the “owner-group” with a link to a guide explaining where to find the Citrix app (PowerShell form), how to add the new mailbox in outlook etc….

The PowerShell-form, when started by a user, finds all the “Owner-groups” the current user is a member of and lists the corresponding mailboxes in a droplist. When a mailbox is selected, it lists the members and allows the user to add new ones and remove current ones.

You search by entering a Name, E-mailaddress or SamAccountName, the search goes off “in real time” (OnChange), no search button.

Here’s a screenshot of the form when started:

mbx-management

This is how it looks when a mailbox is selected: (sorry for all the blurring…)

MBXInAction

This allows any user to manage their own mailbox in an easy and userfriendly way, and they dont need to contact helpdesk everytime someone else needs access to the mailbox, or needs to be removed.

And that’s it! 🙂

I will try to do some blog posts on the steps involved in this process, at least those who were kind of tricky to achieve. (Setting ACLs in AD was not as straightforward as I thought…)

Any code that I think is applicable for someone else will of course be published!

Stay tuned!

Office 365 PowerShell Toolbox – Oneliners to rule them all!

In this post, I will try to add some of the commands you need for managing Office 365, and some code snipets to do pre-migration checks and so on.

I will edit this post and keep adding things to keep them in one place.

Connecting to MSOL/Exchange Online

To connect to MSOL you simple run:

Connect-MsolService

To connect to Exchange Online:

$UserCredential = Get-Credential

$Session = New-PSSession -ConfigurationName Microsoft.Exchange -ConnectionUri https://ps.outlook.com/powershell/ -Credential $UserCredential -Authentication Basic -Allow

Import-PSSession $Session

If you you are behind a proxy-server, you might need to add some session options. Like this (if you configured proxy in IE):

$proxysettings = New-PSSessionOption -ProxyAccessType IEConfig
$Session = New-PSSession -ConfigurationName Microsoft.Exchange -ConnectionUri https://ps.outlook.com/powershell -Credential $UserCredential -Authentication Basic -Allow -SessionOption $proxysettings

To save your credentials to be used in an automated script, you can do this:

# Get the credential into a variable
$MyCredential = Get-Credential

# Convert the password to an encrypted string and save to file
$MyCredential.Password | ConvertFrom-SecureString | Out-File .\Password.txt

# To load the credential...

# Set your username
$User = "[email protected]"

# Get the password from the file
$Password = Get-Content .\Password.txt | ConvertTo-SecureString

# Build the credential
$O365Credential = New-Object System.Management.Automation.PsCredential($User,$Password)

That credential can now be used togheter with the Connect-MsolService/New-PSSession cmdlets.

List all users and their AccountSkuId/License
This might sound easy, but the “Get-MsolUser”-cmdlet is returning an advanced object which makes it a bit difficult to export to for example a csv-file.

But if you use the Select-Object-cmdlet togheter with an expression you will get the job done!

You could to something like this to expand the AccountSkuId for all your users:

Get-MsolUser -All | Select-Object UserPrincipalName, @{Name="License" ; Expression={ ($_ | select -ExpandProperty Licenses | select -ExpandProperty AccountSkuId ) } }

Just pipe that to for example Export-Csv to save the information on disk.

Duplicates in forwarding address

If you have multiple smtp-domains, you might run into a problem with duplicates if you only have one *.onmicrosoft.com domain (simpler than creating multiple ones). Want to see if this is a problem in your domain?

This is one way of doing it:

$Duplicates=Get-ADUser -Filter * | Group-Object { ($_.UserPrincipalName -split "@")[0] } | Where-Object Count -gt 1

$Duplicates now contains all of the users that will be a problem if you only have one “forwarding domain”. There are many options to solve this, forward to something else (AccountName or similiar), add a part of the maildomain left of the @-sign etc…

Managing Mobile Devices

To add a device for a user:

Set-CASMailbox -Identity '[email protected]' -ActiveSyncAllowedDeviceIDs ($MyArrayWithDeviceIDs)

To get all device id’s associated with a user:

Get-CASMailbox -Identity '[email protected]' | select -ExpandProperty ActiveSyncAllowedDeviceIDs

Clear all allowed devices:

Set-CASMailbox -Identity '[email protected]' -ActiveSyncAllowedDeviceIDs $null

Setting a license

To give a user a license you could do something like this:

# Create the license options (if you need to disable some plans)
$LicenseOptions = New-MsolLicenseOptions -AccountSkuId $AccountSkuId -DisabledPlans $DisabledPlans

# Set the country (two letter "code")
Set-MsolUser -UserPrincipalName $UserAccount -UsageLocation $UsageLocation

# Set the license
Set-MsolUserLicense -UserPrincipalName $UserAccount -AddLicenses $AccountSkuId -LicenseOptions $LicenseOptions

# If you don't need to disable anything just use this instead of the above:
Set-MsolUserLicense -UserPrincipalName $UserAccount -AddLicenses $AccountSkuId

Creating Shared Mailboxes
To create a shared mailbox, you first have to give it a temporary license to create the mailbox (see above), then set it to shared, remove the license and add the permissions that are needed.

If the mailbox has a license you could do something like this:

# Set it to shared (mailbox need to exist first, so set a license, wait, and then try this)
Set-Mailbox '[email protected]' -Type Shared -ProhibitSendReceiveQuota 5GB -ProhibitSendQuota 4.75GB -IssueWarningQuota 4.5GB

# Set full access permissions
Add-MailboxPermission '[email protected]' -User 'GroupOrUserName' -AccessRights FullAccess -Confirm:$false

# Set 'SendAs' permission if needed
Add-RecipientPermission '[email protected]' -Trustee 'GroupOrUserName' -AccessRights SendAs -Confirm:$false

# Remove the license
Set-MsolUserLicense -UserPrincipalName '[email protected]' -RemoveLicenses $AccountSkuId

Change UPN of a licensed user
If the user UPN prefix (left of @) changes, DirSync will fix it automatically, if the domain part change, you need to run a few commands to change it.

The overall process is to change it in the On-Prem AD, change it in Azure to your “*.onmicrosoft.com”-domain, and then change it to the new domain.

Example, we need to change John Doe’s smtp domain from “contoso.com” to “contoso2.com”:


# Set the new UPN in Active Directory
Set-Aduser -identity JohnDoe -UserPrincipalName '[email protected]'

# Change the UPN in Azure to a temporary one
Set-MsolUserPrincipalName -UserPrincipalName '[email protected]' -NewUserPrincipalName '[email protected]'

# Change it to the new one
Set-MsolUserPrincipalName -UserPrincipalName '[email protected]' -NewUserPrincipalName '[email protected]'

Run a DirSync and you are done!

Add a Room
To add a room mailbox and set it to auto-accept a booking (if the time slot is free), and make it possible for your users to book it a year ahead (for example) you do the following:


# Create the room (with seats for 20 people)
New-Mailbox -Name "ConferenceRoom1" -DisplayName "Conference Room 1" -PrimarySmtpAddress "[email protected]" -Office "Contoso HQ" -ResourceCapacity 20 -Room

# Make it accept invitations if the time slot is free, 
Set-CalendarProcessing "ConferenceRoom1" -AutomateProcessing AutoAccept -BookingWindowInDays 365

If you run Outlook 2010 or newer (or the OWA) you most certainly want to create a roomlist. The users can then pick that list and see all available rooms right away. You might want to name it after the Office location or similar.

To add a room list and add a room to that list you do the following:


# Add the room list
New-DistributionGroup -Name "ContosoHQ-Rooms" -DisplayName "Contoso HQ" –PrimarySmtpAddress "[email protected]" –RoomList

# Add a room to it
Add-DistributionGroupMember –Identity "ContosoHQ-Rooms" -Member "ConferenceRoom1"

You might need to update your offline address book before this works properly in Outlook, it should work pretty much instantly in the OWA.

Migrating from Lotus Notes to Office 365 – The PowerShell Saga

The last few months have been pretty intense, but we finally finished moving ~18000 mailboxes from Lotus Notes to Office 365. I went to the first startup meeting for the implementation part of the project in late September, and we finished most of the migration this week, which was pretty satisfying to say the least 🙂

It has been a long journey (done in a short timeframe), and a lot of things needed to be done in order for it to work.

Some of the obstacles we (and probably everyone who does a migration) needed to solve were:

  • Changing UPN’s on all the accounts to the users primary smtp address
  • Establish ADFS and DirSync
  • Changing certificates that were using the current UPN’s and therefor would be rendered invalid.
  • Import the ~8000 accounts that only existed in Domino and not in Active Directory and keep them synced.
  • Sync the other 10000 accounts that existed in both Domino and Active Directory
  • Migrate distribution lists
  • Migrate rooms
  • Migrate shared mailboxes with their access lists
  • Build forms to enable users to do some of the management themselves
  • Make sure mail flow works during the “hybrid” period
  • Migrating mobile device id’s allowed to sync through Active Sync
  • Provisioning of new accounts in Office 365 that work with our current processes
  • Automate all the common tasks (creating mailboxes, shared mailboxes, managing distribution lists, approving devices, managing licenses etc.)
  • And more… 🙂

Since a lot of people out there are probably doing, or will be doing, the same thing we did, I will try to do a couple of post on how we solved these tasks (at least those related to powershell), share some code and good cmdlets for managing everything from rooms to mobile devices,

Hopefully this will become a good repository for myself and for anyone out there facing the same challenge we did 🙂

Using Group-Object With Expressions

Some background
I dealt with the task of verifying all dns records in a server with ~50000 A-records. For every forward record, we wanted to check if that IP had a reverse lookup record that was pointing to the same hostname in the reverse zone, and log the results.

This was painfully slow and took hours using dns lookup with the .Net object or nslookup, and puts unnecessary load on the DNS Server. (not much, but still…)

So I decided to go with the option of downloading the zones and comparing them in memory to gain performance.

I won’t go through the process of downloading the dns zones and parsing them now (if you want me to, tell me!), but I just wanted to share something that I learned about the “Group-Object”-cmdlet. Because even when I did this locally in memory, the process of searching through arrays with ~50000 records was very slow, so I thought I could use multithreading to speed things up, and run every zone as a separate job simultaneously.

So how to do this?

Using the Where-Object cmdlet
One way of doing it is to simply find all the IPs in the array that start with a specific address. For example “10.10.”

That would look something like this:

$MyNetwork = $AllMyIPs | Where-Object { $_.IP -like '10.10.*' }

That command takes ~2,5 seconds to execute on my server, and you have to do it for every network you have (or at least for every thread you want to start). You want as small chunks as possible to speed up the search for reverse records later, but you don’t want the penalty of splitting the records up too many times.

So we are getting there… But we could do a lot better!

Using the Group-Object cmdlet With Expressions
The solution was simple, but I never thought of it before this. The Group-Object cmdlet can group things based on expressions!

To group the same array as above ($AllMyIPs, with the columns IP and Hostname), by “B-class networks”, well, two octets, you simply have to write:

$AllMyNetworks = $AllMyIPs | Group-Object { (($_.IP.Split(".")[0,1] -join ".") + ".") }

The above command takes ~3,5 seconds to execute, but now all the IPs will be grouped according to the first two octets. And you can easily loop through them and send them of with the “Start-Job” cmdlet to verify them.

How to access them? You could write something like:

$MyNetwork = $AllMyNetworks | Where-Object Name -like "10.10.*" | select -ExpandProperty Group

Which will take 5-10 milliseconds to execute depending on the network size.

Conclusion
That will save you a lot of time in the end! 🙂 I can now verify the 50000 records in about 15 minutes instead of many hours.

This is very useful for many other applications aswell, and something I’ve started to use a lot when working with huge arrays.

Another example is for grouping e-mailaddresses based on maildomain, it’s as simple as:

$AlotOfMailAddresses | Group-Object { ($_ -split "@")[1] }

I hope someone finds this useful!

Wake me up, when traffic calms down… (Home Automation)

Why do home automation with PowerShell?

There are certainly other solutions out there which are great, even excellent. For me personally, it’s mainly because it’s fun to be able to build parts of it by yourself, you learn a lot by doing it, but you can also base your tasks on almost any piece of information out there.

I’ll give you an example!

I’ve started to go to work after the traffic calms down in the morning, I have a pretty good idea of when this usually happens, but sometimes there is no traffic jams at all, and sometimes it’s completely hopeless.

Wouldn’t it be nice to be able to utilize live traffic information on the internet, and based on that trigger your wake up call? At least I thought so 🙂

First of all, try to find a provider for traffic information near you, and make sure you don’t break their ToS by fetching that information in a automatic way (ie. web scraping).

I won’t go into detail on how to build a webscrape-cmdlet right now, but I’ll show you how to use it when it’s done. (A guide to web scraping available here, here and here.)

This is the script I run every morning, I think the code comments will be enough to explain how it works:

# Import the Telldus module
Import-Module '.\Telldus.psm1'

# Import the Module containing your traffic parser
Import-Module '.\WebDataModule.psm1'

# Set your home and work address
$HomeAddress="Homeroad 1, MyTown"
$WorkAddress="Workaround 1, WorkTown"

# Set a max traveltime limit (in this case, in minutes)
[int] $TravelTimeLimit = 30

# I want it to be under this value for $NumberOfTimes consecutive times
[int] $NumberOfTimes = 3

# Make sure it does'nt get $True on first run
[int] $CurrentTravelTime = $TravelTimeLimit+1

# Reset variable to zero
[int] $NumberOfTimesVerifiedOK = 0

# Run until the traveltime limit has been passed enough times
while ($NumberOfTimesVerifiedOK -lt $NumberOfTimes) {
    
    # Reset variable
    $CurrentTravelTime = $null

    # Load new data, the "Get-Traffic"-cmdlet is my traffic parser
    [int] $CurrentTravelTime = Get-Traffic -FromAddress $HomeAddress -ToAddress $WorkAddress | select -ExpandProperty TravelTime

    # Check if it is below your traveltime limit, and that it is not $null (cmdlet failed)
    # Increase $NumberOfTimesVerifiedOK if it was ok, or reset to zero if it wasn't
    if ($CurrentTravelTime -ne $null -AND $CurrentTravelTime -lt $TravelTimeLimit) {
        $NumberOfTimesVerifiedOK++
    }
    else {
        $NumberOfTimesVerifiedOK = 0
    }

    # Write current status
    Write-Output "Traffic has been verified as OK $NumberOfTimesVerifiedOK consecutive times"

    # Pause for a while before checking again, 10 minutes or so...
    Start-Sleep -Seconds 600
}

# The while loop will exit when traveltime has been verified enough times.

# Write status
Write-Output "Initiating sunrise, current travel time to $WorkAddress is $CurrentTravelTime minutes, and has been below $TravelTimeLimit for $NumberOfTimes consecutive times."

# Time to initiate the "sunrise effect"

# Set the device id for the lamp you want to light up
$BedroomLampDeviceID="123456"

# Set start dimlevel
$SunriseDimlevel = 1

# Set how much it should increase everytime we "raise" it
$SunriseSteps = 5

# Set your Telldus credentials
$Username="[email protected]"
$Password="MySecretPassword"

# Kick off the "sunrise-loop"
while ($SunriseDimlevel -lt 255) {
    # Write some status
    Write-Output "Setting dimlevel to $SunriseDimlevel"

    # Set the new dimlevel
    Set-TDDimmer -Username $Username -Password $Password -DeviceID $BedroomLampDeviceID -Level $SunriseDimlevel

    # Sleep for a while (30 seconds makes the "sunrise" ~30 minutes long depending on your $SunriseSteps value)
    Start-Sleep -Seconds 30

    # Set the next dimlevel
    $SunriseDimlevel=$SunriseDimlevel+$SunriseSteps
}

# Set the lamp to full power (loop has exited) and exit
Set-TDDimmer -Username $Username -Password $Password -DeviceID $BedroomLampDeviceID -Level 255
Write-Output "Maximum level is set."

This script is scheduled to run in the morning (on week days) around the earliest time I want to go up, the first loop will run until traffic calms down, and then start the “sunrise”-loop which will run until the light reaches its maximum level (255).

You could of course turn on other stuff as well, like a coffee brewer (make sure you don’t do this while you are away…), a radio, play some music or something else.

That is one of the (many!) pro’s of doing things with PowerShell! 🙂

Watering plants with PowerShell

Since we moved to an apartment with a balcony we wanted to have some plants there. The problem is that we’re a lot better at killing plants than actually taking care of them. And even the few days when we actually did remember to water them, the plants could dry out on hot days.

So, how to solve this? With PowerShell of course! 🙂

You could start of with the Telldus PowerShell Module from this blogpost (though, this one is preferred since it handles credentials a lot better). The module is under development but works for checking temperatures, dimming or turning on/off devices etc.

You also need something to water with, I went with a pump from Gardena which runs for 1 minute when turning it on, or 1 min/24h if turned on constantly. This means that switching it off/on will start a watering session. The waterflow is controlled by using different outlets from the pump.

After adding the devices to Telldus Live! you can just open up your favorite powershell editor, import the module and start coding. (The module requires at least PowerShell v3)

An example of how it can be done follows. (The below module has been updated, make sure you check out the new version that uses a PSCredential among other things!)

First import the module, set the credentials and some variables needed: (passthrough for credentials (using “secure string”) is on the ToDo-list)

Import-Module C:\Scripts\Telldus\Module\TelldusModule.psm1

$Username="[email protected]"
$Password="MySecretPassword"

# At what temperature (and above) should I start the pump?
$WhenToWaterTemp=25

# If the humidity get's below this value, I will also start the pump
$WhenToWaterHumidity=40

# How old could the sensor data be before I'll consider it invalid? (in hours)
$DataAgeLimitInHours=2

# Time zone difference compared to telldus servers.
$TimeZoneDifference=2

You don’t need to check for how old the sensor data is, but these sensors can sometimes stop updating, and if they do when it’s hot outside, you might end up drowning your plants if you schedule the script to run often.

We continue to load the data from the sensors:

You could do it like this:

# Get the balcony sensor ID
$BalconySensor=Get-TDSensor -Username $Username -Password $Password | Where-Object { $_.Name -eq "Balcony" }

# Get the sensor data from that ID
$BalconySensorData=Get-TDSensorData -Username $Username -Password $Password -DeviceID $BalconySensor.DeviceID

Or with a one-liner, like this:

$BalconySensorData=Get-TDSensor -Username $Username -Password $Password | where Name -eq "Balcony" | Get-TDSensorData -Username $Username -Password $Password

We now know the temperature and humidity (depening on your sensor capabilites) on the balcony, or wherever you have your plants. We continue with the logic for watering:

# Calculate when to consider the sensor data too old
$CurrentAgeLimit=(Get-Date).AddHours(-($TimeZoneDifference+$DataAgeLimitInHours))

# Check if the data is too old
if ($BalconySensorData.LastUpdate -gt $CurrentAgeLimit) {
    # Check if it's too hot or too dry
    if ($BalconySensorData.Temperature -ge $WhenToWaterTemp -or $BalconySensorData.Humidity -le $WhenToWaterHumidity) {
        # If it was, let's give them some water by turning the pump off and then back on
        Write-Output "The plants are sweating (dry and/or hot)! I'm going to give them some water..."
        Get-TDDevice -Username $Username -Password $Password | Where-Object { $_.Name -like "Balcony Watering System*" } | Set-TDDevice -Username $Username -Password $Password -Action turnOff
        Get-TDDevice -Username $Username -Password $Password | Where-Object { $_.Name -like "Balcony Watering System*" } | Set-TDDevice -Username $Username -Password $Password -Action turnOn
    }
}
else {
    # The data was too old
    Write-Output "Sensordata is too old!"
}

That’s basically it! I added some functionality for doing push-notifications to my phone (Growl API and Boxcar works great for this). Or you could just send an e-mail (you probably want to know if the sensor data isn’t getting updated, for example).

Hope this gives you an idea on what you can do with PowerShell and home automation.

I will try to add other things that I’ve automated with this module when I get the time!

If you have any suggestions, please leave a comment below!