Category Archives: PowerShell

Generating passwords for new user accounts

During our migration to Office 365, we first needed to make sure all the users had an account in Active Directory. In our case, a lot of them didn’t since they only used Notes-applications.

The provisioning/sync of these accounts is for another blog post (or several), but I thought I could share some of the code we use for setting passwords.

First of all, you need something to generate the passwords with. There are a lot of scripts written for this (a good blog post that helped me getting started is this one), but most of them I found are using the same process for creating the passwords.

For example:

Get-Random -Minimum 65 -Maximum 90 | % { [CHAR][BYTE]$_ }

This will generate a random upper case letter between A and Z. If you change the range you can generate any character you want using this method. If you would like some help in finding which character is corresponding to what number you can have a look here.

What most of the scripts I found were lacking was a method of making sure that the passwords generated is actually following the password complexity rules. The passwords generated were random, and of the correct length, but you didn’t know if the different characters required were actually in the password.

So I ended up with doing my own function for this. It’s pretty short so I’ll do a code walkthrough of the important parts in it.

First, we need to specify what characters must be included in the password. I did this by creating four different arrays. You might want to have some control of which special characters are included since some applications (if the password is not for Active Directory accounts) can’t handle some of them. And you might not want your users to have to change their keyboard layout to be able to log in πŸ™‚

You could do something like this:

# Set which characters should be used
$CapitalLetters=For ($a=65;$a –le 90;$a++) { [char][byte]$a }
$SmallLetters=For ($a=97;$a –le 122;$a++) { [char][byte]$a }
$Numbers=0..9
$SpecialCharacters="!","@","#","%","&","?","+","*","=","Β£","\"

$AllCharacters=$CapitalLetters+$SmallLetters+$Numbers+$SpecialCharacters

It is now time to actually build a password. I did this with a loop which will execute until it reaches $PasswordLength, which is a parameter for the function.

It looks like this:

# Loop until we reach the password length
for ($CharNr=$NrOfCharacterTypes;$CharNr -le $PasswordLength;$CharNr++) {

# If this is the first run, we should add one of every character type
if ($CharNr -eq $NrOfCharacterTypes) {
$CharacterString+=($CapitalLetters | Get-Random)
$CharacterString+=($SmallLetters | Get-Random)
$CharacterString+=($Numbers | Get-Random)
$CharacterString+=($SpecialCharacters | Get-Random)
}
# If not, start adding random characters.
else {
$CharacterString+=($AllCharacters | Get-Random)
}
}

$CharacterString now contains all the characters we need. But we don’t want the passwords to always have the character types in the same order (first a capital letter, then a small, then a number then a special character, and then random) since that would make the password a lot weaker.

To fix this we turn it into an array and then randomize the order of the characters, and finally send it back to the pipeline.

Like this:

# Create an char array of the characters
$TempPasswordArray=$CharacterString.ToString().ToCharArray()

# Randomize the order of them
$PasswordToReturn=($TempPasswordArray | Get-Random -Count $TempPasswordArray.length) -join ''

# Send it back to the pipeline
Write-Output $PasswordToReturn

This password will always contain all the character types we have specified. And they will always be random.

The complete code (which includes the $NrOfCharacterTypes and some other things), are available here.
Get local groups and their members with PowerShell

The Active Directory Module for PowerShell is great. You can do almost anything with it, but every now and then you might need to list the local groups and their members on a server/client, and that is harder…

To achieve this I wrote a couple of advanced functions to simplify the task. “Get-LocalGroup” and “Get-LocalGroupMember”.

The usage should be pretty simple, but to give you an idea:

PS H:\> Get-LocalGroup

ComputerName GroupName                                   SID
------------ ---------                                   ---
MyMachine    Administrators                              S-1-5-32-544
MyMachine    Backup Operators                            S-1-5-32-551
MyMachine    Cryptographic Operators                     S-1-5-32-569
MyMachine    Distributed COM Users                       S-1-5-32-562
MyMachine    Event Log Readers                           S-1-5-32-573
MyMachine    Guests                                      S-1-5-32-546
MyMachine    IIS_IUSRS                                   S-1-5-32-568
MyMachine    Network Configuration Operators             S-1-5-32-556
MyMachine    Performance Log Users                       S-1-5-32-559
MyMachine    Performance Monitor Users                   S-1-5-32-558
MyMachine    Power Users                                 S-1-5-32-547
MyMachine    Remote Desktop Users                        S-1-5-32-555
MyMachine    Replicator                                  S-1-5-32-552
MyMachine    Users                                       S-1-5-32-545


PS H:\> Get-LocalGroup | where GroupName -eq Administrators | Get-LocalGroupMember

Domain    GroupName      Type  Name
------    ---------      ----  ----
MyMachine Administrators User  Administrator
MyDomain  Administrators Group Domain Admins
MyDomain  Administrators Group TheAdmins

The code is available here.

Automate SCOM Gateway Certificate Renewal

When deploying SCOM (System Center Operations Manager) in a multi-forest environment, you use certificates to establish the trust between the servers. Since we have CA Servers in every domain, we started up with configuring autoenrollment for all the SCOM Gateway Servers, and made sure all the different CA servers were added to the trust-store of the central servers. (I will not go through that process now, if you want me to, leave a comment).

So autoenrollment now works, but that isn’t really enough, is it? We still need to configure the Gateway Server to actually switch to the new certificate when it arrives.

The tool Microsoft has given to us to do this is MOMCertImport.exe, but that tool gives you a pop-up that you actually need to click on… Not very “automatable”.

After some research, we could find that all this tool seems to do is to add the certificates serial number, backwards (in pairs), as a binary key in the registry. That is very automatable! πŸ™‚

Before you start, you should know that this method is probably NOT supported by Microsoft, on the other hand, if it fails, you could run MOMCertImport.exe and see if that helps…

A code walkthrough follows:

Let’s start with setting up some user controlled variables, like what Certificate Template is used and where the registry key is located:

# Specify SCOM Template name
$SCOMTemplateName="SCOM Template"

# Specify SCOM Certificate Registry Key Path
$SCOMCertRegPath="HKLM:\SOFTWARE\Microsoft\Microsoft Operations Manager\3.0\Machine Settings"

# Specify SCOM Certificate Registry Value Name
$SCOMCertRegValueName="ChannelCertificateSerialNumber"

We then need a way of going through the certificates on the server to see if a new certificate has arrived:

# Initialize new array
$ParsedCertificates=@()

# List all local certificates
$LocalCertificates=Get-ChildItem Cert:\LocalMachine\My

# Go through the certificate and parse them to get the certificate template information out
foreach ($LocalCertificate in $LocalCertificates) {

$ParsedCertificates+= $LocalCertificate | Select `
Friendlyname,
Thumbprint,
SerialNumber,
NotAfter,
NotBefore,
@{Name="Template";Expression={($_.Extensions |
Where-Object {$_.oid.Friendlyname -match "Certificate Template Information"}).Format(0) -replace "(.+)?=(.+)\((.+)?", '$2'}},
@{Name="Subject";Expression={$_.SubjectName.name}}
}

As you can see, you need some regex to get the actual Certificate Template name. This should probably be turned into an advanced function! I might put that on a ToDo-list…

Now we have all the information we need to check if a new SCOM Gateway certificate has arrived.

I thought the easiest way of doing that was by getting the serial number of the latest certificate from that template, like this:

# Load the serial number of the newest SCOM Certificate into a new variable
$SerialNumber=($ParsedCertificates | Where-Object { $_.Template -eq $SCOMTemplateName } | Sort-Object NotAfter -Descending | select -First 1).SerialNumber

It’s now time for some regex-magic again, we want to pair this number up (2 and 2), and then reverse those pairs. I must confess I did a couple of rewrites of this before I found one that seems quite effective:

# Reverse the serial number to match the format in the registry
$ReversedPairs=[regex]::Matches($SerialNumber,'..','RightToLeft') | ForEach-Object { $_.Value }

The two dots (‘..’) tells powershell to group them, and the ‘RightToLeft’ reverses them. The last foreach is to get only the values and nothing else.
But it needed to be in binary format aswell, we achieve that by doing this:

# Convert string to binary
$ReversedPairsInBinary=$ReversedPairs | ForEach-Object { [convert]::ToByte($_,16) }

We now have something that we can compare with the current registry value, so let’s load the current one:

# Load current serial number into variable
$CurrentSCOMCertificate=Get-ItemProperty -Path $SCOMCertRegPath | Select-Object $SCOMCertRegValueName -ExpandProperty $SCOMCertRegValueName

And now let’s join the arrays and compare them, and based on the results update the registry if needed and restart the SCOM Gateway Service.

# Check if we have a new certificate
if (($ReversedPairsInBinary -join "") -eq ($CurrentSCOMCertificate -join "")) {
Write-Output "The current certificate is the latest."
}
else {
Write-Output "New certificate found. Changing registry..."
# Write to registry key
New-ItemProperty -Path $SCOMCertRegPath -Name $SCOMCertRegValueName -Value $ReversedPairsInBinary -Type Binary -Force

Write-Output "Restarting health service..."
# Restart the Health Service
Restart-Service -Name HealthService -Force
}

And we are done!

The complete and uncut code for this script is available here.

Good luck! πŸ™‚

Getting pictures converted for ThumbnailPhoto to be used in Lync/Outlook (ConvertTo-ADThumbnail)

There are obviously a lot of things that needs to be migrated when changing mail platform, one of those things that are a “very nice to have” is user pictures/thumbnails which shows up in Outlook, OWA, Lync and so on…

But this can be quite a challenge. The pictures are stored in the “ThumbnailPhoto”-attribute as a byte array, which needs the picture size to be less than 10 kb to work in lync/outlook (actually, the “Active Directory Users & Computers”-snapin wants it under 8 kb to be shown in the attribute editor so this is what we choose).

The pictures from Notes are “user generated”, they can be gif, jpg, png, bmp or something else, and I’m guessing this would be the case for many large organisations out there.

The solution we used was to add a step in our “Notes to Active Directory”-script to check if a picture is available, if it is, it uses a small “advanced function” I wrote to convert the picture to a byte array, and save a copy of the new file on disk, it’s called ConvertTo-ADThumbnail. It also output’s the changes in size if that’s needed.

It looks like this:

PS H:\> ConvertTo-ADThumbnail -PictureFile .\MyPrettyPicture.jpg

OrgFilename : .\MyPrettyPicture.jpg OrgFileSize : 33,748046875 OrgFileWidth : 400 OrgFileHeight : 300 NewFilename : H:\\MyPrettyPicture-ADThumbnail.jpg NewFileSize : 8,9111328125 NewFileWidth : 336 NewFileHeight : 252 ThumbnailByteArray : {255, 216, 255, 224…}


To actually write the “ThumbnailByteArray” to the user object you do something like this:


# Set the folder paths
$PictureFilePath = '.\Path\MyPrettyPicture.jpg'
$ADThumbnailPictureFolder = '.\TheFolderISave\ADThumbnails'

# Load the byte array
$UserPicture = [byte[]] $(ConvertTo-ADThumbnail -PictureFile $PictureFilePath -OutputDir $ADThumbnailPictureFolder | select -ExpandProperty ThumbnailByteArray)

# Write it to Active Directory
Set-ADUser -Identity 'MySamAccountName' -Replace @{ thumbnailPhoto = $UserPicture }

The cmdlet handles most picture formats, and shrinks them until they are small enough. You can set the file size, output folder path etc. with parameters.

I have tested the code on 1000+ pictures, so far so good πŸ™‚

If you missed the link above, the code is available here.

Home Automation With PowerShell

Home Automation is probably not something we can’t live without. But it is fun πŸ™‚

A while ago I bought a little device called “Tellstick Net“, which is a device made for controlling other electrical devices, like dimming your lamps, turning on/off sockets, or for receiving data from different sensors, like temperature.

It had one obvious disadvantage though, it didn’t have PowerShell support…

Luckily this is a problem that has an easy fix! I went with a “quick and dirty” method of talking to the API site, but it has worked pretty much flawlessly for over a year now.

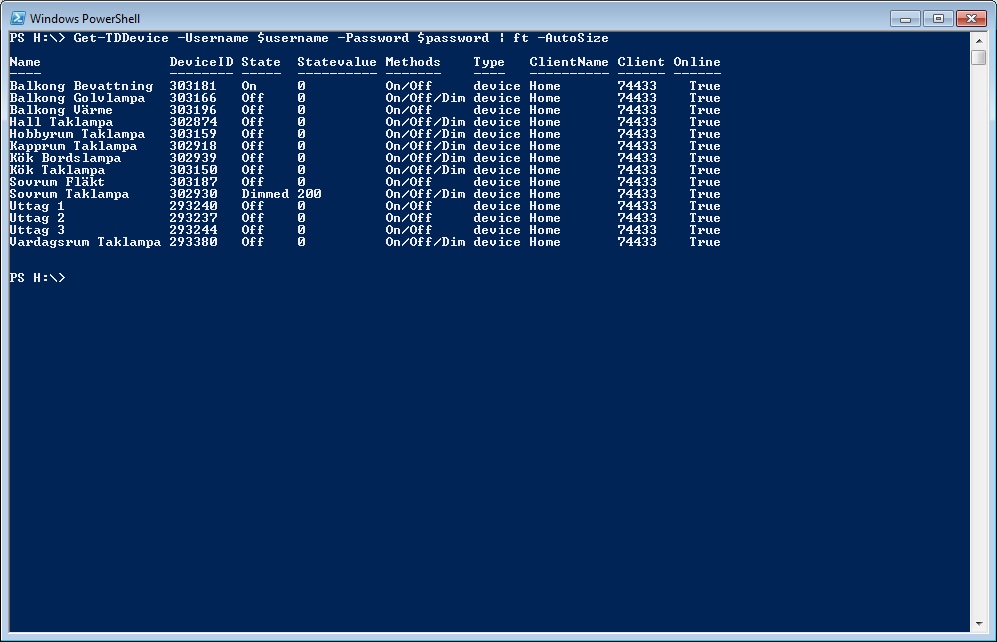
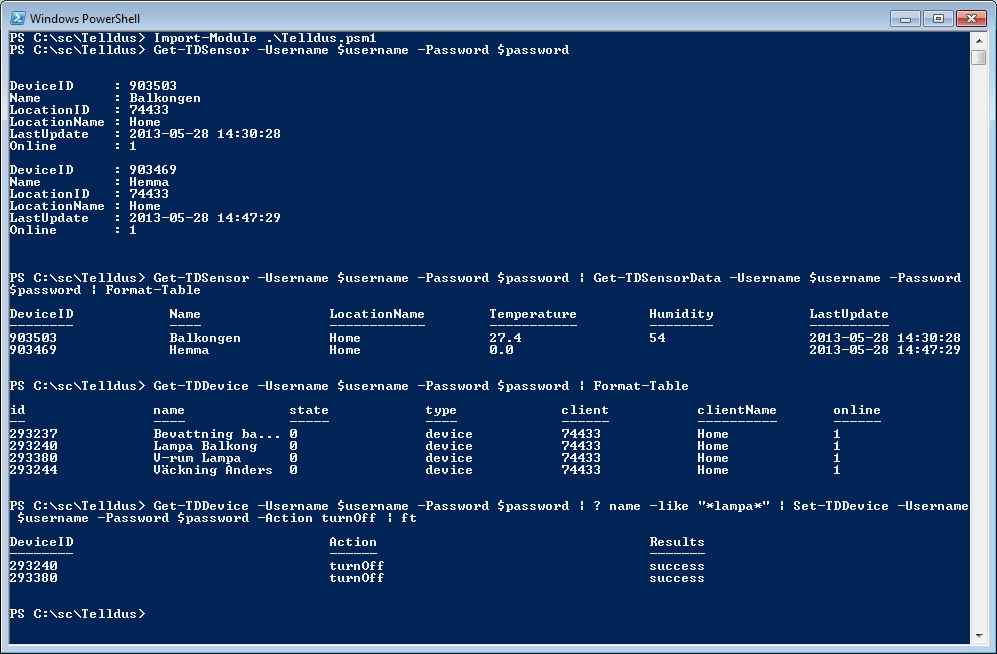
I will post more information about this project on this blog, but I thought I could start with some screenshots to help you get an idea on what you can do: (sorry for naming my devices in swedish…)

telldus cmdlet


telldus_cmdlets2


This module has for example been used for water plants during vacations (giving extra water during hot days), turning of lights when launching media players etc…

This module is now published at the PowerShell Gallery. You can get the latest version at this link.

Parsing Windows DNS Debug log…

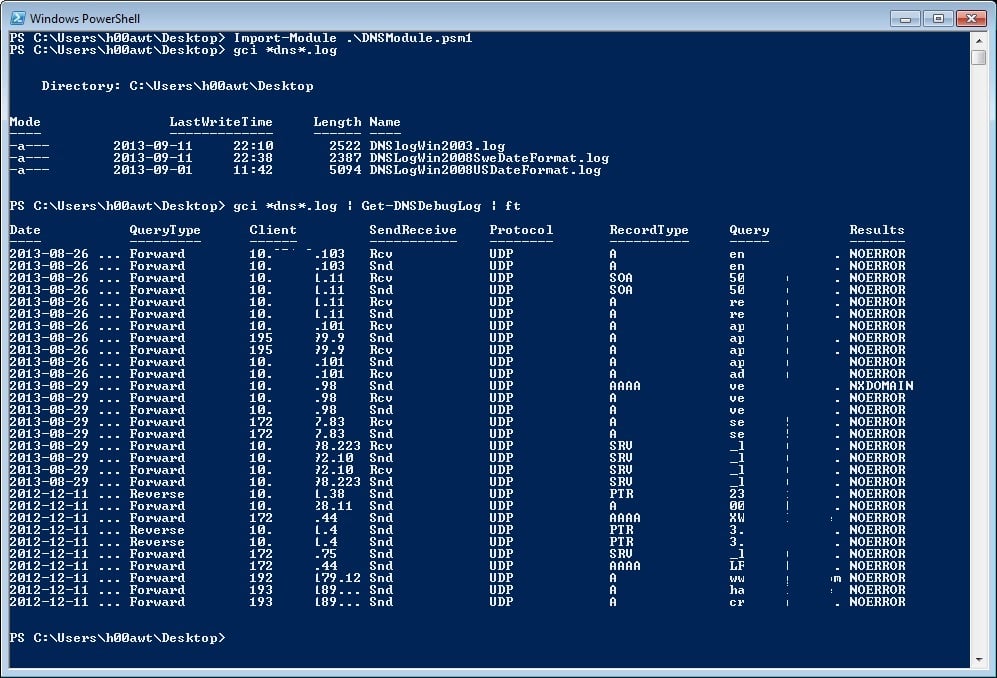
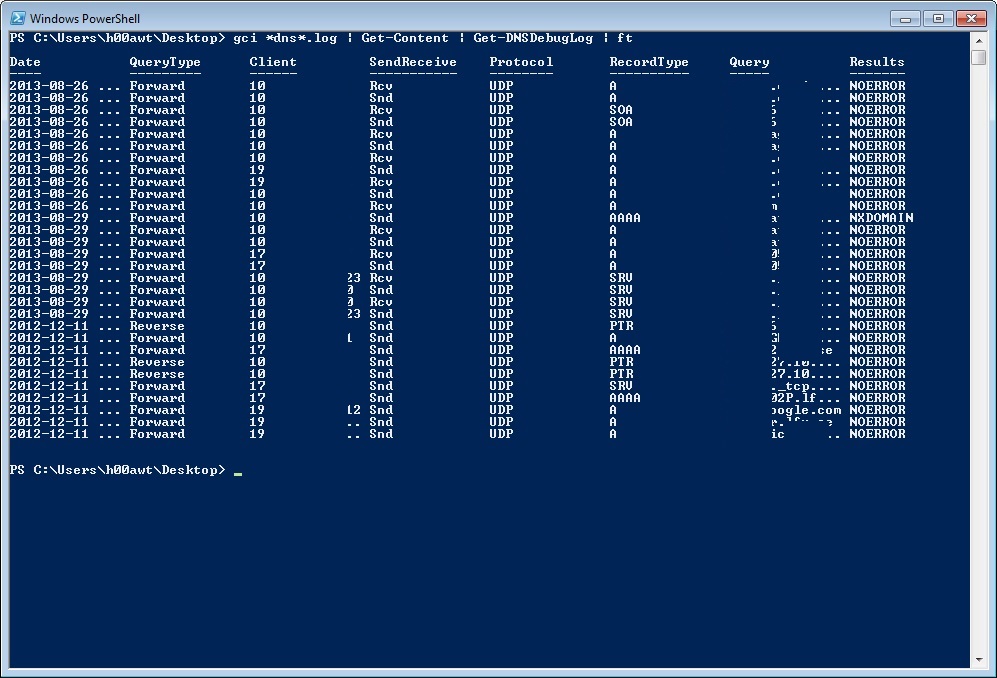
Every now and then I need to be able to parse a DNS debug log, it’s useful in many different scenarios. I wrote an advanced function to help me with this, specify a file name or pipe log lines (or file names) to it and it will return a properly formatted object.

Be aware that I only added some of the different date formats I could find, so verify that it works for your server.

Some dumps (with IP and hostnames masked):
dnslogparser_masked1

dnslogparser_masked2

Code is available here. (updated 2016-01-11)

Creating Master Lists for Quests Lotus Notes to Exchange tool

During our migration to Office 365, we ran into an issue with creating Master Lists for the migration tool. The tool just creates one huge file with all of the users in it, but we want to migrate them based on different things like mailbox size, where in the organisation they are and so on.

When we have the users we want to migrate in a list, we need to split that list up for scaleability reasons (multiple migration tool servers), and since the files need to be formatted in a quite specific way, this was becoming a pain…

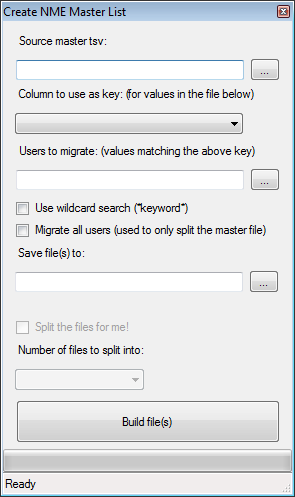
What better way to fix this problem than with a PowerShell form?

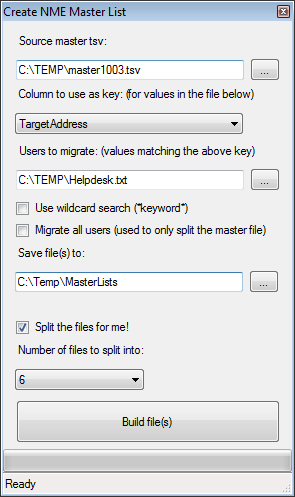
I opened up Sapien PowerShell Studio 2012Β and started working. Here are the results:
CreateMasterLists

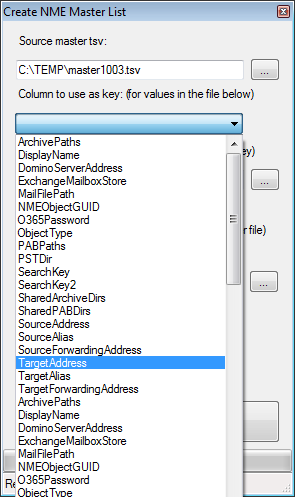
Just browse for the master tsv file, the columns found in the file will be automatically populated in the droplist. Choose which one you want to do the matching on (in our case targetaddress, same as e-mail/UPN):

ChoosingKey


Select the other settings, should be pretty obvious:

OtherSettings


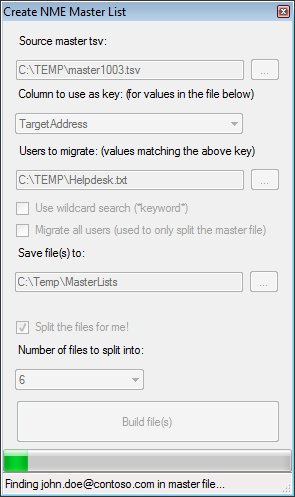
And hit “Build file(s)”, and watch it go:

finding_users


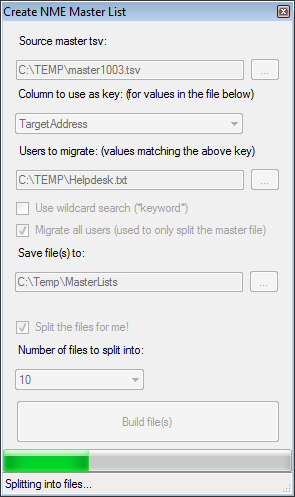
If you just want to split the master file, that’s possible aswell, just tick that box and hit the Build-button:

splitting_into_files


I hope someone else might have use of this little form!

The code is available hereΒ and it requires at least PowerShell v3 to run properly.

A PowerShell ‘Gotcha!’, numbers becomes strings…

During our migration project from Lotus Notes to Office 365, we were doing an inventory of mailbox sizes to determine which ones to migrate first.

So our Lotus Notes admins gave us a CSV file with the users and their mailbox size in bytes. The goal was to fetch the mailboxes under 1 GB of size that would be a part of a Pre-Pilot. Could’nt be easier, right?

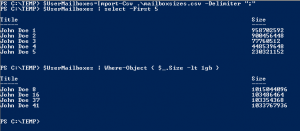
I imported the file, verified it got parsed correctly and went ahead and looked for the < 1 gb mailboxes. The results I expected were that most of the ~100 mailboxes would be under this limit.

But I got four…

MailboxContents


What has happened? I tried to find out how big the total was by adding them all togheter:

TotalSize


Ok… So things are becoming really weird, I have 99 mailboxes in this file, with 4 of them being under 1 gb in size, but the total is 83,6? What has happened?

The answer comes now:
SystemString

Look at the definition of the Size-property… System.String!!!

Why would PowerShell do that with something that clearly only contains numbers?

Let’s force it to handle them correctly…

ToBigForInt


That did not work at all… But now we have the explanation! Some of the mailbox sizes in this file are simply to big to be stored as an [int] since it’s 32-bit!

We need to convert this to a 64-bit value, pretty obvious when you think about it, but since PowerShell usually takes care of these things for us, it’s easy to forget…


So how to fix it?

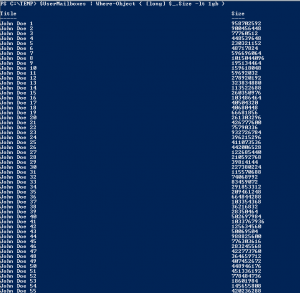
We simply tell PowerShell that Size is of the type [long]. Let’s go back the Where-clause we had in the beginning:

ConvertToLong


Works perfectly… Let’s do a count:
NumberOfSmallOnes

Now it makes sense!

Conclusion:

PowerShell does an awesome job on creating objects for us, guessing the property types and so on, “it just works” most of the time.

But when working with larger numbers, make sure you aren’t working with strings!